Classic Airframes 1/48 Hudson Mk III/IV
| KIT #: | |
| PRICE: | |
| DECALS: | |
| REVIEWER: | Patrick Earing |
| NOTES: | Max Decals 4810 Irish Model 14 Hudson/Super Electra (Limited Edition) |
| HISTORY |
 Others have said it better already, so
I won’t take much space here.
Key
point to consider as that the Super Electra was originally designed as an
airliner; however, it successfully made the transition to light bomber and
became known as the
Others have said it better already, so
I won’t take much space here.
Key
point to consider as that the Super Electra was originally designed as an
airliner; however, it successfully made the transition to light bomber and
became known as the
Unfortunately, I was not able to model
No. 91.
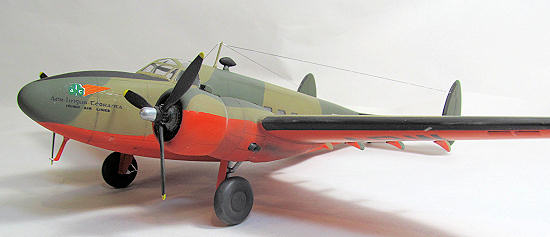
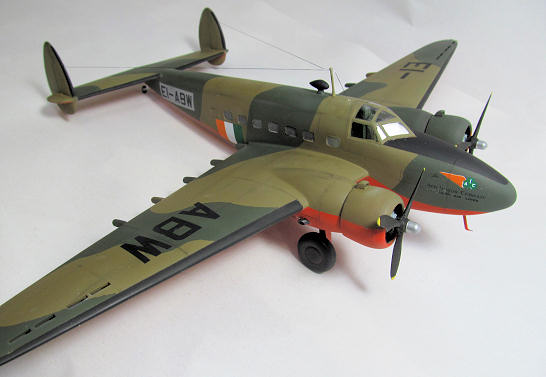
Instead I have modeled EI-ABW, one of two Lockheed Model 14 Super
Electra’s that Aer Lingus purchased in 1939.
These aircraft were obtained as a direct result of
increased passenger counts and route expansion.
Later, in May of 1940 they were sold to
| THE KIT |
The Classic Airframes
 This being a
revisionist history, I can tell you that the experience was less than ideal.
Although now, in 2012, I honestly do not remember the
details; suffice it to say that I had never, ever not finished what I had
started in terms of a plastic model and did not have a box of doom.
As such I fought valiantly, with this kit-a kit that was
at best difficult.
In fact, as I remember it, I was winning; although
slowly.
The nose was on, the wings and tail were attached, and most of the body
work was done and in primer.
Then… it happened.
I dropped it.
Nose first.
The kit dropped right onto the concrete floor of my
(then) work space.
This did not go well.
The nose essentially shattered, as did most of the glue
seams.
In a fit of rage, I glued it all back together, tossed it into a box and
walked away-for ten years.
This being a
revisionist history, I can tell you that the experience was less than ideal.
Although now, in 2012, I honestly do not remember the
details; suffice it to say that I had never, ever not finished what I had
started in terms of a plastic model and did not have a box of doom.
As such I fought valiantly, with this kit-a kit that was
at best difficult.
In fact, as I remember it, I was winning; although
slowly.
The nose was on, the wings and tail were attached, and most of the body
work was done and in primer.
Then… it happened.
I dropped it.
Nose first.
The kit dropped right onto the concrete floor of my
(then) work space.
This did not go well.
The nose essentially shattered, as did most of the glue
seams.
In a fit of rage, I glued it all back together, tossed it into a box and
walked away-for ten years.
Fast forward to 2012.
Not only am I building models again, but I have slowly
been plowing through the aftermath of the
For 2012 I have set a goal to
build as many aircraft of the Irish Air Corps as possible in 1/48 scale.
As such, the completion of the
| CONSTRUCTION |
I will pick up construct in
2012, as I do not remember the details of the past.
Suffice it to say that the detail I can see in side
is fantastic, and my work looked quite good, with a few exceptions.
The fuselage windows.
Oh, I remember now; even before being dropped how I
struggled with the windows.
They show it.
No apologies-they are rough and cloudy and not nice
at all.
Oh well… I can always knock them out and make new ones from
Crystal Kleer; right?
 Okay, in
2012 I started by assessing the damage of 2002 and ten years of being moved
around in a less that secure box.
On initial inspection everything seemed intact, so into
the fray I went.
The kit I had purchased was the later boxing of the Mk
Okay, in
2012 I started by assessing the damage of 2002 and ten years of being moved
around in a less that secure box.
On initial inspection everything seemed intact, so into
the fray I went.
The kit I had purchased was the later boxing of the Mk
Looking at the nose I realized
that all was not lost.
In my fit of reassembly I had made some work for myself
as the seams of the glass nose pieces did not line up well, but overall, all of
the other sprung seams were finished and in final primer.
I really just needed to ‘fix’ the nose and move on.
I started with sanding and some small amounts of filler.
This is a real pain as the nose of the
Rescribing lost detail is torture
for me.
I don’t know why.
I do it a lot, and purposely rescribe whole kits, but it
is a hang up for me.
After a few days of stalling, I dove in and got the
scribing done.
I now use an Olfa P Cutter for most of my scribing, and
where that does not fit I have a Bare Metal scriber and small pin tools
(actually, old airbrush needles) that I use to get into real tight areas.
For an edge I use a mixed bag of a small flexible ruler,
Verlinden scribe template and tape to get those lines straight. No real problems
were encountered, and after a few redo areas were touched up I was finished.
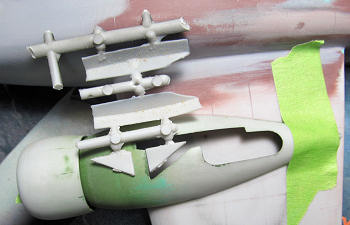 I now mocked
up the nacelles to the wing, looking for fit issues.
Overall, these fit fantastic.
Wow… I did not expect that to happen.
I did check that I could install the landing gear legs
after I put on the nacelles,
Oh, and those little triangle pieces?
They are an extension of the lower cowling between the
gear leg and the brace.
Unfortunately, they do not fit as the gear assembly sits
too low into the opening.
I fussed with them some, but in the end threw then away
with a clear conscious-their omission is not noticeable in the end, and why
stress over that?
Once tightly glued in place I cleaned up the remaining
seams around the nacelles, rescribed some lost detail added the air intakes.
Preparing for paint, I also masked and installed the
cockpit canopy which fit excellent.
I now mocked
up the nacelles to the wing, looking for fit issues.
Overall, these fit fantastic.
Wow… I did not expect that to happen.
I did check that I could install the landing gear legs
after I put on the nacelles,
Oh, and those little triangle pieces?
They are an extension of the lower cowling between the
gear leg and the brace.
Unfortunately, they do not fit as the gear assembly sits
too low into the opening.
I fussed with them some, but in the end threw then away
with a clear conscious-their omission is not noticeable in the end, and why
stress over that?
Once tightly glued in place I cleaned up the remaining
seams around the nacelles, rescribed some lost detail added the air intakes.
Preparing for paint, I also masked and installed the
cockpit canopy which fit excellent.
Now, I was finally ready to paint
this beast.
It was a long time coming, to say the very least.
As an afterthought, I decided to build the rear turret
and make sure of the fit before I painted.
Good thing I did, as the clear pieces that comprise the
turret literally disintegrated as I was removing them from their sprues.
Holy Buckets… what a mess.
Now what?
Unfortunately, there are, as far as I know, no
aftermarket alternatives for these parts.
Well… long ago I built a Koster PV-1
I set things aside for a few days
and worked on other projects to let my disappointment settle.
Looking over the Max decal sheet it became apparent that
an alternative was available to me.
The decal sheet includes additional markings for two
Lockheed Model 14 Super Electra’s that Aer Lingus purchased in 1939.
The aircraft were initially natural metal, but later in
1940, before they were sold to
| COLORS & MARKINGS |
Once I was satisfied that
everything was masked up and ready to go I began spraying with my trusty
Iwata TR-1.
To start with I sprayed the leading edges and panel lines
with Floquil Engine Black.
Once dry, I masked up all of the de-icer boots and
the glare panel in front of the windscreen.
I then
started to finish the model working in colors from light to dark.
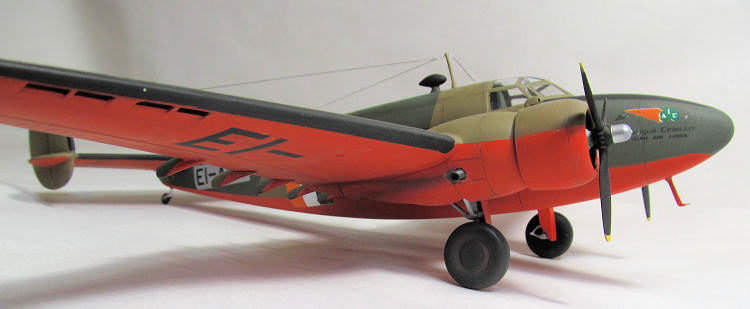
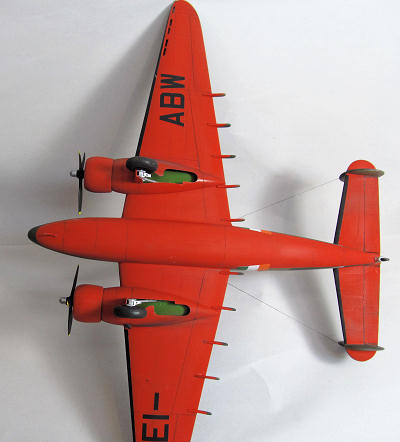
In this instance I started with the bottom, and I
started with Model Master International Orange.
What?
 Well, the
instruction sheet for the decals states that they are not sure about the color
on the bottom of the two Electra’s.
What they do know is that there is clear demarcation
line in a published black and white picture of one of the two Electra’s prior to
being camouflaged that is assumed to be International
Well, the
instruction sheet for the decals states that they are not sure about the color
on the bottom of the two Electra’s.
What they do know is that there is clear demarcation
line in a published black and white picture of one of the two Electra’s prior to
being camouflaged that is assumed to be International
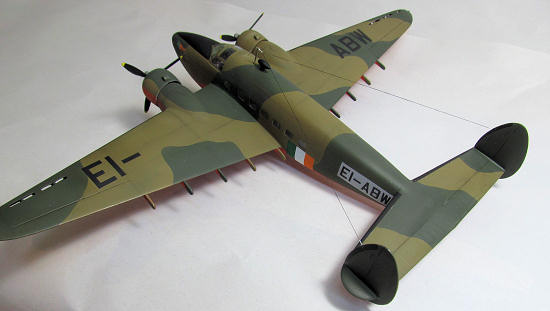
After a day or so to dry, I
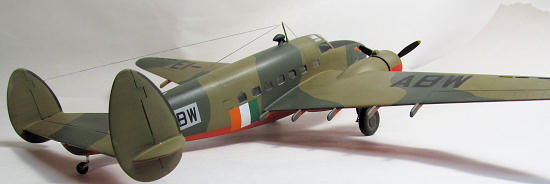
masked off the bottom and sprayed the topside with MM Dark Earth.
Using frisket paper I cut an approximated RAF camouflage
pattern and sprayed the remaining areas MM RAF Dark Green.
The rear fuselage sported a natural metal area where the
painters chose to leave the call letters for the Electra’s intact.
I replicated this with Floquil Bright Silver using the
dimensions of the decals as a guide.
Once dry, I unmasked everything but the black areas and
clear-coated the entire model with MM Glosscoat from a rattle can.
 Max Decals
are awesome, and even though these were quite old they worked perfectly.
There is some discussion about whether the Electra’s had
a national flag painted on the bottom of the fuselage.
I made one using spare decal materials, but in the end I
left it off as I couldn’t decide if went longitudinally (looking from the front
or the back?) or crosswise.
After everything had a chance to dry I wiped the model
down, unmasked the black areas and gave the whole thing a final coat of MM
Dullcoat.
Here I must state that I love Testors’ lacquer system; however, I
have over the years had some trouble with Dullcoat frosting, or whitening
models.
This time, it got nearly sideways as most of the upper surfaces turned
white…Grrrrrr!
Well, here is my solution.
I cut my bottle of Dullcoat with approximately one
quarter (1/4) MM Glosscoat clear.
When a dull finish is created, it is achieved by adding
a fine powder to an existing gloss clear that ‘dulls’ the gloss, but if mixed to
heavily will color the clear like a pigment.
As such, the frosting is a result, I think, of too much
matt agent. (That
sounds reasonable as I have had this happen to my usual Tamiya matte base/Future
mixes if too much matte base is added. Ed) My
solution of mixing in some more clear seems to help with the problem-in my
experience.
I then way over reduced some of my ‘tinted’ clear (about 150%)
and sprayed a very wet coat over the whole model.
This worked magically, except on the tail where I got a
small run in the clear and some additional frosting.
Once things had set for a few days I went back and
touched up the camouflage with the original colors and sealed the area with more
of my diluted Dullcoat.
Max Decals
are awesome, and even though these were quite old they worked perfectly.
There is some discussion about whether the Electra’s had
a national flag painted on the bottom of the fuselage.
I made one using spare decal materials, but in the end I
left it off as I couldn’t decide if went longitudinally (looking from the front
or the back?) or crosswise.
After everything had a chance to dry I wiped the model
down, unmasked the black areas and gave the whole thing a final coat of MM
Dullcoat.
Here I must state that I love Testors’ lacquer system; however, I
have over the years had some trouble with Dullcoat frosting, or whitening
models.
This time, it got nearly sideways as most of the upper surfaces turned
white…Grrrrrr!
Well, here is my solution.
I cut my bottle of Dullcoat with approximately one
quarter (1/4) MM Glosscoat clear.
When a dull finish is created, it is achieved by adding
a fine powder to an existing gloss clear that ‘dulls’ the gloss, but if mixed to
heavily will color the clear like a pigment.
As such, the frosting is a result, I think, of too much
matt agent. (That
sounds reasonable as I have had this happen to my usual Tamiya matte base/Future
mixes if too much matte base is added. Ed) My
solution of mixing in some more clear seems to help with the problem-in my
experience.
I then way over reduced some of my ‘tinted’ clear (about 150%)
and sprayed a very wet coat over the whole model.
This worked magically, except on the tail where I got a
small run in the clear and some additional frosting.
Once things had set for a few days I went back and
touched up the camouflage with the original colors and sealed the area with more
of my diluted Dullcoat.
| FINAL CONSTRUCTION |
Now for all the small bits.
Prior to affixing the nacelles I drilled the small
indentations for the main gear legs molded on the bottom of the wing.
The point of this was to allow a slight increase in
gluing area for the main gear legs.
Mounting the legs required no small amount of
trimming to the wheel bay opening to get the necessary room to set at the
correct angle.
There are small pins below (above) the ‘foot’ of the
gear leg that are there to help ease alignment.
With my holes, I had to use care not to overly
reduce the leg length by pushing them all the way into the holes.
As stated earlier, I did not use the small
triangular bits as they fouled with the landing gear.
I am not sure, but in an uncharacteristic move,
Classic Airframes provides absolutely no wheel bay details, and I have to
wonder if there was originally planned a resin bay part that would have
further raised (lengthened) the gear so those small parts fit.
In any case, I painted the wells MM Zinc Chromate
and installed the landing gear.
To make sure alignment was the same side to side I
first installed the wheels onto the gear legs and as the glue was setting
flipped the model over to visually check that th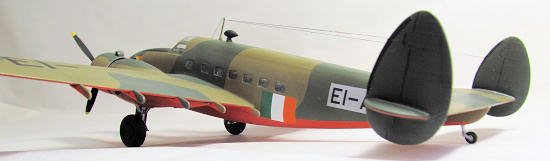 ings
looked correct.
The Gear legs were painted Floquil Old Silver, and
the tires a mixture of Engine Black and Weathered Black.
The tail wheel was assembled, painted and installed
by drilling a small mounting hole in line with the elevator hinge line.
ings
looked correct.
The Gear legs were painted Floquil Old Silver, and
the tires a mixture of Engine Black and Weathered Black.
The tail wheel was assembled, painted and installed
by drilling a small mounting hole in line with the elevator hinge line.
Propellers were sourced from the
spares box, as I was not using the spinner covers, and were appropriately
shortened and reshaped. Additionally, the football antenna was also sourced from
the spares box and mounted on the existing mount that I failed to remove, and
the large vertical antenna installed just in front of it.
I now installed the kit attitude indicator on the nose
and gave the panel lines a slight wash with artist acrylics.
‘The funky Fowler flap stubs were also painted and
installed at this time-I purposely left them for last as I expected them to be
rug monster fodder (being that they are easy to knock off.)
Finally, I made new exhaust pipes
from plastic tubing, drilled holes at a sharp angle into the nacelle and
installed them.
Here I used some pastels for a light staining.
The wire antenna were installed and shrunk up with a
match, painted black and the
| CONCLUSIONS |
Well, she is not my best work;
but, certainly represents a stubbornness I exhibit to finish a kit at any price.
She looks fine, and although not strictly speaking an Irish Air Corps aircraft,
it is Irish.
Will I build another-NO!
Besides, these kits are being auctioned at simply
ridiculous prices these days.
I can say that this kit went onto my shelf kicking and
screaming the whole way.
Glad it is finished- I had some challenges to overcome
both psychologically and physically along the way, but learned a lot; that is
for sure.
This model certainly taxed the concept that modeling is supposed
to be fun. But I have grown, and now I only have three left in the box ‘O doom.
Recommended for those who have deep pockets and are
looking for a challenge.
| REFERENCES |
Bowers, Peter M.
The Makeshift
Armada
Wings, April 1984
vol. 14, No. 3
Pg. 26=41
Maxwell, Joe and Patrick J.
Cummins
The Irish Air Corps: An
Illustrated Guide.
W &G Baird,
May 2012
If you would like your product reviewed fairly and fairly quickly, please contact the editor or see other details in the Note to Contributors.