Matchbox 1/72 Fairey Seafox
| KIT #: | ? |
| PRICE: | £2.00 from an on-line auction |
| DECALS: | Two options |
| REVIEWER: | Julien Dixon |
| NOTES: | Revell has reboxed this kit |
| HISTORY |
The Fairey Seafox was a pre-war maritime floatplane version of the Fairey Fox biplane which first flew on 3 January, 1923. It was designed to meet specification S.11/32 for a spotting and reconnaissance aircraft for the Fleet Air Arm. The fuselage was of all-metal monocoque construction, the wings were covered with metal on the leading edge, otherwise fabric. It was powered by a sixteen cylinder 395 hp (295 kW) air-cooled Napier Rapier engine.
Specifications were;
|
Engine: |
One 395hp Napier Rapier VI inline engine |
|
Wing Span: Length: Height: Wing Area: |
Wingspan12.19m |
|
Empty Weight: Max.Weight: |
Empty Weight 1726kg
|
|
Speed: Ceiling: Range: |
Speed 200kph at 1785m;
|
|
Armament: |
One rear-firing
.303in machine gun |
Production ended in 1938, and the Seafox served in front-line service as catapult launched floatplanes on cruisers and battleships until 1942, when it was replaced by the Fairey Swordfish, Vought Kingfisher and Supermarine Walrus.
Two prototype Seafoxes were built by Fairey at Hamble under Contract No. 333000/34 to spec S.11/32. They were on charge in September 1939 and had an unusual design that had an open cockpit for the pilot, but an enclosed canopy for the observer. The first flight was on 27 May 1936, and a contract awarded in January 1936 for 49 aircraft, with 15 more being awarded in September 1936. Sea trials were carried out aboard HMS Neptune off Gibraltar.
By the beginning of the War in September 1939, the Fleet Air Arm had on charge the 2 prototypes and 49 Mk I Seafoxes, the first K8579, which reached 754 squadron in October 1939. These were distributed on the following capital ships and to 773 squadron at Bermuda:
Orion (700, 718 sqns), Pretoria castle (702 sqn), Ajax (718 sqn), Arethusa (713 sqn), Penelope (713 sqn), Asturias (702 sqn), Alcantara (702 sqn), and HMS Emerald (700 sqn).
 The aircraft was quickly relegated
to secondary roles, and a few lingered
on in a training role until it finally left the service(at sea) of the Royal
Navy in July 1943. The very last Seafox, K8607, saw service in the Royal Navy
with 753 squadron at Lee on Solent in July 1945.
The aircraft was quickly relegated
to secondary roles, and a few lingered
on in a training role until it finally left the service(at sea) of the Royal
Navy in July 1943. The very last Seafox, K8607, saw service in the Royal Navy
with 753 squadron at Lee on Solent in July 1945.
A total of 66 Seafox catapult-launched versions had been built, and 311 Foxes built by the end of its production in 1943. The Seafox and Fox saw service with the Fleet Air Arm, air forces of Belgium, Peru and Switzerland. The Seafox also saw service with the ships in Royal Australian Navy Service (Modified Leander Class) including HMAS Perth, HMAS Sydney and HMAS Hobart, after which they were replaced by the Fairey Swordfish.
Despite obsolescence the Seafox was involved in a number of conflicts. The Seafox’s moment of glory came on the 13th December 1939. Flying from HMS Ajax it spotted for the Battle of the River Plate that resulted in the scuttling of the battleship Graf Spee on the 17th. Unfortunately, very little seems to be known about the aircraft. The Ajax carried two Seafoxes probably not camouflaged and possibly K8581 and K8582 with the crest of Ajax on the fin. As one was damaged only one spotted but no one seems to remember which or any other details except that Lt. Lewin received the DFC for his efforts and Lt. Kearney was mentioned in dispatches. In other actions Fairey Seafox including K8571 of 700 squadron were lost when Orion was sunk off Crete on 10 March 1941.
| THE KIT |
I think everyone on this site knows I love matchbox kits by now. This kit which dates from 1982 and consists of forty two bi coloured parts (like many matchbox kits) and includes two crew. The 1986 Revell reissue has no stand unlike the original. As a two bay biplane with floats it can not be recommended for beginners although, thanks to the good fit of parts, is reasonably simple to assemble.
| CONSTRUCTION |
 I started by painting the inside of
the fuselage, there is no real info on what this colour was so I used an
interior green colour. The pilots seat and observers seat were also painted and
at this time. The Instructions would have you add these and the figures now. I
decided to add mine later (more about this later!). Once done the fuselage sides
were glued together. While this was drying the two floats were built up. The
instructions would have you attach the topsides of the floats to the mountings
and then add the floats later. I built mine in one go.
I started by painting the inside of
the fuselage, there is no real info on what this colour was so I used an
interior green colour. The pilots seat and observers seat were also painted and
at this time. The Instructions would have you add these and the figures now. I
decided to add mine later (more about this later!). Once done the fuselage sides
were glued together. While this was drying the two floats were built up. The
instructions would have you attach the topsides of the floats to the mountings
and then add the floats later. I built mine in one go.
Once dry the fuselage need a little tidy up. The fit is actually very good and just a touch of filler is needed. Inside the observers compartment there is a bit of a gap on the shelf where the single Lewis gun is placed. I added a little filler here just to tidy it up, although the gun will cover most of this up.
Next to be added were the lower
wings, to get the correct angle for these I actually placed the kit onto the one
piece upper wing and allowed the wings to dry. Afte r the lower wing was dry it
came time to do the part we all dread on biplanes, attaching the upper wing. As
the matchbox kits were designed in simpler times this is not to difficult, the
main struts are linked so you only have 2 per wing instead of four. I attached
the main struts and lined the wing with the fuselage struts. When it all looked
in the right place it was held together with a home made jig using mainly lego!
Once the wing had completely dried I then added the struts which connect the
flaps together. This was fairly easy to slightly bend them and then slip them
into place. I also added the tailplanes and rudder at this stage.
r the lower wing was dry it
came time to do the part we all dread on biplanes, attaching the upper wing. As
the matchbox kits were designed in simpler times this is not to difficult, the
main struts are linked so you only have 2 per wing instead of four. I attached
the main struts and lined the wing with the fuselage struts. When it all looked
in the right place it was held together with a home made jig using mainly lego!
Once the wing had completely dried I then added the struts which connect the
flaps together. This was fairly easy to slightly bend them and then slip them
into place. I also added the tailplanes and rudder at this stage.
The next stage was to add the floats, this went really well, better than I expected. I used superglue for this to get everything set well. It was then at this stage that I dropped the kit! This promptly broke the floats off (so much for it going well!) It was then hard to reattach the floats as they had broken off laving tabs in holes/slots etc. Much cursing later they were on.
| COLORS & MARKINGS |
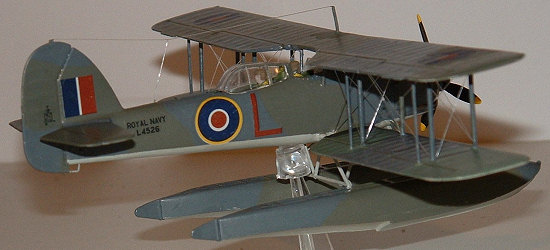
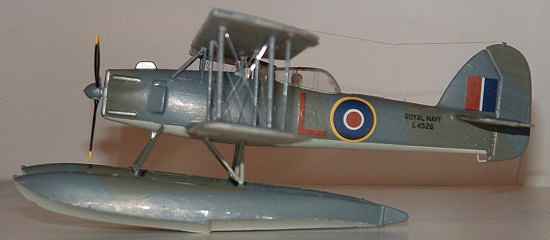
There are 2 options provided in the kit. The first is for a camouflaged machine from 702 Sqn. on HMS Asturias in 1942, the second is an all aluminum painted one from HMS Arethusa in 1939.
 HMS Asturias was an armed Merchant Cruiser, a civilian
ship converted to a Military role in times of need (Taken up from Trade was the
official term). The 22,048 ton Asturias was one of the principal liners on Royal
Mail Lines' service from Southampton to South America between the two World
Wars. She was one of the first big ships to be fitted with diesel machinery. A
few days after the start of the WWII, Asturias arrived at Southampton from a
Mediterranean cruise, and within a few hours left for Belfast to be fitted out
as an armed cruiser.
HMS Asturias was an armed Merchant Cruiser, a civilian
ship converted to a Military role in times of need (Taken up from Trade was the
official term). The 22,048 ton Asturias was one of the principal liners on Royal
Mail Lines' service from Southampton to South America between the two World
Wars. She was one of the first big ships to be fitted with diesel machinery. A
few days after the start of the WWII, Asturias arrived at Southampton from a
Mediterranean cruise, and within a few hours left for Belfast to be fitted out
as an armed cruiser.
For a time HMS Asturias was flagship of the South American Division but in July, 1943 she was torpedoed while escorting a slow-moving floating dock. The attack, which occurred around 400 miles from Freetown, severely damaged the vessel and killed four of the crew.
 The liner never resumed the South America run; instead
she was used for trooping voyages or taking emigrants to Australia, until she
was finally broken up in 1957. Film fans might like to know that before the ship
was broken up she played the part of the RMS Titanic in the film “A Night to
Remember”
The liner never resumed the South America run; instead
she was used for trooping voyages or taking emigrants to Australia, until she
was finally broken up in 1957. Film fans might like to know that before the ship
was broken up she played the part of the RMS Titanic in the film “A Night to
Remember”
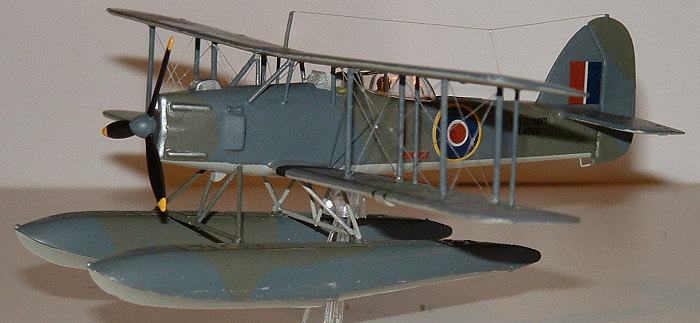
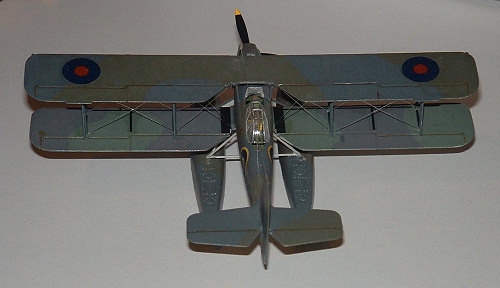
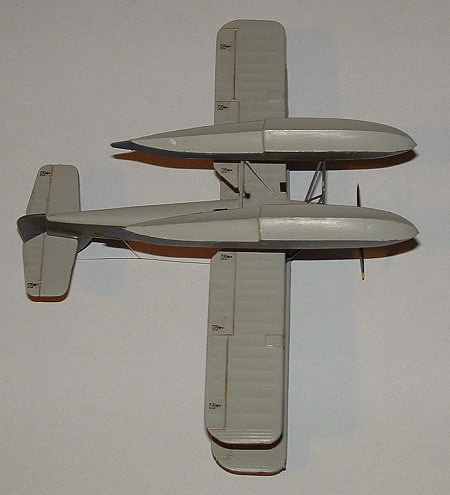
I decided to go with camouflaged version of Seafox as I had just got some new Humbrol paints with which to do the scheme. The scheme for the time was Dark Slate Grey & Extra Dark Sea Grey over Sky Grey Undersides. The lower Wing being counter shaded with Light Slate Grey and Dark Sea Grey. There has been some discussion over what exactly Sky Grey was, in the end I just went for Humbrol 64 Light Grey to save mixing something up and it looks ok to me. Now if you look at the IPMS Stockholm colour charts they give you complicated mixing instructions for these colours, now this is one of their errors as most of them are available straight from the tin by Humbrol. Dark Slate Grey is No.224, Extra Dark Sea Grey is No.123, Dark Sea Grey is No.164, for the Light Slate Grey I added a few drops of white to Slate Grey No.31. All of these colours were freehand brushed onto the kit, with the line between the upper and lower the only masking.
Once the paint was dry a coat of Klear (future) was added for the decals. For these aircraft you could use the kit decals, or I am sure if you wanted to you could make the markings from a standard FAA set. I used the kit decals even thought they were slightly out of register. I ended up with a white line on the edge. This was solved, with a little careful touching up with a paintbrush. When the decals were dry I painted overall with xtracrylix Matt varnish, this does not dry dead flat but more of a satin/matt finish which I like and it is extremely brush friendly.
| FINAL CONSTRUCTION |
I had decided to rig this aircraft as kind of a
practice run for some Eduard WWI aircraft I had in the stack. After all is
better to practice on a £2 than a £27.99 kit!! Rigging was done between the
painting and decaling. The thread I use is a kind of nylon thread that is used
in jewelry making and found on ebay for approx £1 for a largish reel. Holes were
drilled,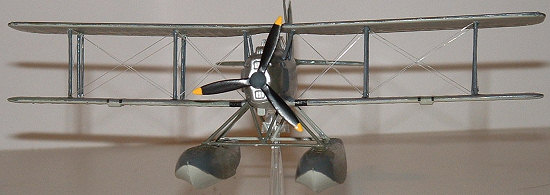 filled, re-drilled and a couple of struts broken and replaced during
this exercise. I considered it a good practice run and will do thing slightly
different next time. Luckily all of my botches were covered up by the paint.
filled, re-drilled and a couple of struts broken and replaced during
this exercise. I considered it a good practice run and will do thing slightly
different next time. Luckily all of my botches were covered up by the paint.
Once the rigging paint etc was finished it was time to add the crew, as mentioned earlier I had not followed the instructions and left them out. Now for the figures to see over the cockpits they do actually need approx 3 to 4mm of plastic adding to the bottom of the seats otherwise all you see is the tops of their heads! The observer went in with no problems at all, along with his Lewis gun. However there was no way I could squeeze the pilot in. In the end I had to remove his legs to get him in! Not very dignified but you cant see in the small cockpit. The prop was painted Extra Dark Sea Grey with yellow tips and placed in so that it could be removed for transport.
Finally I decided on a little bit of weathering. As people who know me will tell you I don’t like to much weathering so in the end I just scuffed up the top of the floats and marked a bit of a line on the floats were they would cut through the water.
| CONCLUSIONS |
This is a great little kit which I remember building many years ago! It always surprises me that Matchbox kitted such Aircraft which were away from the mainstream. As much as it would be great for a new Seafox and perhaps in 1/48th I think the matchbox one is the only one we will ever see. Thankfully it is available as revel re-issued it. If you want a Fleet Air Arm kit to add to your collection, want an easy build, or just some rigging practice like I started out with then grab a copy and give it a go. I really did enjoy this trip down memory lane.
| REFERENCES |
www.fortunecity.com/meltingpot/portland/971/Reviews/interwar/seafox.htm
en.wikipedia.org/wiki/Fairey_Seafox
February 2007
Copyright ModelingMadness.com
If you would like your product reviewed fairly and fairly quickly, please contact the editor or see other details in the Note to Contributors.
Back to the Review Index Page 2017