Hasegawa 1/48 Typhoon I 'Car Door'
|
KIT # |
9059 (JT 59) |
|
PRICE: |
$31.98 |
|
DECALS: |
See Review |
|
REVIEW : |
|
|
NOTES: |
|
|
HISTORY |
Traditionally, the hallmark of a successful aircraft manufacturing company has been that future requirements should always be the concern of the Chief Designer and the project team. In other words, when the latest project has been accepted for production, its replacement should be on the drawing board. Sir Sydney Camm, Hawker Aircraft's Chief Designer and one of the true legends of aircraft design alongside Ed Heineman and Kelly Johnson, was already hard at work in the summer of 1937 on the Hurricane's replacement - to meet Air Ministry Spedification F.18/37 which called for a fighter with a top speed over 400 m.p.h. - when the first production model of that famous airplane had yet to fly.
The result was - at the time the first prototype was rolled out - the biggest single-seat, single-engined fighter ever designed, with the heaviest armament any traditional fighter had ever carried, with the most powerful aero engine ever installed in an airframe. Unfortunately, not enough was known at the time of its design to prevent it being equipped with a wing too thick for what was really needed, which would always hold it back in fighter versus fighter performance. The exigencies of war would dictate that the airplane was committed to production too early in the development cycle, resulting in it acquiring a worse reputation with its pilots than any fighter that ever preceded it, a dangerous reputation that was fully deserved at the outset and would cost the lives of many young fighter pilots to resolve.
In the end, all the heartache would be justified, as it became the primary weapon of close air support alongside the P-47 Thunderbolt, covering the victorious Allied armies as they swept across northwestern Europe in the breakout from Normandy. As a killer of German armored vehicles, it would only be out-done by the Russian Sturmovik.
 The airplane was the
Hawker Typhoon, the first all-metal airplane produced by Hawker Aircraft.
Originally to carry 12 .303 machineguns, it was redesigned to carry the
then-unheard-of armament of four 20mm cannon and was powered by the Napier Sabre,
the first 2,000 h.p. engine. Ordered "off the drawing board" in 1939, the
prototype Typhoon flew on February 24, 1940. It became the subject of a
quantity production order to be assigned to Gloster Aircraft, since Hawkers was
thoroughly committed to the Hurricane.
The airplane was the
Hawker Typhoon, the first all-metal airplane produced by Hawker Aircraft.
Originally to carry 12 .303 machineguns, it was redesigned to carry the
then-unheard-of armament of four 20mm cannon and was powered by the Napier Sabre,
the first 2,000 h.p. engine. Ordered "off the drawing board" in 1939, the
prototype Typhoon flew on February 24, 1940. It became the subject of a
quantity production order to be assigned to Gloster Aircraft, since Hawkers was
thoroughly committed to the Hurricane.
Fortunately for the Typhoon, the Battle of Britain intervened before it could enter large-scale production and it lost all priority until October 1940. This allowed some of the plethora of problems that had manifested themselves with the Sabre engine to be dealt with
Flight testing quickly revealed the effects of compressibility, of which little was known at the time. The thick wing also resulted in extreme slipstream buffet around the wing roots, due to the fact the engine was fitted as close to the leading edge of the wing as possible to preserve c.g. balance. Unknown at the time was the fact that the buffet also created a disturbed slipstream along the entire fuselage that became quite violent by the time it reached the tail. It would be early 1943 before it was discovered the fuselage/tail joint was not strong enough to withstand these forces in a maximum-velocity dive and the joint would be reinforced with the fishplates so prominent on the Typhoon afterwards. Nineteen pilots died due to catastrophic tail separation discovering this, the result of the speeded-up development process.
The first Typhoon IA - with the machinegun armament - was completed by Gloster on May 26, 1941, after a limited production run of this type, the cannon-armed Typhoon IB appeared in early July. By that fall, the RAF had encountered the Focke-Wulf Fw-190, and needed the Typhoon more than ever. 56 Squadron at Duxford received their first Typhoons in September, 1941; they were followed in January 1942 by 266 "Rhodesian" squadron and 609 "West Riding" Squadron that following March. Due to the lack of development, these squadrons would by necessity become part of the flight testing of the Typhoon to unearth solutions to its many faults. One of the first items the pilots of 56 discovered was that the pilot had to wear his oxygen mask at all times, due to the leakage of carbon monoxide into the cockpit from the engine compartment.
The price of the premature introduction of the Typhoon was high. Despite being issued to 56 Squadron in September 1941, the first operational sortie - an interception of a "bogie" that turned out to be a Spitfire - was not flown until May 28, 1942; the first sweep was flown on June 20. During the first nine months of operations, far more Typhoons were lost due to structural failure or engine trouble than were lost on operations; between July and September 1942, it was estimated at least one Typhoon in four failed to return from an operational sortie as a result of one of its many defects.
The Typhoon in Combat:
The Typhoon scored its first aerial victory in August 1942, when Pilot Officers Munro and Lucas of 56 Squadron - flying respectively a cannon-armed Typhoon IB and a machine-gun armed Typhoon IA - caught a Junkers Ju-88 50 miles off Cromer, on the Norfolk coast, and shot it into the sea.
The Typhoon first entered large-scale combat in the Dieppe Raid on August 19, 1942, with the Duxford Wing claiming one Do-217E shot down. From then on, the wing became more and more involved in countering the "tip and run" raids by the Fw-190A-4/U4 "Jabos" of JG26 and JG2, and later SKG10, with the squadrons operating from Biggin Hill and Manston as well as Duxford and Warmwell. By September, No's 1, 486 and 257 Squadrons had converted on to the Typhoon.
 "Cheval" Lallemant and the
Typhoon:
"Cheval" Lallemant and the
Typhoon:
On December 19, 1942, Flying Officer "Cheval" Lallemant, one of the Belgian pilots assigned to 609 Squadron - who was one of the original pilots to check out in the Typhoon - caught his first Focke-Wulf over the Channel and shot it down. On January 20, 1943, the Focke-Wulfs staged an incredible daylight raid on London with 50 Jabos supported by the rest of JG26 and JG2. Lallemant scored again in the huge air battle that developed as the Germans dropped their bombs at 20,000 feet and turned to dive back to France. On February 14, 1943, Lallemant and his wingman, Tony Polek, were detailed to provide cover for a crippled MTB in the Channel. Attacked by four Fw-190s of JG26, Lallemant managed to shoot one off his wingman's tail as Polek nailed the one he was after; ten minutes later four more Focke-Wulfs turned up to play, and Lallemant got his second with a high deflection shot in which he could not see the results of his fire until the wing of the Fw-190 flipped over him and the fireball that had been the fighter went into the Channel upside down. He then shot at another, which was credited as a "probable," though the "Y": listening service later confirmed it destroyed. Like most Typhoon combats, this took place at such a low level that flying into the sea inadvertently was something a pilot had to keep in his mind if he was to survive. Had Lallemant been credited with the third Focke-Wulf on February 14, he would have been the first Typhoon "ace." On January 14, 1944, flying with 197 Squadron, he shot down an Me-210, though the Wing Leader would not confirm it because he was angry Lallemant had requested transfer to another squadron; following D-Day, Lallemant located the wreckage of this Me-210 and was credited with the victory. His "official" fifth kill came on February 26, 1944, while flying with 198 Squadron - a Bf-110G night fighter off Dunkirk flown by a 54-victory experte - Oberfeldwebel Helmut Vinke of IV.NJG1.
The Typhoon squadrons were transferred from Fighter Command to Second Tactical Air Force in February, 1944, where their primary mission changed from air superiority to ground support.
|
THE KIT |
The "cardoor" Typhoon IB, the first kit of the early Typhoon to be released in 1/48 scale - appeared from Hasegawa in December 1998. From the separate upper-central fuselage section, it was apparent that the bubbletop version would also be produced, which it was - appearing some four months later.
|
CONSTRUCTION |
The Typhoon model has some definite fit and assembly problems, mostly associated with the poor engineering around that separate upper-central fuselage section.
 Due to the poor
engineering of the center section of the fuselage, I recommend you attach each
part to the separate fuselage half before assembling the fuselage. This will
allow you to get as good a fit to the parts as possible. When you then assemble
the fuselage halves, there will be a gap down the center joint of the center
section, which can be filled with a piece of .010 evergreen strip.
Unfortunately, none of the joints of this assembly run along panel lines, so you
will particularly need to ensure the best fit possible when attaching the parts,
and will then need to use more than a bit of Mr. Surfacer 500, likely with
repeated application, to successfully fill in the seams. This is crucial -
failing to do so will ruin the look of the model. Don't be afraid to apply Mr.
Surfacer, let it harden, sand it down, airbrush some gray paint over the area,
and reapply Mr. surfacer to any seams that still show up. Once you have those
filled, cover the area with Mr. Surfacer 1000 and when dry sand it down with
fine-grit sandpaper for a final surface. You will have to rescribe the engraved
panel lines in this area, which is not that difficult.
Due to the poor
engineering of the center section of the fuselage, I recommend you attach each
part to the separate fuselage half before assembling the fuselage. This will
allow you to get as good a fit to the parts as possible. When you then assemble
the fuselage halves, there will be a gap down the center joint of the center
section, which can be filled with a piece of .010 evergreen strip.
Unfortunately, none of the joints of this assembly run along panel lines, so you
will particularly need to ensure the best fit possible when attaching the parts,
and will then need to use more than a bit of Mr. Surfacer 500, likely with
repeated application, to successfully fill in the seams. This is crucial -
failing to do so will ruin the look of the model. Don't be afraid to apply Mr.
Surfacer, let it harden, sand it down, airbrush some gray paint over the area,
and reapply Mr. surfacer to any seams that still show up. Once you have those
filled, cover the area with Mr. Surfacer 1000 and when dry sand it down with
fine-grit sandpaper for a final surface. You will have to rescribe the engraved
panel lines in this area, which is not that difficult.
Once you have installed the cockpit (on this version of the Typhoon, the cockpit is British Interior Green, with the seat left in NMF), the next thing is to attach the wing sub-assembly. Uf you are doing the airplane with the bomb racks attached, be sure that you have drilled out the holes on the lower wing surface for the racks. Glue the central part of the lower wing to the fuselage. You will notice there is quite a gap where the upper wing should attach to the fuselage. If you don't want to be bogged down with a lot of puttying and sanding, use this trick: rubber band the wing to raise the dihedral until the upper wing and fuselage meet properly. Now glue that joint. Allow this to dry overnight with the rubber bands holding the wing in position. After it has fully set up the next day, when you remove the rubber bands the wing will revert to its proper dihedral, and pull the fuselage out with it. You'll still want to apply Mr. Surfacer to that wing-fuselage joint, as well as to the under-fuselage joint of lower wing to rear fuselage; this last will require a similar effort to what you did getting the seam filled for the area around the cockpit. At the same time you can attach the horizontal stabilizer and aply Mr. Surfacer to that joint.
Once you have gotten all those seams nice and smooth and rescribed the panel lines where necessary, the model is ready to head for the paint shop.
|
PAINT & DECALS |
Painting and Camouflage:
First thing, I airbrushed the wheel wells, landing gear and inner gear doors with SNJ Aluminum. When dry, I stuffed the wheel wells with tissue paper and proceeded with the rest of the painting.
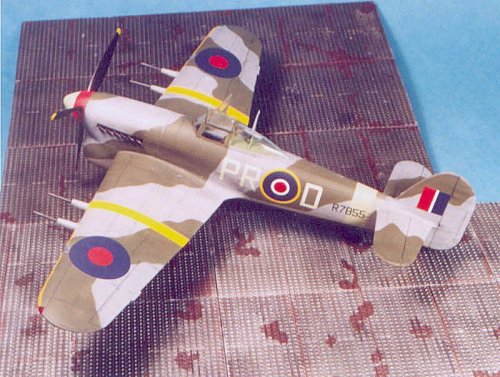
I "pre-shaded" the model by airbrushing flat black over all the panel lines. I also painted the areas where the under wing identification stripes would go on the lower surfaces of the wings. When that was dry, I masked off the black areas of the identification stripes. These are alternating stripes of 12" wide black, 24" wide white, starting at the outer end of the flap and working inboard. I toned down the flat white with a brushful of flat black, and thinned the paint enough that it took quite a bit of effort to apply over the black pre-shading. I stopped when I could still see through to the shadows, just barely, though these stripes appear well-painted and well-maintained in photographs. When these stripes were dry, I masked them off. I then painted the rear fuselage stripe with Tamiya XF-21 "Sky." When this was dry, I masked it off - this strip is 18" wide.
 I started the camouflage
by applying the underside color of Sea Grey Medium. For this, I used Tamiya
XF-20 "Medium Grey." When this was dry, I masked it off, using the "thread"
system so the edge of the mask was not directly against the model's surface. I
then free-handed an approximation of the Ocean Grey part of the upper surface
scheme, using Gunze-Sanyo H-337 "Grayish Blue." Once done, I added a bit of
Gunze-Sanyo "Neutral Grey," which is lighter and has a distinct violet tone, to
the "Grayish Blue," and went over the painted areas to increase contrast and
simulate ultraviolet sun fading. Remember - Europe is cloudy; airplanes did
not generally sun-fade sitting on the airfield, but rather faded at altitude
above the clouds, when subject to UV radiation, which turns the paint toward the
red end of the spectrum.
I started the camouflage
by applying the underside color of Sea Grey Medium. For this, I used Tamiya
XF-20 "Medium Grey." When this was dry, I masked it off, using the "thread"
system so the edge of the mask was not directly against the model's surface. I
then free-handed an approximation of the Ocean Grey part of the upper surface
scheme, using Gunze-Sanyo H-337 "Grayish Blue." Once done, I added a bit of
Gunze-Sanyo "Neutral Grey," which is lighter and has a distinct violet tone, to
the "Grayish Blue," and went over the painted areas to increase contrast and
simulate ultraviolet sun fading. Remember - Europe is cloudy; airplanes did
not generally sun-fade sitting on the airfield, but rather faded at altitude
above the clouds, when subject to UV radiation, which turns the paint toward the
red end of the spectrum.
When that was dry, I masked over with drafting tape, running thread along the edges 1/16 inch in from the edge, to lift it so there would be no "ridges with the next coat of paint. This is a tiresome process, but the result is worthwhile, trust me on that.
I used Gunze-Sanyo H-73 "RAF Dark Green" for the rest of the camouflage. Once applied, I then put a brushful of the light green I use for British Interior Green in the paint cup, and did the same contrast-heightening and sun-fading for the green areas I had done for the grey areas.
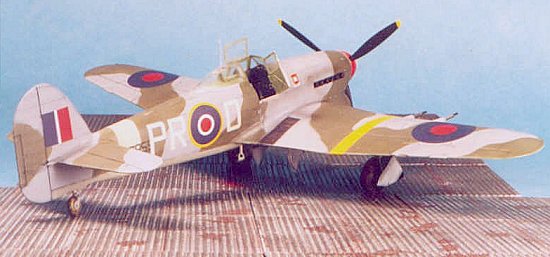
I masked off and painted the leading edges of the wing yellow to match the decal of the overwing stripe for the airplane I was modeling.
After unmasking everything, I gave the model two coats of Future and was ready for decals.
Decals:
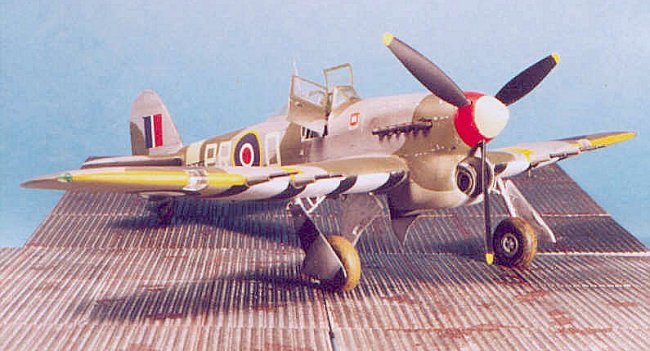
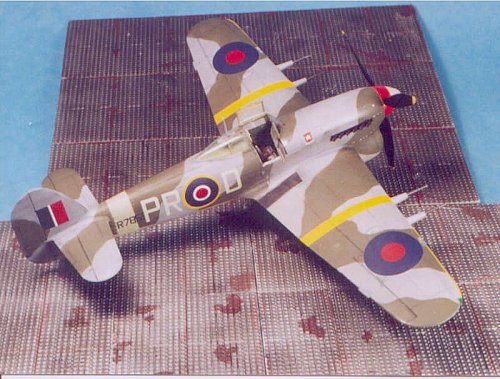
Since I had Aeromaster 48-436 "Storms In The Sky, Pt. X," which has "Cheval" Lallemant's PR-D R7885 on it, the choice was easy. This airplane is the subject of a three-view color profile in "Camouflage and Markings: Typhoon and Tempest," which considerably eased doing the painting described above. Interestingly enough, it kept the under wing type A national insignia, in hopes of easing the identification of the airplane as RAF to the English ack-ack gunners below while on low-level missions along the coast. The decals went on easily under a coat of Micro-Sol.
Once they had set, I washed the model to get rid of dried setting solution, and gave it another coat of Future.
Final Finish:
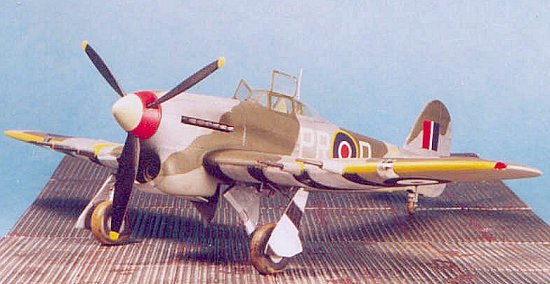
After the Future was dry, I airbrushed exhaust stains on the fuselage sides and oil stains on the belly, and "dinged" the airplane around the walkways, the engine cowling, leading edges of flying surfaces, etc. I then applied two coats of thinned Dullcote overall.
When that was dry, I attached the landing gear and prop, unmasked the canopy and attached the car door.
|
CONCLUSIONS |
This Typhoon looks great sitting next to its bubbletop brother to one side, with its Tempest cousin beyond on my Hawker Aircraft shelf, just down from the herd of Hurricanes. The kit has its share of fit problems and is no "shake 'n' bake," but the end result is certainly worth the effort so far as I am concerned.
For those who want to do more with the kit, Hasegawa did a limited release of the cardoor Typhoon with the Jaguar resin cockpit designed by Roy Sutherland; though now out of production, I have seen it on dealer's tables at shows. It goes for around US$40.
If you would like your product reviewed fairly and quickly by a site that has thousands of visits a day, please contact me or see other details in the Note to Contributors.