Magna Models 1/72 Martin-Baker MB.3
|
KIT #: |
5672 |
|
PRICE: |
$25.00 |
|
DECALS: |
One option |
|
REVIEWER: |
Peter Burstow |
|
NOTES: |
Resin kit |
 Designed by Sir
James Martin, the third aircraft built by the Martin-Baker Aircraft Company, the
M.B.3, was a prototype fighter. First flown on August 31, 1942. It was fast at
415 mph, and one of the heaviest armed single engined aircraft at the time, with
six 20 mm cannon with 200 rounds per gun. It was powered by a 2000hp Napier
Sabre II, 24 cylinder sleeve valve engine. On September 12, 1942, the aircraft
crashed after engine failure, (a sleeve drive crank broke), killing the pilot,
company partner Captain Valentine Baker.
Designed by Sir
James Martin, the third aircraft built by the Martin-Baker Aircraft Company, the
M.B.3, was a prototype fighter. First flown on August 31, 1942. It was fast at
415 mph, and one of the heaviest armed single engined aircraft at the time, with
six 20 mm cannon with 200 rounds per gun. It was powered by a 2000hp Napier
Sabre II, 24 cylinder sleeve valve engine. On September 12, 1942, the aircraft
crashed after engine failure, (a sleeve drive crank broke), killing the pilot,
company partner Captain Valentine Baker.
This
crash spurred Sir James Martin's interest in aircrew safety, with the first
Martin-Baker ejection seat test on the 24th
of January 1945.
The incomplete second prototype
was extensively modified and fitted with a Griffon engine to become the M.B.5.
Coming in a small
top opening box, there are 13 cream coloured resin parts and 18 white metal
parts supplied. There are four vac-formed canopies, two each of the razorback
and bubble versions. The decal sheet had just two yellow 'P' in a circle,
prototype markings, nothing else.
All the
resin parts had a thick greasy layer of mould release wax.
Here is a more complete
preview.
 The first step was cleaning up the
resin parts. The pouring lugs and flash was removed with a combination of
sawing, filing, sanding, hacking, grinding and carving. It was a big job and
took the best part of an evening.
The parts were then all washed in a mix of
hot soapy water and rubbing alcohol, given a good scrub and left to soak
overnight in the brew. Next morning another scrub then left to dry.
The first step was cleaning up the
resin parts. The pouring lugs and flash was removed with a combination of
sawing, filing, sanding, hacking, grinding and carving. It was a big job and
took the best part of an evening.
The parts were then all washed in a mix of
hot soapy water and rubbing alcohol, given a good scrub and left to soak
overnight in the brew. Next morning another scrub then left to dry.
Dry
fitting revealed that the cockpit floor part was too large for the fuselage, so
the floor and sides were carved down to fit. I separated one of the vac-formed
bubble canopies from the card and used it to check clearance to the large
headrest. Next step was to get the white metal instrument panel to fit. There is
a slot formed in the right fuselage half for it, but was too forward and low,
blocking access to the rudder pedals. The panel was too wide to fit just below
the coaming, where I expected it to go. I got out the motor tool and gouged out
a channel for the panel and eventually made it fit.
I then
started detail painting the cockpit. The instructions suggested interior green
which seemed reasonable. I picked out the moulded seatbelts in blue, and other
details in black and silver. I then added the pre-painted white metal control
column and closed up the fuselage. I managed to line it up ok along the top
deck, but ended up with a step at the rear lower joint and tail. Not too bad,
filled the whole joint with superglue, and cleaned it up.
 The wings didn't
fit, they are much thinner and shorter than the roots, and if joined as moulded
will dangle down at about 10 degrees anhedral. Just to add to the fun, there was
a huge bubble at the leading edge of the port root. I matched them up to the
roots at the top surface at the front and as best as I could along the rest of
the top surface, the curvature of the roots does not match the aerofoil of the
wings very well. I ran a bead of superglue to tidy up the top surface, then
filled the huge gap along the bottom surface with several layers of thick
superglue. There was a step between the wing and the root of about 2mm at the
thickest, about mid cord.
The wings didn't
fit, they are much thinner and shorter than the roots, and if joined as moulded
will dangle down at about 10 degrees anhedral. Just to add to the fun, there was
a huge bubble at the leading edge of the port root. I matched them up to the
roots at the top surface at the front and as best as I could along the rest of
the top surface, the curvature of the roots does not match the aerofoil of the
wings very well. I ran a bead of superglue to tidy up the top surface, then
filled the huge gap along the bottom surface with several layers of thick
superglue. There was a step between the wing and the root of about 2mm at the
thickest, about mid cord.
When it
was all dry and hard, (not too long as I'd used accelerator), I ground down the
wing roots with the machine. Second time to use the Dremel on this kit, resin
dust everywhere. I was reasonably careful, wearing a dust mask and safety
glasses. Tidied up the wing root with various half round files. Took the
opportunity to grind out the resin blobs in the undercarriage wells. Gave it all
a wet sand and a good wash.
I then
added the remaining resin bits, spinner, tailplane, intake, and the two
underwing radiators. Nothing fitted well, needing plenty of filling and sanding,
but no more grinding. Fixed a few more bubbles, and found a couple more blobs of
resin and moulding silicon in the wheel wells.
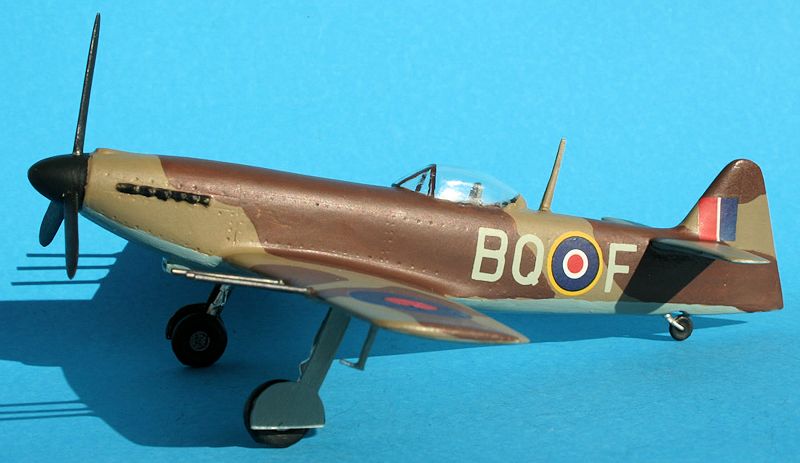
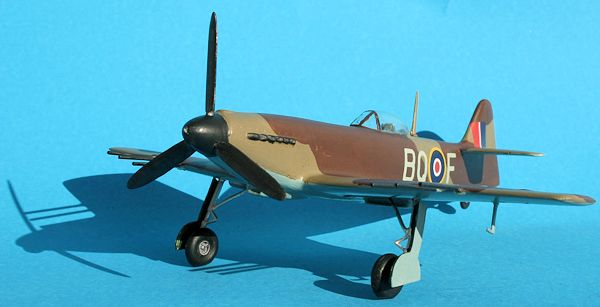
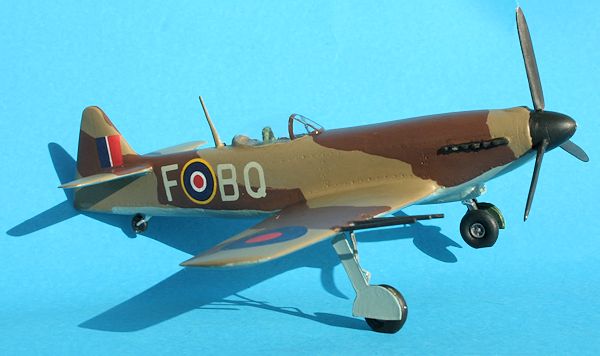
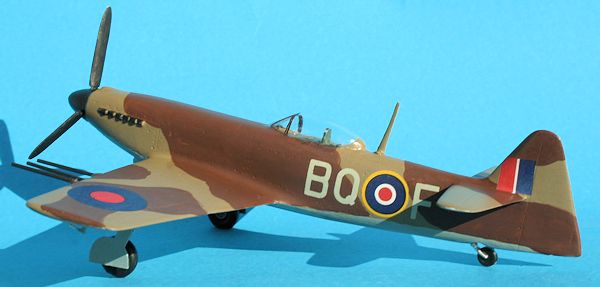 I decided to do a
desert air force scheme for No 451 Squadron RAAF. They operated Hurricanes,
Spitfires, Lysanders and briefly Typhoons. I like the desert scheme of earth,
stone and light blue, and could gather the roundels from the decal stash. I have
a few sets of letters in various colours and styles so could get the squadron
code 'BQ' and an individual aircraft letter.
I decided to do a
desert air force scheme for No 451 Squadron RAAF. They operated Hurricanes,
Spitfires, Lysanders and briefly Typhoons. I like the desert scheme of earth,
stone and light blue, and could gather the roundels from the decal stash. I have
a few sets of letters in various colours and styles so could get the squadron
code 'BQ' and an individual aircraft letter.
I painted
the underside Tamiya light blue, and did the topside overall light earth. The
good news was the paint adhered well to the resin, all that sanding and washing
helped that. I then freehand painted an approximation of the typical camouflage
pattern in a darker brown.
While the various
layers of paint were drying, I started the clean up of the white metal parts.
All had flash and moulding seams to be removed, and in some cases pouring lugs.
Most of the clean up was done by cutting with side cutters and scraping with a
scalpel blade, which just about destroyed the blade. Finished off with needle
files and sanded where I could. I attached the white metal wheel legs and doors,
tailwheel, pitot, radio mast and propeller blades, most of which fitted into
small holes I drilled into the model for strength. I don't
 trust butt joints on
those tiny parts.
trust butt joints on
those tiny parts.
The
cannon fairings had a bad case of mould misalignment, and needed a lot of work.
They looked like baseball bats. I chucked them in the Dremel, filing and sanding
them at low speed. They are still the wrong shape. I hope it really was white
metal and not lead as there was dust everywhere again. The moulding of the metal
parts was a lot crisper than the resin.
After all
the work on the cannon barrels, they still didn't look good, and were really far
to fat. I made replacement barrels from 0.5mm brass tube, with 0.3mm inside
diameter. A quick calculation reveals that works out to 21.6mm calibre which is
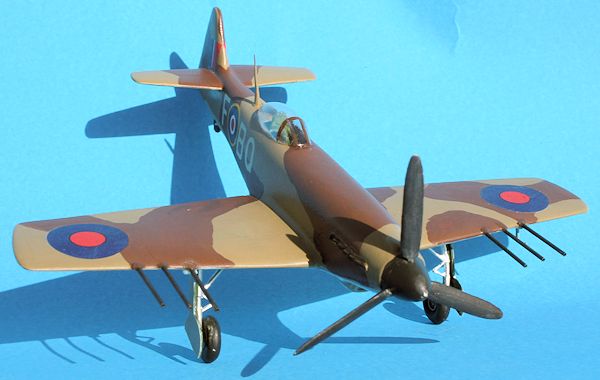
close enough for government work. My M.B.3 now has unfaired cannons.
I attached the vac-formed bubble canopy with Krystal
Klear. It needed a little trimming but fitted fine.
 I had to touch up
a few spots around the white metal parts and the canopy, then I then gave it a
coat of floor polish to help the decals.
I had to touch up
a few spots around the white metal parts and the canopy, then I then gave it a
coat of floor polish to help the decals.
The
roundels and fin flash decals were taken from an old Matchbox Mosquito sheet,
worked fine but thick and glossy, needed a couple of doses of Mr Softer. The
squadron codes came from Altmark decal set A18, 24” sky letters, very thin with
continuous carrier, I had a bit of trouble with them folding, conformed well
with Mr Setter. I didn't bother with a serial.
Another
small touch up paint here and there, then a coat of floor polish to seal
everything. A final spray of dull coat, this time remembering to mask the
canopy!
A rather
difficult build of a one-off prototype fighter. The finished result looks the
part, but it was a lot of work. I used the Dremel more on this build than I have
on any other kit. The cannon supplied were useless and the only bits that needed
replacement. I had to supply my own decals.
Recommended
for experienced modellers.
William
Green, Fighters Volume 2, Macdonald, London 1961
http://www.awm.gov.au/units/unit_11145.asp
http://www.martin-baker.com
Peter
BurstowMay 2013
If you would like your product reviewed fairly and fairly quickly, please
contact
the editor or see other details in the
Note to
Contributors.
Back to the Main Page
Back to the Review
Index Page