| KIT #: | 72008 |
| PRICE: | £29.99. |
| DECALS: | One option |
| REVIEWER: | Frank Reynolds |
| NOTES: | Upgraded with parts from the spares box. Montex vinyl canopy masks, set SM 72159, price £3-50. |
| HISTORY |
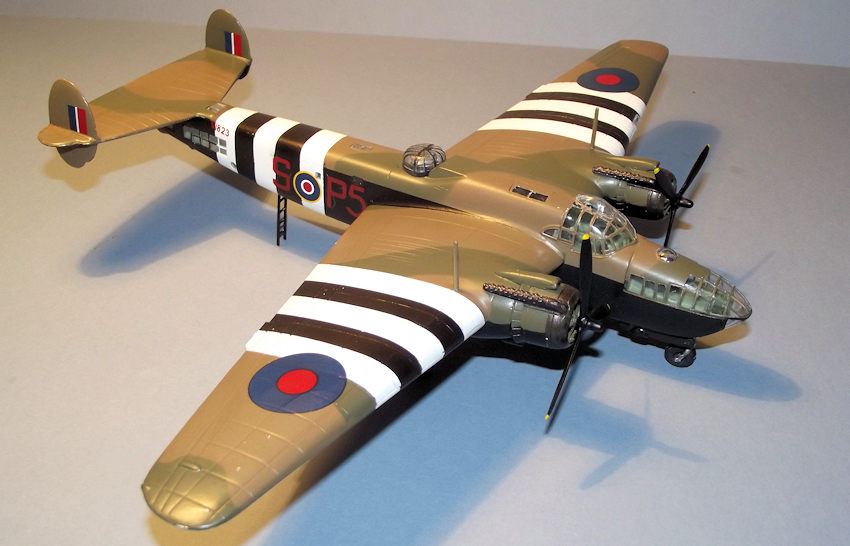
With a production run of 698 airframes the Armstrong Whitworth Albemarle is more than a footnote in World War 2 history, yet a design that was intended to be a bomber was adapted to the more mundane, yet still vital, roles of transport and glider tug and so does not appear in the headlines of that conflict.
The design bears a superficial
resemblance to the Blenheim and Beaufort from the Bristol aircraft company,
where its origins indeed lay, but the specification was transferred to Armstrong
Whitworth 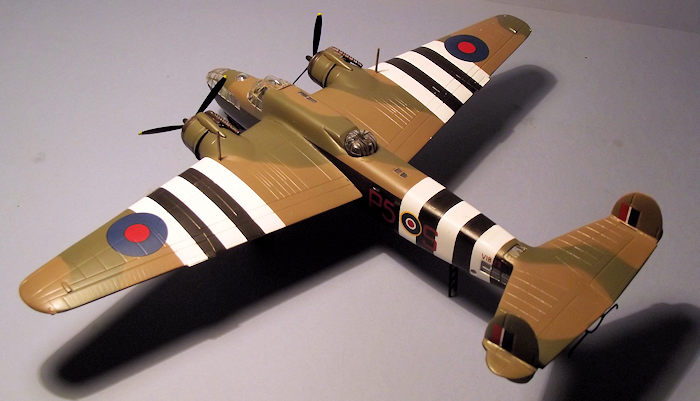 to
develop a production version. The Albemarle had a complex structure built
largely from non-strategic materials and was intended to be built by a wide
range of sub-contractors – some sources suggesting 1,000 such suppliers.
Establishing a supply and logistics chain to support this endeavour must have
been a planner’s nightmare and may have contributed to the gap between the
prototype’s first flight in 1939 and the delivery of the first production
aircraft in December 1941. By the time of delivery of the first aircraft a
decision had been taken to adapt the design for transport, para dropping and
glider towing.
to
develop a production version. The Albemarle had a complex structure built
largely from non-strategic materials and was intended to be built by a wide
range of sub-contractors – some sources suggesting 1,000 such suppliers.
Establishing a supply and logistics chain to support this endeavour must have
been a planner’s nightmare and may have contributed to the gap between the
prototype’s first flight in 1939 and the delivery of the first production
aircraft in December 1941. By the time of delivery of the first aircraft a
decision had been taken to adapt the design for transport, para dropping and
glider towing.
The ST versions (Special Transport) were the most versatile, capable of carrying ten airborne troops and glider towing.
The type first went into action from North Africa in 1943 in support of the invasion of Sicily, featured in D-Day operations in the invasion of Normandy in June 1944 and the Arnhem operations in September of the same year. It was the D -Day operation that was probably the Albemarle’s finest hour. Aircraft from Nos 295, 296, 297 and 570 Sqns, Royal Air Force delivered the tip of the spear to Occupied Europe when they dropped the pathfinder units of the airborne forces, each aircraft carrying a stick of ten paratroopers who would guide in the main airborne assault of gliders and parachute troops
| THE KIT |
A standard tray-type box
contains six bagged parts frames in a medium grey softish plastic and one in
clear. Some slight flash was present as is typical of a short run kit. A bag
of resin parts provides the nose wheel well, exhaust pipes and upper guns. A
small etched brass fret provides an instrument panel, aerials and seat belts
with cockpit instruments on a tiny acetate strip. The small decal sheet has
markings for just one aircraft and two small correctio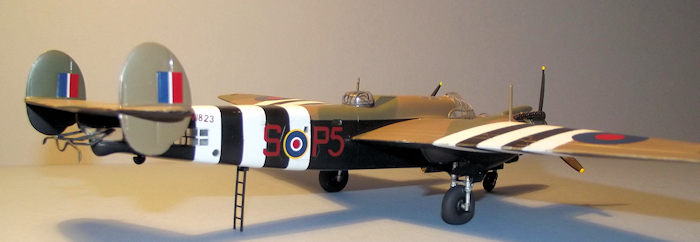 n
sheets had been slipped in to replace faulty code letters – good for Valom.
The plastic mouldings have trench-like panel details and apart from the etch
and acetate the kit bears an eerie resemblance to a 1970s Frog kit
n
sheets had been slipped in to replace faulty code letters – good for Valom.
The plastic mouldings have trench-like panel details and apart from the etch
and acetate the kit bears an eerie resemblance to a 1970s Frog kit
The instructions run to eight pages of A5 with exploded views and parts frame diagrams. The positioning of parts was rather vague in some diagrams. Four further pages of A5 in colour on glossy paper give colour call out in Humbrol, Agama, Model Master, Gunze Sangyo and FS colours. The colour five-view for the aircraft is adequate for camouflage pattern and decal placement but the artist has gone a little wayward on the layout of the engine exhaust pipes, shown correctly on the front view as being on the upper right hand side of each engine.
| CONSTRUCTION |
Like many modellers I tend to wander from one theme to another and I find myself slipping into a short series of related builds. In this case it began when Italeri released their Short Stirling V in airborne forces guise, then I fell in love with the re-tooled Airfix C-47 and before I knew it Italeri’s Waco CG-4A Hadrian and Airspeed AS.51 Horsa gliders appeared in my showcase, followed in short order by a Novo General Aircraft Hotspur, so a short series of Allied Airborne Forces aircraft was under way. Came the day that I was browsing the shelves of my LHS and the Valom box art caught my eye. Now one of the great advantages of a real old-fashioned, civilised, LHS is that they will permit an examination of the box contents so I was able to reassure myself that this was indeed just what I was looking for.
For a variety of reasons the
kit was part built and lay on the shelf of doom. Mainly because I was not happy
with the form of the engine cowlings and I could not see a solution that would
fit my limited s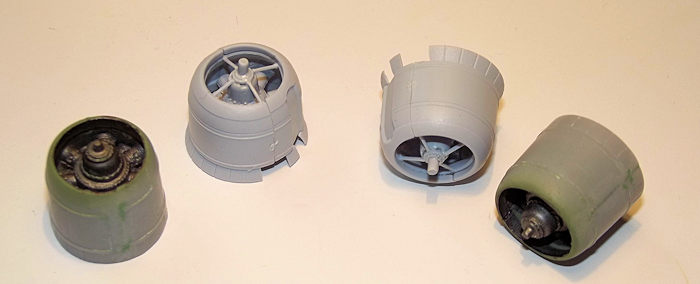 killset.
Its rescue came from an odd occurrence and an unplanned one – the availability
of replacement engines. Now this particular upgrade only works if you happen to
have lying around a spare set of engines from an Airfix Lancaster II. This
occurred by random chance since I had recently butchered such an Airfix
Lancaster which had donated its fuselage, tail and inner wings to a planned
conversion project. Since both the Hercules-engined Lancaster II and the
Albemarle were products of the same factory in Coventry, I compared the
mouldings from Valom and Airfix to find that they were within a whisker of the
same size and confirmed that the Airfix parts compared favourably with the
Albemarle drawings in my most ancient volume of Aircraft of the Fighting Powers.
This is not exact science but close enough for my modelling needs. This would
enable me to fit the Albemarle with better quality engines.
killset.
Its rescue came from an odd occurrence and an unplanned one – the availability
of replacement engines. Now this particular upgrade only works if you happen to
have lying around a spare set of engines from an Airfix Lancaster II. This
occurred by random chance since I had recently butchered such an Airfix
Lancaster which had donated its fuselage, tail and inner wings to a planned
conversion project. Since both the Hercules-engined Lancaster II and the
Albemarle were products of the same factory in Coventry, I compared the
mouldings from Valom and Airfix to find that they were within a whisker of the
same size and confirmed that the Airfix parts compared favourably with the
Albemarle drawings in my most ancient volume of Aircraft of the Fighting Powers.
This is not exact science but close enough for my modelling needs. This would
enable me to fit the Albemarle with better quality engines.
The parts frames were washed in a solution of water and washing up liquid to remove any mould release agent and allowed to dry.
Where possible I will always
look for one or two simple sub-assemblies to begin a build so as to get a feel
for how the plastic reacts to cutting and trimming and to different brands of
glue. The tail assembly was swiftly assembled as upper and lower halves to which
the one piece outer fins were added, then small outer stubs to the fins. The
outer fins are toed in slightly so it was helpful to use Revell Contacta glue to
allow for some fine tuning of the angles while the glue set. The main wings are
simple upper and lower panels each side which trap a one piece wheel bay roof
and bulkhead. These simple assemblies were set aside to harden while more
detailed work commenced on the fuselage. The Albemarle is a strange beast with
an asymmetric cockpit layout and a scattering of windows in odd places. In the
past I have certainly learned the hard way with short run kits that
transparencies do not a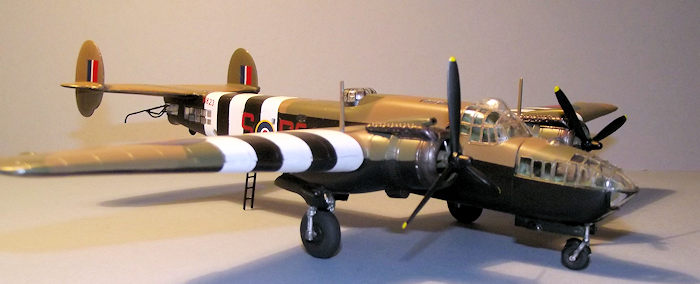 lways
fit well, so some careful checking was essential. I try to build the fuselage so
that it fits the main transparencies, packing out the joints or shaving them
down to fit as required.
lways
fit well, so some careful checking was essential. I try to build the fuselage so
that it fits the main transparencies, packing out the joints or shaving them
down to fit as required.
The various openings in the fuselage halves were cleaned up with a small file and a scalpel blade. A scribed circle under the lower rear fuselage was cut out to depict the parachutists’ exit hatch. The smallest areas of glazing were discarded since the small windows could be finished with Kristal Klear at the final assembly stage. The larger windows were glued in place in the openings under the tail assembly and on the fuselage spine. With the nose area occupied by a low floor under the bombardier’s glazed position and with a nose wheel box beneath, I made the decision to omit any nose weight and to rely on a ladder through the parachute hatch to balance the machine on its landing gear.
The fuselage interior is simply rendered consisting of floors and bulkheads in the nose area with some side wall and panel detail. Bucket seats are provided for the pilot, radio operator and navigator. The instrument panel and seat belts are provided on the etched fret. The lower nose area is provided with a resin nose wheel bay. This is a simple box structure that I chose to copy in 15thou plastic card since I prefer plastic to plastic joints where possible. A small piece of plastic card was used to blank off the doorway in the bulkhead behind the crew area since this leads to an empty fuselage. With the nose structures glued in place I used the kit-supplied circular tub under the mid upper gun position. Now it is clear in references to the Albemarle that the mid upper position was only equipped with a turret in a handful of the bomber versions and that the transport/tug variants had a fixed cupola with two flexibly mounted machine guns. References are scarce, so the kit provided parts would have to do. Small tabs of plastic card were glued around the edges of the fuselage halves to aid alignment when they were closed. With the fixed glazing suitably masked the interior was sprayed in Tamiya XF-71 Cockpit Green.
 Valom
provides a substantial wing spar to aid dihedral alignment and this was slipped
in place while the fuselage halves were repeatedly dry fitted to ensure that,
when they were closed up, the transparencies fitted as well as I could manage.
The joint forward of the windscreen had to be packed about with 10 thou card and
the fuselage halves could be joined. When the joints were dry the fuselage was
plastered with Green Stuff putty along the joints and, a great deal of sanding
and rescribing later, the main transparencies were glued into place. In spite of
my best efforts the clear parts did not blend into the fuselage as smoothly as
with a Tamiya or Airfix kit, but with a little more filler around the joints I
decided that it would be as near as it gets. The glazing is a minor challenge on
its own since there are, according to my math 103 windows on an Albemarle.
Blessings upon Montex for providing pre-cut, self-adhesive, vinyl masks for this
kit, beautifully crafted to fit the complex the complex glazing. These were
fitted during an evening’s work and the fuselage structure set aside. The vinyl
masks tended to lift on the more sharply radiused compound curves of the nose
glazing and needed to be carefully checked and pressed back into place at the
painting stage.
Valom
provides a substantial wing spar to aid dihedral alignment and this was slipped
in place while the fuselage halves were repeatedly dry fitted to ensure that,
when they were closed up, the transparencies fitted as well as I could manage.
The joint forward of the windscreen had to be packed about with 10 thou card and
the fuselage halves could be joined. When the joints were dry the fuselage was
plastered with Green Stuff putty along the joints and, a great deal of sanding
and rescribing later, the main transparencies were glued into place. In spite of
my best efforts the clear parts did not blend into the fuselage as smoothly as
with a Tamiya or Airfix kit, but with a little more filler around the joints I
decided that it would be as near as it gets. The glazing is a minor challenge on
its own since there are, according to my math 103 windows on an Albemarle.
Blessings upon Montex for providing pre-cut, self-adhesive, vinyl masks for this
kit, beautifully crafted to fit the complex the complex glazing. These were
fitted during an evening’s work and the fuselage structure set aside. The vinyl
masks tended to lift on the more sharply radiused compound curves of the nose
glazing and needed to be carefully checked and pressed back into place at the
painting stage.
The weakest part of the Valom kit is the moulding of the engines. The cowls are split horizontally and intended to be fixed to the front edge of the nacelles by a butt joint of the cowling gills to the nacelles. The engine mouldings are simply one and a half rows of cylinders glued inside the cowls.
The Airfix nacelles are more detailed in their form, as befits a mainstream kit and although the cowls are also split horizontally, they enclose two rows of engine cylinders which have a frame of spacing struts to align the propeller shaft. The Airfix cowl gills are moulded open so I had to fashion some circular plastic spacers to pack out the cowls to the correct position. A search of the spares box revealed some suitably sized plastic discs that had started life as alternative wheel hubs on a Wingnut Wings Fokker D.VII – (never throw anything away!). The replacement engine units were fixed in place with tube cement. Valom provide the “hedgehog” exhaust in both injected plastic and resin, but on this occasion I used the Airfix items since they are tailored to the replacement cowls.
| COLORS & MARKINGS |
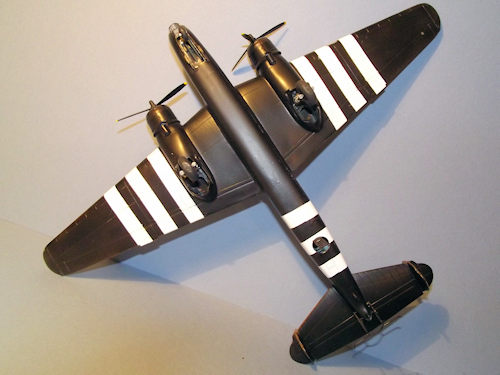
The airframe was primed with grey auto primer from a rattle can and the white areas for the fuselage and wing striping sprayed with Tamiya ultra-fine white primer which was masked off with Tamiya tape.
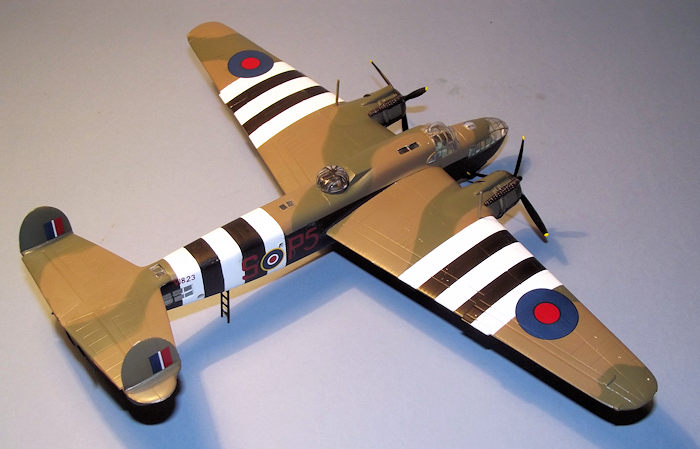
The upper surfaces were painted in Xtracrylix XA 1002 Dark Earth applied by my Iwata HP-C airbrush. The relevant areas were masked off with Tamiya tape and the contrasting camouflage of Tamiya XF-81 Dark Green was applied. When the paint had dried enough the upper surfaces were masked off with what seemed like masses of Tamiya tape ready for the application of Tamiya X-18 semi-gloss Black to the sides and under surfaces. With further masking the cowl fronts and engine exhausts were sprayed with Tamiya X-33 Bronze.
 On
completion of the paintwork the masking was stripped away with the exception of
the masking to the glazing and the whole airframe treated to two hand brushed
coats of Future/Klear floor polish prior to the application of decals.
On
completion of the paintwork the masking was stripped away with the exception of
the masking to the glazing and the whole airframe treated to two hand brushed
coats of Future/Klear floor polish prior to the application of decals.
The simple decal sheet consists of upper wing and fuselage roundels, squadron codes, serial numbers and tail flashes. No stencils are provided. The thin decals went on without fuss, aided by a little Micro Set. A final coat of Xtracrylix Matt varnish was sprayed on and the masks to the glazing stripped away. The remaining small windows were glazed with Micro Kristal Klear applied with the tip of a wooden toothpick.
Valom provide a sturdy undercarriage assembly which plugged neatly into the gear bays and this was glued in place, along with a ladder from a model railroad source to hold the tail up.
The propellers had been painted black earlier in the build, with the tips picked out with a dab of yellow.
The tail yoke for the glider towing gear took a bit of fiddling to get into place through pre-drilled holes in the tail transparencies but with patience and the use of slow-setting tube cement the structure was lined up to my satisfaction.
Finally the gear doors were added and the unusual radio masts were glued to the upper wings adjacent to the engines to complete the build.
| CONCLUSIONS |
Being
a short run moulding the Albemarle required more work than a mainstream kit
in checking the fit of parts and associated fitting, filling and fettling.
The trench-like panel lines might be too much for some but the effect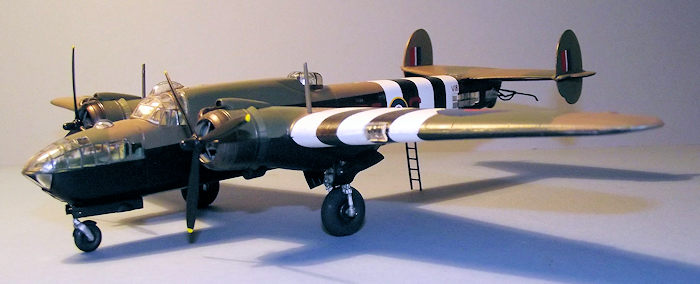 improved under a couple of coats of paint. The large number of glazing
panels is a bit of a challenge but more manageable thanks to the set of
pre-cut paint masks from the aftermarket. The basic mouldings are very
simple and unrefined, but adequate. My use of replacement engines from
Airfix is just a bit of modeller’s whimsy and I could probably have got a
fair result from what is provided in the box. It was certainly a lot of
effort just to display opened cowling gills
improved under a couple of coats of paint. The large number of glazing
panels is a bit of a challenge but more manageable thanks to the set of
pre-cut paint masks from the aftermarket. The basic mouldings are very
simple and unrefined, but adequate. My use of replacement engines from
Airfix is just a bit of modeller’s whimsy and I could probably have got a
fair result from what is provided in the box. It was certainly a lot of
effort just to display opened cowling gills
My effort is basically what Da Boss of this site calls a “three footer” and looks reasonable behind glass in my showcase. Recommended for fans of the less ordinary.
| REFERENCES |
Aircraft of the Fighting Powers Vol V, Harborough Publications 1945
British Warplanes of World War II, Aerospace Publishing Ltd 1998
20 December 2016
Copyright ModelingMadness.com
This package courtesy of my wallet.
If you would like your product reviewed fairly and fairly quickly, please contact the editor or see other details in the Note to Contributors.
Back to the Main Page Back to the Review Index Page Back to the Previews Index Page