Eduard 1/48 Tempest V
| KIT #: | 8021 |
| PRICE: | £10 from IPMS meeting |
| DECALS: | Two options |
| REVIEWER: | Patrick Barratt |
| NOTES: | Still can be found |
| HISTORY |
In March of 1940, Hawker initiated a number of design studies aimed at improving the Typhoon. Among these studies were ways of improving the Typhoon’s high altitude performance. These involved the use of a new wing design that featured a thinner wing section and a reduced wing area. The new wing had a elliptical plan form and showed a great potential for increasing performance at altitude while reducing the tendency of the original Typhoon wing to buffet at speeds around 500 mph! The new wing was five inches thinner at the root than the original Typhoon wing.
 In order to save
development time, Sidney Camm decided to mate the new wing to a modified Typhoon
airframe, which retained the Sabre power plant. The RAF ordered two prototypes
under Specification F.10/41 18 November of 1941 and the project quickly became
known as the Typhoon II.
In order to save
development time, Sidney Camm decided to mate the new wing to a modified Typhoon
airframe, which retained the Sabre power plant. The RAF ordered two prototypes
under Specification F.10/41 18 November of 1941 and the project quickly became
known as the Typhoon II.
Hawker’s biggest problem with the new fighter was the engine. As with the Typhoon, and as a precaution, it was felt that the prototype should allow for the use of alternative engine installations. By the spring of 1942, the various problems with the Sabre had not been fully eliminated and the company proceeded with its plans for alternative engine installations for the Typhoon II prototypes (which were renamed the Tempest during August). By this time the RAF had also revised the original prototype contract, now calling for a total of six aircraft each one designated a different Mk. Number. The Tempest modelled here was the sabre engined MkV
In the middle of 1942, a Young French pilot had walked out of RAF Cranwell collage in the UK having completed his pilot officer training and set course for Wales, RAF Rednal to be precise, and No. 61 OTU and conversion to Spitfires before joining the Free French “Alsace “ squadron at RAF Turnhouse.
The Young Pilot was Pierre Clostermann (later DFC) and within a couple of months the new Alsace squadron was integrated into the RAF and posted to RAF Biggin Hill.
 3 years later and
over 420 operational sorties, 33 victories, and with the rank of Wing commander,
he finished his war with a final power climb up into the sun and a few loops in
his aircraft that had become an emotional and physical extension of himself,
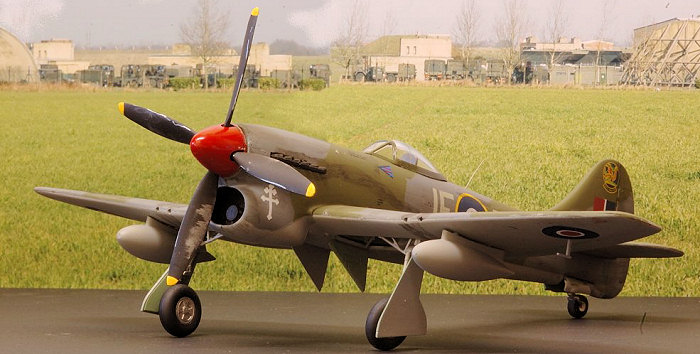
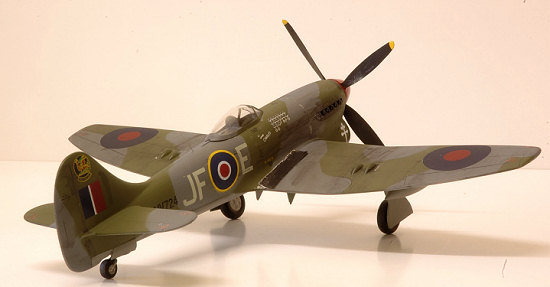
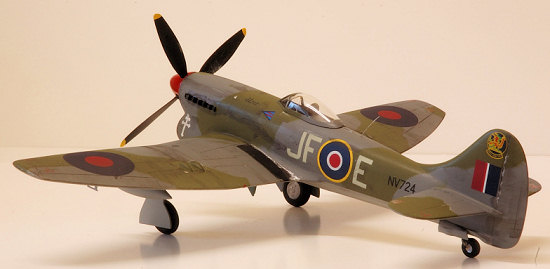
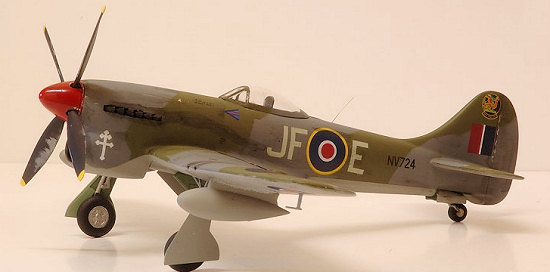
Hawker Tempest MkV “ Le Grand Charles” JF-E, NV724.
3 years later and
over 420 operational sorties, 33 victories, and with the rank of Wing commander,
he finished his war with a final power climb up into the sun and a few loops in
his aircraft that had become an emotional and physical extension of himself,
Hawker Tempest MkV “ Le Grand Charles” JF-E, NV724.
For those of you who like to read, you could do worse than find yourself a copy of Pierre’s book,” The Big Show” that detail’s his war time service with the RAF as they probed the German defences from the UK before finally advancing field by field across his native France and all the way to Germany and finally Victory including his meetings with V1’s and ME262’s!! In his Tempest.
| THE KIT |
I picked up my copy of the Eduard Hawker Tempest model recently from an IPMS meet; it has already been around ten years and not readily available anymore. Good 1:48 Tempests are few and far between and if you see one its worth picking up as it makes a great addition to you model shelf sitting after the Hurricane and Typhoon and before the Fury/Sea fury.
The Kit comes in
the usual top opening Eduard box, it is made up of just 66 parts on 3 spru’s
plus a clear one-piece canopy. For a short run kit I was very impressed with the
quality of the parts. These parts are moulded in a very hard, but thin plastic,
and the fit 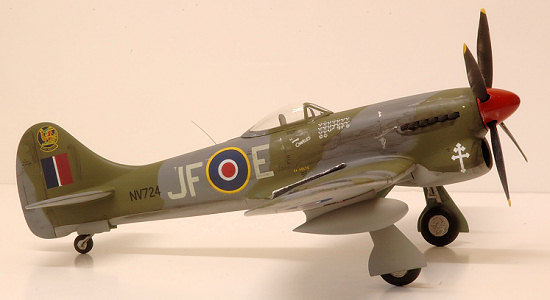 is as good as you might expect from a mainstream Japanese product,
never mind a short run kit. As always there is an exception to the rule and a
little work might be needed on the tail plane to tailfin fit. Panel lines seem
pretty accurate and are recessed. Those of you who like to pick out panel lines
with a wash or pastels might find them a little shallow but in truth, they are
probably to scale. My version of this model is the non-Profipack and as such is
pretty basic but I have to say, quite adequate with a nice cockpit area
including detailed sidewalls. The Tempest has a small cockpit opening and I
doubt whether any after market additions would be of benefit here particularly
if you use the moulded shut canopy supplied although a set of seat belts would
be a worthwhile addition.
is as good as you might expect from a mainstream Japanese product,
never mind a short run kit. As always there is an exception to the rule and a
little work might be needed on the tail plane to tailfin fit. Panel lines seem
pretty accurate and are recessed. Those of you who like to pick out panel lines
with a wash or pastels might find them a little shallow but in truth, they are
probably to scale. My version of this model is the non-Profipack and as such is
pretty basic but I have to say, quite adequate with a nice cockpit area
including detailed sidewalls. The Tempest has a small cockpit opening and I
doubt whether any after market additions would be of benefit here particularly
if you use the moulded shut canopy supplied although a set of seat belts would
be a worthwhile addition.
No location pins are moulded in to the parts but the accuracy of the moulding is such that a very good alignment is possible with care where halves have to be joined and I would go as far as saying that the wing to fuselage fit is as good as I have come across and only a very light sanding of a few high spots will be necessary.
Don’t be put off by the basic appearance and lack of parts. By this stage in the war, aircraft were being produced in a very clean and streamlined profile and lacked all the fiddly additions of Radiators, oil coolers, aerials and cannon barrels that make up the parts tally of the earlier aircraft model kits. No option is given for rudder/airlon/flap position but they could be quite easily cut and posed if required.
Wheel well are boxed in and have light detailing that could easily be improved on should you so wish.
| CONSTRUCTION |
 As I have said,
this is a very simple model and construction is divided into just seven sections
in the instruction leaflet, all of which are straightforward. Even intermediate
modellers would stand a very good chance of building this perfectly well with
out instructions at all; such is the simplicity of the kit.
As I have said,
this is a very simple model and construction is divided into just seven sections
in the instruction leaflet, all of which are straightforward. Even intermediate
modellers would stand a very good chance of building this perfectly well with
out instructions at all; such is the simplicity of the kit.
As usual I have built this model, for the purpose of the review, OTB so what you see here is what you get.
Points to look out for!
A/ Don’t forget to open up the cartridge exhaust ports in the lower wing
B/ You can insert the cockpit tub after you have joined the fuselage halves. (Makes a good join easier).
| COLORS & MARKINGS |
I chose to finish my aircraft in the
standard RAF camouflage and used Tamiya spray cans AS-10 RAF Ocean Grey, AS-9
RAF Dark Green and AS11 RAF Medium Sea Grey plus a bright Red spinner in keeping
with Pierre’s aircraft. Follow this with two coats of Future to give a good
decal surface and apply your chosen d ecals. Another coat of future and a coat of
Matt Humbrol clear to finish off .
ecals. Another coat of future and a coat of
Matt Humbrol clear to finish off .
Decals for two aircraft are supplied, Pierre Clostermann’s No. 3 Sqn “Le Grand Charles” and F/Sgt MaKennaugh’s No 56 Sqn “Thelma II”.
The decals seem to be nice and thin but my set fell to pieces despite taking every care with them after a warning from Frank who reviewed his TT version Tempest on these pages a while ago.
| CONCLUSIONS |
This was a most enjoyable build of a very handsome airplane! I particularly liked the very tough/rigid/hard plastic used that enabled Eduard to make their mouldings a little thinner than usual and it seemed to prevent distortion and warping of the parts. It’s a quick and easy build requiring no special skills and as I have said, it will add a very nice addition to your Hawker collection particularly when posed next to the Typhoon, showing the longer nose and clipped and thinner wings of the Tempest.
Highly recommended if you can find one!
| REFERENCES |
Pierre Closterman's “ The Big Show” (A must read) and various web sites including http://www.jaapteeuwen.com/ww2aircraft/html%20pages/HAWKER%20TEMPEST.htm
October 2007
Copyright ModelingMadness.com. All rights reserved. No reproduction in any form without express permission from the editor.
If you would like your product reviewed fairly and quickly, please contact the editor or see other details in the Note to Contributors.