| KIT #: | 1004-5/02053-0/PK-7 |
| PRICE: | $ Cheap |
| DECALS: | various sources |
| REVIEWER: | Brian Baker |
| NOTES: |
| HISTORY |
The Westland Lysander was
designed in the mid thirties as a replacement for the classic Hawker Audax, a
Hart variant, in Royal Air Force army cooperation squadrons. After the Air
Ministry issued Specification A.39/34 for an Audax replacement,
the
designer, W.E.W. Petter,
spent
considerable time with Audax squadrons during 1935 in order to find out exactly
what was needed in a replacement aircraft. The Audax had been the result of
standardization policies during the early thirties, and was really unsuitable
for the role envisioned for an army cooperation type.
The requirements included a good
forward view, easy handling characteristics, and good low speed control, with
the ability to operate out of small fields.
Petter’s design was a high wing
monoplane powered by an 890 hp. Bristol Mercury radial engine, a popular engine
at the time, and the type was what today would have been considered an STOL
plane. The
first prototype was completed in 1936, and after extensive testing and some
modifications, the Lysander I was ordered into production, with the first
squadron deliveries in 1938. Some were initially issued to Army Cooperation
Squadrons , and some planners initially thought that the type might be useful in
the fighter role, but calmer
 heads soon
prevailed,
and
by the outbreak of war in 1939,
seven squadrons were operational on the type.
By this time, the Mk. II had
appeared, powered by the Bristol Perseus XII engine of similar size but with a
power rating of 905 hp.
heads soon
prevailed,
and
by the outbreak of war in 1939,
seven squadrons were operational on the type.
By this time, the Mk. II had
appeared, powered by the Bristol Perseus XII engine of similar size but with a
power rating of 905 hp.
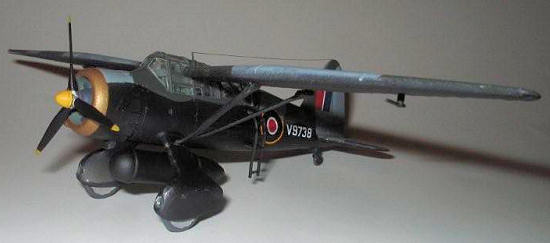
High losses during the Battle
of France resulted in the eventual replacement of the Lysander in Army
Cooperation Squadrons with American built Tomahawks, but the type remained in
use, finally finding a niche as a special purpose intruder, delivering agents
into occupied
A number of Lysanders were
exported to foreign countries before and during the war.
One reached
| THE KITS |
The first 1/72 scale Lysander
was the old Frog Penguin kit, which is now a collector’s item.
In the fifties, Airfix released
their first Lysander issue, and this, being one of their first kits, was not a
very good model.
I have the engine and prop
assembly in a spares box, and it is pretty bad. (It is illustrated with one of
the photos of the Airfix model.) It was on a par with their first Gloster
Gladiator.
In 1973, Lesney-Matchbox
released PK-7, a Mk. II Lysander. Later, in 1974, Airfix retooled their
model
into a more competitive kit.
Strangely, during the same year,
Frog introduced what might have been an upgrade of the Penguin kit in the form
of a Mk. I or Mk.
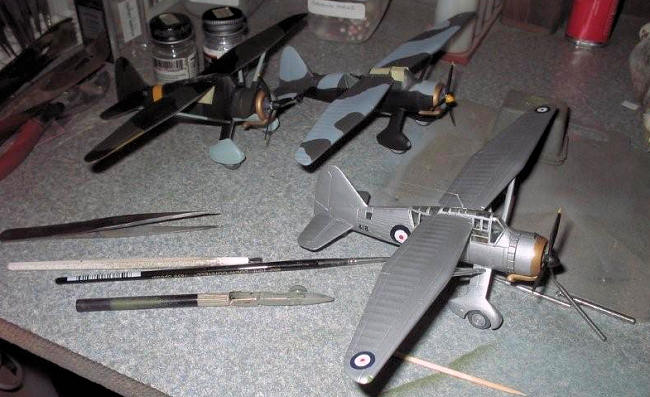
I decided to build all three
versions simultaneously to compare and evaluate them.
I had built both the Matchbox and
Frog kits within the past ten years, and recall building the original Airfix kit
in the early sixties, but only the engine and prop survive. I built
 them
“out-of-the-box” and did not add anything, except that I didn’t use kit decals,
as none of those I had survived 35 years of storage.
them
“out-of-the-box” and did not add anything, except that I didn’t use kit decals,
as none of those I had survived 35 years of storage.
Keep in mind that there was
very little external difference between the various Marks of the Lysander. The
Mk. I and MK.
There are some articles on the
Lysander available, but I used as my main source the old Profile Publication
Number 159, which gives a pretty complete account of the development and service
life of this aircraft.
There are some color drawings, and
a few interior photos which I found useful. In addition, Squadron and Aircam
produced booklets on the Finnish Air Force, and these provide some information
on these aircraft in Finnish service.
There must also be some sources on
line.
| CONSTRUCTION |
 The Airfix
Lysander Mk. I or Mk.
The Airfix
Lysander Mk. I or Mk.
Instructions come on one large
sheet of paper in the boxed version, or a smaller set of drawings on the bagged
issue.
Three views are provided, along
with decals, for two aircraft, a Mk. II of No. 225 Squadron, or
The Airfix kit follows the old
Harleyford drawings to the letter, so it can be assumed to be accurate in
outline.
It is probably supposed to be a
Mk.
I or Mk.
 Surface
detailing is fair to good, with overdone wing ribbing and raised rivets. Whether
this aircraft had flush rivets is open to conjecture, but I doubt that it had
them.
The cowling seems to be tapered a
little more than it should be, but this might be because the cowl flaps are cast
in the open position, with huge grooves in between them. The exhaust stack is
hopeless, and I would advise sanding it off and adding one from a Frog or other
kit, or else scratchbuilding one. I would suggest attaching the landing gear
struts before attempting to fit the wings.
Wing
attachment is odd, with small tabs molded onto one of the clear canopy sections.
The wings fit over them, but the
holes need to be trimmed so that they fit.
Once the wings are attached, the
struts need to be glued in position. There are holes for the strut ends, but
they aren’t very secure. The strut positions are essential for aligning the
wings at the proper dihedral angle.
Mine turned out a little flat, but
I put up with that.
Surface
detailing is fair to good, with overdone wing ribbing and raised rivets. Whether
this aircraft had flush rivets is open to conjecture, but I doubt that it had
them.
The cowling seems to be tapered a
little more than it should be, but this might be because the cowl flaps are cast
in the open position, with huge grooves in between them. The exhaust stack is
hopeless, and I would advise sanding it off and adding one from a Frog or other
kit, or else scratchbuilding one. I would suggest attaching the landing gear
struts before attempting to fit the wings.
Wing
attachment is odd, with small tabs molded onto one of the clear canopy sections.
The wings fit over them, but the
holes need to be trimmed so that they fit.
Once the wings are attached, the
struts need to be glued in position. There are holes for the strut ends, but
they aren’t very secure. The strut positions are essential for aligning the
wings at the proper dihedral angle.
Mine turned out a little flat, but
I put up with that.
The engine detail is rather
generic, with cylinders cast in place. They need some detailing to look
realistic. The prop is acceptable, and the spinner merely glues on to the front
of the hub. Quite a bit of filling was required on the tailplanes, as the gaps
were too large to ignore.
I didn’t use the little winglets on
the wheel pants, but these would fit on easily.
The slots on the wheel pants have
to be filled in if you don’t use them. There are holes for the landing lights in
the front of the wheel pants, the only kit to have them.
They
go through the leading edge of the wheel cover, and you can see the tire inside.
Small
disks are provided to make the lenses, but I used Crystal Clear instead, as I
did to represent the small windows just ahead of the tailplanes. The wheels look
like they are a little thin, with the tires too small and narrow.
They look like the old high
pressure tires of the 1930’s. They fit into the wheel pants with small axles,
but the fit is snug.
The radio antenna mast is too short
and stubby, but a locating hole is provided.
The pitot tube is there, but it
does not look like those in photos of the actual airplane. The boarding ladder
is OK, but it is one rung too long and needs to be trimmed off. The small bombs
look pretty nice, but I didn’t use them on the Mk.
The Airfix Lysander is a typical 1970’s kit. Heavy detail, coupled with marginal assembly engineering provide a kit that requires a lot of skill to salvage it into a decent model. It is worth building, but there are better kits available.
 The Frog
Lysander Mk. I and Mk.
The Frog
Lysander Mk. I and Mk.
The instructions come on a
large sheet of newsprint, fully 19 ½ inches by 12 ½ inches, with drawings and
instructions on both sides.
A painting guide is provided on the
box bottom, with decals for two aircraft: a
Mk.
I of No. 2 Army Cooperation Squadron, Le Plessiel, France, 1939 (L4705, KO-X);
and a Mk.
The Frog kit is basically
accurate in outline, and is cast in soft, light grey plastic.
Wing ribs and
stringer lines are shown by raised
lines on the model, and the engine has the raised rocker arm covers common to
the Mk. I and MK. 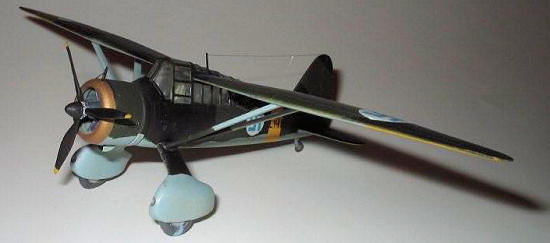 quite like
the ones in the photos. It may be a fuel drain.
Small
bomb clusters are provided for the “winglets” and for the rear fuselage rack,
which is not included.
The winglets glue directly onto the
wheel pants, with no stubs. This might make for difficult alignment problems,
but if you don’t use them, you don’t have any holes to fill in. I would suggest
gluing the landing gear struts in position before attempting to attach the
wings. I would also suggest painting and masking the entire airframe before
attaching the wings, unless your airplane is going to be primarily one color.
quite like
the ones in the photos. It may be a fuel drain.
Small
bomb clusters are provided for the “winglets” and for the rear fuselage rack,
which is not included.
The winglets glue directly onto the
wheel pants, with no stubs. This might make for difficult alignment problems,
but if you don’t use them, you don’t have any holes to fill in. I would suggest
gluing the landing gear struts in position before attempting to attach the
wings. I would also suggest painting and masking the entire airframe before
attaching the wings, unless your airplane is going to be primarily one color.
The engine is a little better
than the Airfix kit, but still needs serious detailing. The cowling should
probably taper a little, as it doesn’t narrow until the collector ring starts.
The cowling, with the bumps, is correct for both Mk. I and Mk.
The canopy is one piece and semi transparent. You can almost see through it. The wings attach to slots in the upper portion of the canopy, and are pretty secure once glued in place. After installing each wing, be sure to attach the wing struts securely to the gear strut and the underside of the wing. The problem here is that the rear strut is too short, and is designed to fit about a foot or two in scale inside where it should be. I don’t know how to correct this without cutting off the entire rear strut and replacing it with a longer one. It is not noticeable unless you are looking at the plane from directly underneath, but it is wrong. A LF antenna needs to be added above the left wing root, and a pitot tube should be scratchbuilt for the left wing position.
All in all, this is a pretty
good kit, and if you want to take the time and effort to make the corrections,
an excellent Lysander model can result.
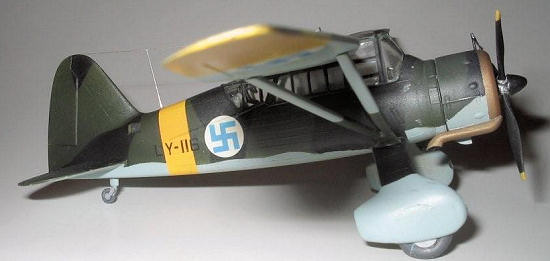
I did mine as a Lysander Mk. I of
Tlelv. 16 of the Finnish Air Force.
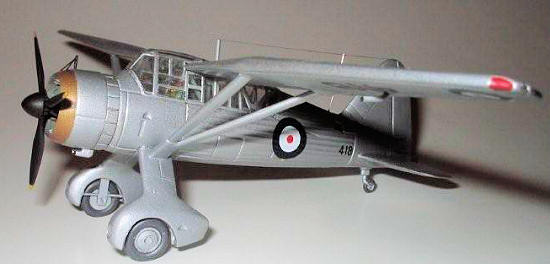
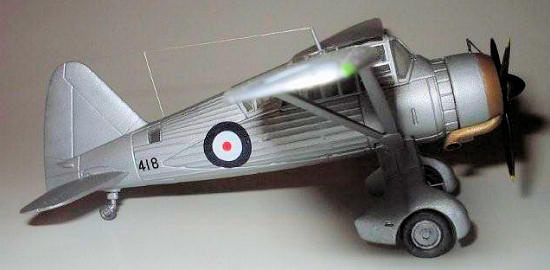
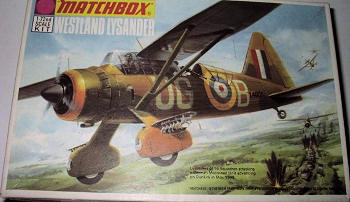 Matchbox
Lysander Mk. II
(Kit. No. PK-7, Copyright 1973)
Matchbox
Lysander Mk. II
(Kit. No. PK-7, Copyright 1973)
The
instructions come on a small three-fold sheet, with an aircraft history and
general model building instructions on one side, and exploded assembly drawings
on the other.
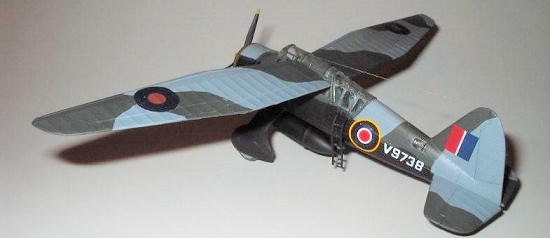
Painting instructions are on the
box bottom, although the colors appear to be wrong, showing the middle stone and
dark earth schemes associated with the Desert Air Force, rather than the correct
dark earth and dark green colors that should have been shown.
Decals are provided for two
aircraft, L4805, UG-B, of No. 16 squadron,
This kit has a good outline,
but the surface detail is a little overdone, typical of Matchbox kits of this
era. The usual Matchbox “plowed furrows” appear on the wings and fuselage, but
wing rib detail is more subtle and realistically done. There is no rear window
near the tailplane, but this is easily cut out and filled with Crystal Clear or
white glue. One problem with this kit is that the
 plastic
was extremely brittle. ( I got out another Matchbox Lysander and found that the
plastic was just as brittle, whereas that of a Gladiator kit next to it
was not.) This made trimming the
wheel covers a little touchy, as the plastic split several times,
requiring gluing and filling. As
with all other Lysander kits, the landing gear should be attached and lined up
before the wings can be attached.
plastic
was extremely brittle. ( I got out another Matchbox Lysander and found that the
plastic was just as brittle, whereas that of a Gladiator kit next to it
was not.) This made trimming the
wheel covers a little touchy, as the plastic split several times,
requiring gluing and filling. As
with all other Lysander kits, the landing gear should be attached and lined up
before the wings can be attached.
In my opinion, the Matchbox Lysander was the best kit of the lot, although it still has its issues. But it looks like a Lysander, and that, I believe, is the issue. This was the most fun to build, and I think the detail was superior to the other kits.
| CONCLUSIONS |
 All three
of these kits can be used to build an acceptable Lysander in 1/72 scale.
Each kit has its limitations, and I
supposed that if you were going to superdetail
a “Lizzie’ in this scale, you could
combine parts.
But to do more than one,
any of them would be OK. My personal preference is the Matchbox kit, with the
Frog a close second, but the Airfix kit cannot be entirely ruled out, as it too
has
potential.
Just be sure that you have your
references handy, and that you use the proper kit for the version you are
modeling.
Try one.
All three
of these kits can be used to build an acceptable Lysander in 1/72 scale.
Each kit has its limitations, and I
supposed that if you were going to superdetail
a “Lizzie’ in this scale, you could
combine parts.
But to do more than one,
any of them would be OK. My personal preference is the Matchbox kit, with the
Frog a close second, but the Airfix kit cannot be entirely ruled out, as it too
has
potential.
Just be sure that you have your
references handy, and that you use the proper kit for the version you are
modeling.
Try one.
January 2009
If you would like your product reviewed fairly and quickly, please contact me or see other details in the Note to Contributors.