CMR 1/72 Welkin Mk II
| KIT #: | ? |
| PRICE: | $? |
| DECALS: | ? |
| REVIEWER: | Carmel J. Attard |
| NOTES: | Resin kit |
| HISTORY |
At a first glance the Welkin has a close resemblance to the former Westland Whirlwind fighter. There were two principal types of Welkin produced: These were the Westland Specification F4/40, which later corresponded to the F1 version, and the later NFII version that was developed in 1946. The subject of the CRM resin scale model is the Welkin NF Mk I1 version. This was a single seat day and night fighter capable of fighting at great heights. The interesting thing as far as modeling is concerned is that although it was never issued to a squadron, it was the subject of a typical unique prototype colour schemes and markings, which made it all the more interesting.
 The prototype welkin DG558,
which flew, flew on I-11-42, had a camouflage pattern to the upper surfaces
painted similar to that on the Whirlwind of Dark green and ocean Grey with all
yellow undersurfaces and an 18-inch sky painted "fighter band" around the rear
fuselage. Some sources quote the upper surface camouflage scheme as being of
dark green and dark earth. The production Welkin Mk1Eg XD278 had the standard
fighter camouflage consisting of upper surfaces pattern of Dark green and ocean
Grey with all medium sea Grey to undersurfaces. Fuselage band and spinners were
sky. After a production of a dozen Welkins was complete, the camouflage scheme
was altered to comply with the scheme issued on 7-6-43 for very high altitude
fighters that operated by day. This consisted of all medium sea Grey to upper
surfaces with PRU blue undersurfaces and spinners.
The prototype welkin DG558,
which flew, flew on I-11-42, had a camouflage pattern to the upper surfaces
painted similar to that on the Whirlwind of Dark green and ocean Grey with all
yellow undersurfaces and an 18-inch sky painted "fighter band" around the rear
fuselage. Some sources quote the upper surface camouflage scheme as being of
dark green and dark earth. The production Welkin Mk1Eg XD278 had the standard
fighter camouflage consisting of upper surfaces pattern of Dark green and ocean
Grey with all medium sea Grey to undersurfaces. Fuselage band and spinners were
sky. After a production of a dozen Welkins was complete, the camouflage scheme
was altered to comply with the scheme issued on 7-6-43 for very high altitude
fighters that operated by day. This consisted of all medium sea Grey to upper
surfaces with PRU blue undersurfaces and spinners.
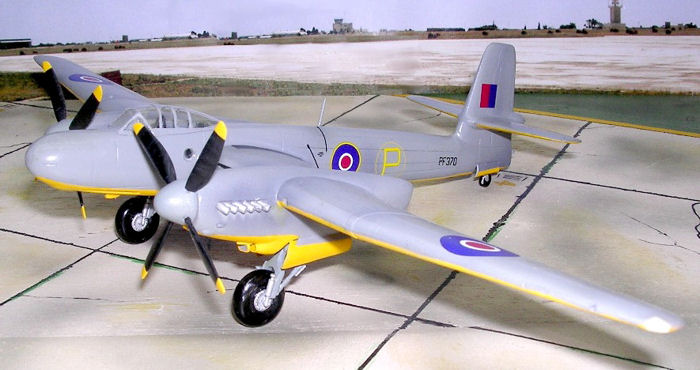
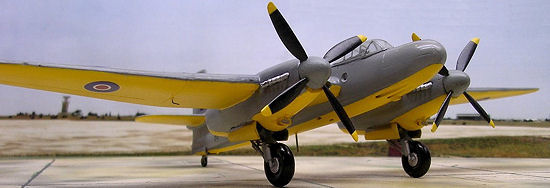
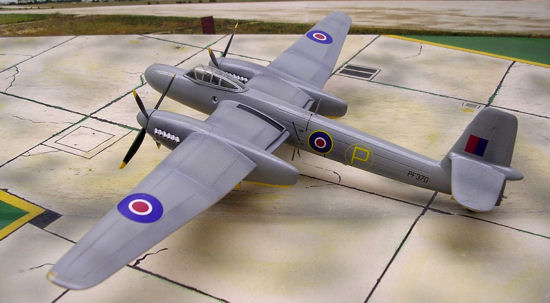
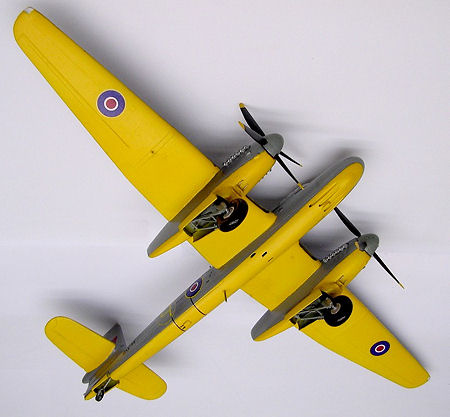
The Welkin Mk II came at a time when further development on the original Mk1 was being undertaken so that a 2-seat version catering for a pilot and a back seat radar operator could be carried in an enlarged cockpit. The high flying bomber treat never materialized and the 67 Mk1s were kept in storage while further development of the Mk2 discontinued. The advent of the jet era also attributed towards further development of the Welkin so that in the end the MII only reached the prototype stage. The prototype Welkin Mk II carried two liveries an both cases being medium sea grey upper surfaces and yellow undersides. The only difference between the two schemes was that one carried the serial No PF370 in black along with the yellow encircled P for prototype marking,. The other carried large yellow letters P17 at the rear of the fuselage. The Welkin had a speed in excess of 380 mph, and could reach an altitude of 44,000 ft and a range of 2500 miles.
| THE KIT |
Once again CMR goes where
others certainly keep their distance. They have concentrated on a very
interesting prototype; the two seat Westland Welkin NF Mk2. It is not so much a
large aircraft but certainly the long wingspan makes it looks like one. Same as
with all other kits by CMR that I know of, the Welkin model is also packed in
multi-sectioned plastic bag, properly sealed with all
 the parts with no exception
arrive intact and undamaged. There is a side view picture in colour that shows a
Welkin in Prototype markings finished in very contrasting colours of medium sea
grey upper surfaces and yellow undersurfaces. One may wonder why prototype
aircraft of today are not finished in similar scheme!
the parts with no exception
arrive intact and undamaged. There is a side view picture in colour that shows a
Welkin in Prototype markings finished in very contrasting colours of medium sea
grey upper surfaces and yellow undersurfaces. One may wonder why prototype
aircraft of today are not finished in similar scheme!
Before one start to open the kit bag one may recommend to have available an empty box to take all the parts, the tiny ones in particular, in which these are safely stored once trimmed from the excess fines. Therefore avoid the risk of misplacing any of the intricate parts which are irreplaceable. The kit is made up of three different media. These comprise of the light orange resin components for medium and large sections: Separate propeller blades, spinners, wheels, wing sections with engine nacelles integrally cast, spinners, wheels, fuselage with interior detail inside and other even smaller parts to go inside the cockpit area which are impressively detailed. There is even a ladder in resin that can be fitted to the port side of the fuselage to the rear of the trailing wing root area if one desires to do so. Then there are white plastic injection moulded parts as the wheel oleos, supporting frames that go inside the wheel wells. These are rather thin in section and contain a lot of flash that needs a lot of care to avoid breaking them during cleaning prior to fitting in place. There are also exhaust pipes that are to fit inside a slot at the sides of the engine nacelles. Finally there are plastic clear parts such as the wing tip lights and two small windows that fit to the side of the cockpit canopy. A clear plastic acetate cockpit canopy comes in duplicate. I found this to be an easy task to trim to fitting size from first attempt, leaving the spare one for some other future use.
 As with most resin parts
these come attached with a heavy section runner/ feeder and care should be taken
not to remove away any actual kit proper part particularly when it comes to trim
the wheel well doors and tail wheel doors. Some good clean up is also required
to the wing and fuselage parts and remove excess resin in way of the wing
leading edges. There is no porosity on the surface that at times are encountered
with resin kits indicating that the casting technique with resin has been well
mastered. There is however with my particular kit parts a small degree of
warping which effected the progressive building of the model. When viewed from
front the starboard fuselage had the tail fin and rudder tilting towards the
left, which at first I thought that when the two halves are joined together,
these would correct the situation. Having arrived to this stage I noted that
this warping persisted and the only way to bring it aligned was to cut the rear
fuselage from the front area just ahead of the fin root and then refit it in the
aligned position. This was necessary and should not deter anyone from doing so
it is a simple task and it is also a first time try with good results.
As with most resin parts
these come attached with a heavy section runner/ feeder and care should be taken
not to remove away any actual kit proper part particularly when it comes to trim
the wheel well doors and tail wheel doors. Some good clean up is also required
to the wing and fuselage parts and remove excess resin in way of the wing
leading edges. There is no porosity on the surface that at times are encountered
with resin kits indicating that the casting technique with resin has been well
mastered. There is however with my particular kit parts a small degree of
warping which effected the progressive building of the model. When viewed from
front the starboard fuselage had the tail fin and rudder tilting towards the
left, which at first I thought that when the two halves are joined together,
these would correct the situation. Having arrived to this stage I noted that
this warping persisted and the only way to bring it aligned was to cut the rear
fuselage from the front area just ahead of the fin root and then refit it in the
aligned position. This was necessary and should not deter anyone from doing so
it is a simple task and it is also a first time try with good results.
The CMR instructions are typical of CMR kits of the recent past with very clear self-explanatory drawings and labeling the colour of the components wherever necessary. There is also a 2-page full of black and white photos of the aircraft and other pictures showing highly detailed photos of the cockpit interior. On cross examination with the exceptionally detailed cockpit interior resin parts gives these exhibit clear proof of how far accuracy can reach with CMR kits.
The injection moulded exhaust stacks consist of 4 separate components each have 6 outlet pipes needed drilling at the outlets. This was a time consuming method but each photo shows this detail and therefore I had no other option than to drill these open. I used a 4mm dia. drill first that was then followed by drilling with a 2mm dia. one.
| CONSTRUCTION |
 Apart from the warping on
the fuselage parts and opening of the exhaust parts that I had to attend to
there be other areas that needed some more work. The four gun ports opening were
opened with a drill close to the diameter of the gun ports. There are 4
elongated cartridge outlets at the rear of the guns right under the fuselage
centre section that also needed to be opened. The propeller spinners are
separate and I found best to drill a 2mm diam. shallow hole to take these before
fixing with super glue. The best way to assemble the blades was to fix the
opposing blades first and at the same time ensure that the leading edge of the
blades faces the unticlockwise rotation of the propeller. A small hole was also
drilled in the centre at the back of each spinner. This ensures the exact
centering of the props with the nacelles. Finally an 'L" shaped tiny antenna
was added under the starboard wing referring to the Welkin photo given at the
centre of the picture page. Two other whip type aerials were added, one on top
and the other under the fuselage. I made these out of thin steel wire in
preference to the resin ones provided for obvious breakage reasons.
Apart from the warping on
the fuselage parts and opening of the exhaust parts that I had to attend to
there be other areas that needed some more work. The four gun ports opening were
opened with a drill close to the diameter of the gun ports. There are 4
elongated cartridge outlets at the rear of the guns right under the fuselage
centre section that also needed to be opened. The propeller spinners are
separate and I found best to drill a 2mm diam. shallow hole to take these before
fixing with super glue. The best way to assemble the blades was to fix the
opposing blades first and at the same time ensure that the leading edge of the
blades faces the unticlockwise rotation of the propeller. A small hole was also
drilled in the centre at the back of each spinner. This ensures the exact
centering of the props with the nacelles. Finally an 'L" shaped tiny antenna
was added under the starboard wing referring to the Welkin photo given at the
centre of the picture page. Two other whip type aerials were added, one on top
and the other under the fuselage. I made these out of thin steel wire in
preference to the resin ones provided for obvious breakage reasons.
| COLORS & MARKINGS |
I added interior dry brush
detail to the grey green cockpit with instrument panel, radar equipment and
control column in black. Added also seat straps, whichI then allowed to dry and
the whole s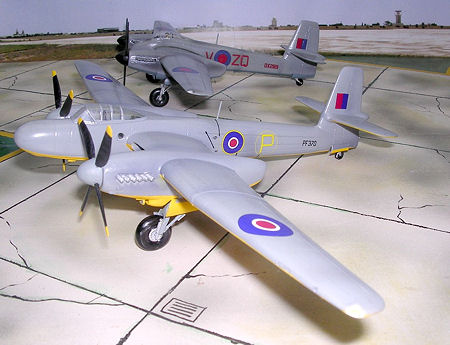 etup were covered
with a very clear cockpit canopy. I preferred to replace the wing tip light
clear parts with others made from thick plastic. Two porthole windows at the
side of the cockpit were covered in Kristal Klear in preference to the clear
parts given.
etup were covered
with a very clear cockpit canopy. I preferred to replace the wing tip light
clear parts with others made from thick plastic. Two porthole windows at the
side of the cockpit were covered in Kristal Klear in preference to the clear
parts given.
| CONCLUSIONS |
I am pleased with this second model of the Welkin. I have placed it alongside the Welkin Mk1 by Hallam-Vac. In doing so I have also completed a short time in history before the new generation of 2 seat jet night fighter started to appear in post war operational service. As with most short run kits the CMR model of the Welkin requires some clean-up to do before assembly and this combined with a little effort for the little extra work needed will bring an unusual aircraft. This is a limited run resin model, and in view of this few modellers will have on their accurate scale model shelves.
November 2006
If you would like your product reviewed fairly and quickly, please contact the editor or see other details in the Note to Contributors.