Pavla 1/72 Lysander
| KIT #: | ? |
| PRICE: | $ |
| DECALS: | Three options |
| REVIEWER: | Carmel J. Attard |
| NOTES: | Short run multimedia kit |
| HISTORY |
Way back
in early 1935 a specification was issued by the Air Ministry calling for an Army
aircraft capable of short take off and landing from rough landing strips. Among
its request was to be suitable for artillery spotting, reconnaissance and light
bombing. The prototype was ordered and construction for a high wing monoplane of
an unusual wing design initiated by June. A long forward cockpit canopy provided
accommodation of a pilot and an observer. The aircraft had a fixed undercarriage
with 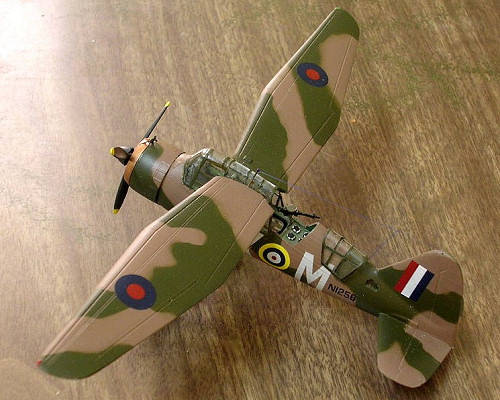 streamlined wheel spats. The prototype was K6127, (the same one that was
later modified for the P-12 project) made its flight on 15th June
1936.
streamlined wheel spats. The prototype was K6127, (the same one that was
later modified for the P-12 project) made its flight on 15th June
1936.
The aircraft was powered by a Bristol Mercury radial engine and became known to the RAF as “ Lizzie” short for Lysander. 189 Lysander Mk1 aircraft were ordered. The Lysander Mk2 was powered by Bristol Perseus provided better for field use. It entered service with 4,13,26,11, and 16 squadrons. Many Lysanders saw service in France as part of the British Expeditionary Force and suffered heavy losses during the battle of France. Other Lysanders were used for patrolling coastal areas and for Air Sea rescue. The MkII also saw service in Middle East and S.E Asia with 20 and 28 Sq. By early 1940, a total of 442 MkII were produced. The type also saw service with Turkish AF and Irish AF. Others were used by the Free French Forces in N.Africa.75 Lysanders were built under license in Canada, these being delivered to 110 Sq. RCAF.
The Lysander |Mk II was armed with two .303 Browning machine guns in the wheel spats. Another Lewis or Vickers gun was carried on a swivel mount in the rear cockpit. 20lb bombs could be carried on pylons fitted below the rear fuselage, other on stab wings mounted on the undercarriage legs. 120 lb or 250 lb bombs, supply drops or dinghies could also be carried below the stub wings. Another feature common on the Lysander was a message hook mounted under the fuselage and used for picking secret messages from territory occupied by the enemy. Only a handful are known to have survived and are still air worthy. Two of these are in the UK and a couple more in Europe. The Lysander has a span of 15.24M, and 9.30M long. It had a maximum speed of 332 Km/hr, and a service cealing of 9920 M and a range of 965 Km.
| THE KIT |
 three piece vacuum moulded clear canopy and decal sheet
there is an 8 page instruction booklet containing sequence of assembly, and side
views and plans for colour information and decal application. The decal sheet
which is of excellent quality with opaque colours and adheres very well offers
for a two RAF Squadron which are No 13 and No 225 for aircraft in dark earth and
olive upper camouflage and silver dope lower; and a Free French Force of
Escadrille ‘Rennes’ based in Tchad in 1942 finished in stone and dark earth
upper camouflage and azure blue undersurfaces. The kit parts are all contained
in separate sealed bags while the three-piece cockpit comes in a small bag.
three piece vacuum moulded clear canopy and decal sheet
there is an 8 page instruction booklet containing sequence of assembly, and side
views and plans for colour information and decal application. The decal sheet
which is of excellent quality with opaque colours and adheres very well offers
for a two RAF Squadron which are No 13 and No 225 for aircraft in dark earth and
olive upper camouflage and silver dope lower; and a Free French Force of
Escadrille ‘Rennes’ based in Tchad in 1942 finished in stone and dark earth
upper camouflage and azure blue undersurfaces. The kit parts are all contained
in separate sealed bags while the three-piece cockpit comes in a small bag.The instructions have 32 stages of construction. These can be followed easily but be advised that this is not the type of kit to go about rushing with assembly on one evening. If carefully followed the instructions contain enough information to enable one locate the exact position of parts in particular since it is a short run kit which may lack the location points on the fuselage that we are more used to find in mass produced kits nowadays.
| CONSTRUCTION |
The
initial stages cover the assembly and paintwork of instrument panel, pilot seat,
engine and cowling, wheel spats, observers cabin, and cockpit area. Sanding
rectified a slight disparity with wheel spats and finning at the meeting edges
and this may have 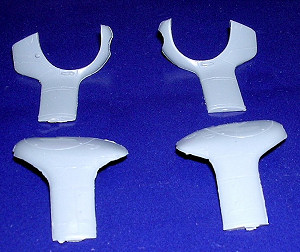 caused some loss of fine surface detail. The instructions
indicate in detail by means of sketch how the spats would take a new form once
the side guards are removed. This I found quite intriguing and I took the
liberty of drilling small holes outside the semi circular detail and all of the
four side guard panels were removed and then brought the desired shaped with a
caused some loss of fine surface detail. The instructions
indicate in detail by means of sketch how the spats would take a new form once
the side guards are removed. This I found quite intriguing and I took the
liberty of drilling small holes outside the semi circular detail and all of the
four side guard panels were removed and then brought the desired shaped with a
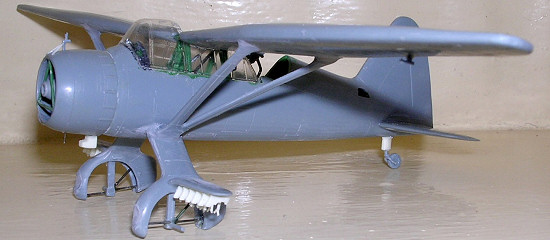
 half-round file. The four wheel spats halves were then fixed to form a pair with
the central vertical wheel bracket attached to the center from the upper end.
Reference to Scale Aircraft Modeller Vol 4 No 4 indicated to me that the exposed
wheel spats had the central bracket further supported by two rod like thinner
brackets, one placed at the top and another at the rear which were added before
the wheels were assembled on shaft. Then at a later stage another lightweight
bracket was fitted on the outer side of the wheels. This was made from a thin
plastic card, which had several drilled small holes before it was shaped to
taper and cut to size. (See picture).
half-round file. The four wheel spats halves were then fixed to form a pair with
the central vertical wheel bracket attached to the center from the upper end.
Reference to Scale Aircraft Modeller Vol 4 No 4 indicated to me that the exposed
wheel spats had the central bracket further supported by two rod like thinner
brackets, one placed at the top and another at the rear which were added before
the wheels were assembled on shaft. Then at a later stage another lightweight
bracket was fitted on the outer side of the wheels. This was made from a thin
plastic card, which had several drilled small holes before it was shaped to
taper and cut to size. (See picture).
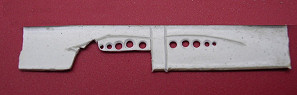
 The
fuselage interior is highly detailed for a small-scale kit. A considerable
amount of framework is provided and one can make this look more authentic by
thinning down the section of the components. You should also take time to define
the location point by yourself by referring to a cut away side view given at
stage 17. Finding the correct location point for best fit is essential so that
this will not foul with roof of canopy at some later stage. Towards the rear,
just ahead of the fin there are two inspection windows, rectangular in shape. In
my kit there was only one, which was cut open on the port fuselage halve. The
one on the starboard halve was drilled and shaped to conform with the other.
Both windows received a drop of Kristal kleer at a later stage. Among the
cockpit detail is also found a large oval shaped fuel tank. This had rear
brackets and was a sub assembly on its own, fitted on the rear fuselage space.
Having painted the interior green other pieces as seats, gun, coaming were also
painted in their respective colour given and after drying the two fuselage
halves were joined together. The vacform three-piece canopy was carefully cut
and tried times over for the best fit. Being a vacform type, this is thin and
very clear and so showed the interior to the best advantage. I could have
decided to mount the cockpit pieces in the closed position as I found them to
fit so well however I decided to leave the rear-sliding canopy in the open
position as the raised gun on its mount was very prominent and gave the Lysander
a more war like appearance. There are also four or five spare rounds of
ammunition that are stored on the gunner desk at the rear that were carefully
painted and displayed accordingly. I never recon
The
fuselage interior is highly detailed for a small-scale kit. A considerable
amount of framework is provided and one can make this look more authentic by
thinning down the section of the components. You should also take time to define
the location point by yourself by referring to a cut away side view given at
stage 17. Finding the correct location point for best fit is essential so that
this will not foul with roof of canopy at some later stage. Towards the rear,
just ahead of the fin there are two inspection windows, rectangular in shape. In
my kit there was only one, which was cut open on the port fuselage halve. The
one on the starboard halve was drilled and shaped to conform with the other.
Both windows received a drop of Kristal kleer at a later stage. Among the
cockpit detail is also found a large oval shaped fuel tank. This had rear
brackets and was a sub assembly on its own, fitted on the rear fuselage space.
Having painted the interior green other pieces as seats, gun, coaming were also
painted in their respective colour given and after drying the two fuselage
halves were joined together. The vacform three-piece canopy was carefully cut
and tried times over for the best fit. Being a vacform type, this is thin and
very clear and so showed the interior to the best advantage. I could have
decided to mount the cockpit pieces in the closed position as I found them to
fit so well however I decided to leave the rear-sliding canopy in the open
position as the raised gun on its mount was very prominent and gave the Lysander
a more war like appearance. There are also four or five spare rounds of
ammunition that are stored on the gunner desk at the rear that were carefully
painted and displayed accordingly. I never recon
 finding this ammunition detail
feature in any previous three Lysander kits made by three different kit
manufacturers and even here Pavlamodels deserves extra marks. Whereas the front
canopy section was more conveniently painted when it was on its own and
afterwards assembled in place when dry, the top small roof canopy section was
left to a later stage and fitted after the wings were fixed and correctly
aligned on the four protruding side lugs. The locating holes found at the wing
root for these lugs were re-drilled to ensure they are deep enough for a snug
fit. This was done with a 1mm Diameter drill.
finding this ammunition detail
feature in any previous three Lysander kits made by three different kit
manufacturers and even here Pavlamodels deserves extra marks. Whereas the front
canopy section was more conveniently painted when it was on its own and
afterwards assembled in place when dry, the top small roof canopy section was
left to a later stage and fitted after the wings were fixed and correctly
aligned on the four protruding side lugs. The locating holes found at the wing
root for these lugs were re-drilled to ensure they are deep enough for a snug
fit. This was done with a 1mm Diameter drill.
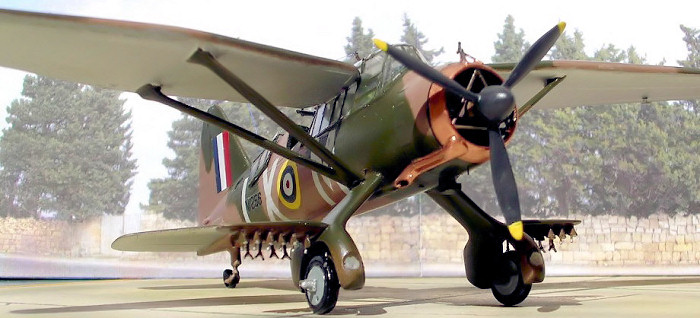
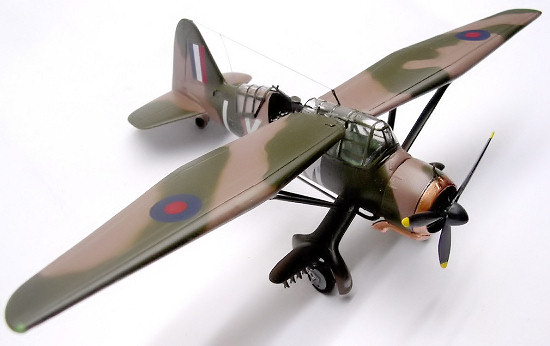
The main plane surfaces contain a great amount of surface detail and care was taken not to spoil any of it. At a first glance one may get the impression that they are slightly on the thick side towards the leading edge but this proved to be a false impression as this took a different appearance after it received the paintwork. The wing support brackets were carefully assembled in place. A special bonus that comes with the kit is the provision of 12 accurate and highly detailed bomb racks that will go on the spats winglets. These are fixed in position marked by faint impressions using super glue as they are in resin. The kit also contains alternative air intakes that fits on lower of cowling. The prop comes in four parts, a central shaft part in resin and three prop blades that are assembled at 120 degrees to each other. An accurate size spinner is then fitted in front. A resin mast is also provided and is shown to fit perpendicular, in fact in reality this should be fitted at an inclination towards the center. I drilled a blind hole to locate this antenna and replaced the resin one with one made from steel pin. A wireless made from invisible thread connected the pin o a hole on the upper fin and another wireless coming out of upper fuselage as indicated on cover side views. A message hook was fitted under fuselage. This is a feature part that I never recall being issued in previous Lysander kits.
| COLORS & MARKINGS |
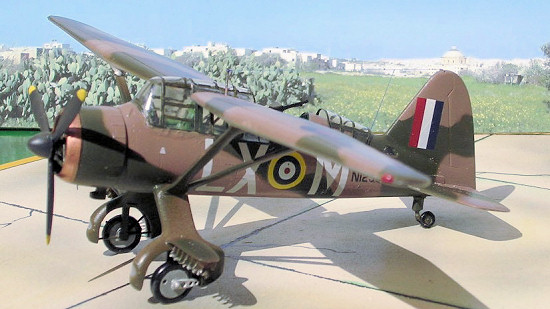 The
model was ready for paintwork. The lower surfaces of wings were painted in a mix
of a local Hempel brand of silver mixed with Humbrol semi matt varnish and a few
drops of white. These areas were masked and the upper wing surfaces and fuselage
wrap round received the dark earth and green standard camouflage using Tamiya
paints. The front of cowling was given a coat of bronze shade. The painted
model was given time to dry then given a coat of floor polish liquid to smoothen
down the matt nature of the surface and allow decals to adhere more effectively.
Finally after applying all the decals the kit was given a coat of semi matt
varnish and the wheels were then inserted in place with the outer horizontal
bracket added.
The
model was ready for paintwork. The lower surfaces of wings were painted in a mix
of a local Hempel brand of silver mixed with Humbrol semi matt varnish and a few
drops of white. These areas were masked and the upper wing surfaces and fuselage
wrap round received the dark earth and green standard camouflage using Tamiya
paints. The front of cowling was given a coat of bronze shade. The painted
model was given time to dry then given a coat of floor polish liquid to smoothen
down the matt nature of the surface and allow decals to adhere more effectively.
Finally after applying all the decals the kit was given a coat of semi matt
varnish and the wheels were then inserted in place with the outer horizontal
bracket added.
| CONCLUSIONS |
I enjoyed going step by step in making the Lysander model and it was worth the extra time that the assembly merited in view of extra parts that come with the kit. Exactly a year ago I visited Hendon RAF museum and I can tell that the kit was just like the real thing. An interesting issue by Pavlamodels indeed.
July 2006
Copyright ModelingMadness.com. All rights reserved. No reproduction in part or in whole without express permission from the editor.
If you would like your product reviewed fairly and fairly quickly, please contact the editor or see other details in the Note to Contributors.