|
KIT # |
60747 |
|
PRICE: |
$23.00 |
|
DECALS: |
See review |
|
REVIEW |
|
|
NOTES: |
|
|
HISTORY |
|
KIT # |
60747 |
|
PRICE: |
$23.00 |
|
DECALS: |
See review |
|
REVIEW |
|
|
NOTES: |
|
|
HISTORY |
Note: historical introduction by the editor.
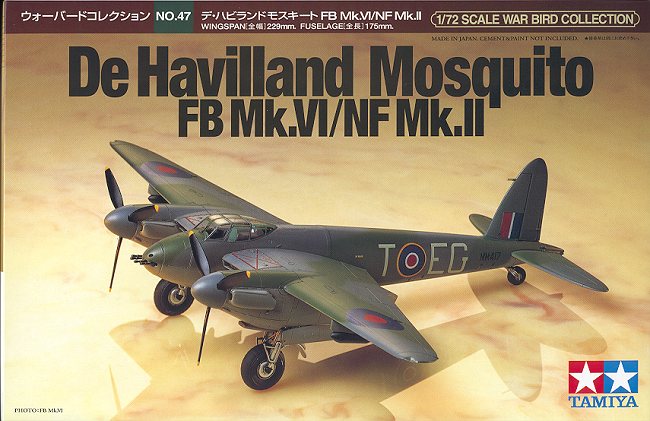
DeHavilland's superb wooden wonder, the Mosquito was not only a highly regarded aircraft during the war, but was one of those types that found widespread use after WWII. It was exported to a number of diverse countries such as Israel and the Dominican Republic. In addition, those Allied countries who supplied pilots and crews for RAF squadrons often got to keep their aircraft as the squadrons returned to their home countries in Europe.
One of those countries was France. Like Czechoslovakia, they used the Mosquito for a number of years after WWII. Like many of the European countries that had overseas colonies, the French found that there was a lot of desire by the people living in those colonies to be free from European domination. Probably the most immediately troublesome are for France was Indochina, which encompasses the current countries of Laos, Cambodia and Vietnam. It was here, and mostly in Vietnam, that the French put forward a half-hearted effort to stop Ho Chi Mihn and his Communist backed forces from succeeding in taking over the country.
Needless to say, the French failed, the country was divided in 1954 and eventually the US got involved and had to go through all of that again. This theater saw the use of a number of interesting WWII types, all by the French as the enemy had no air power at all. Besides Bearcats, Hellcats and even Spitfires and Ki-43 Oscars (!), the Mosquito was one type used. It did not fare too well as the wooden airframe required quite a bit of maintenance in the hot, humid environment. After a short use, they were removed from service. For more information on the French in Indo-China, you should visit Will's website.
THE
KIT Although the classic Airfix kit has offered a fairly decent
portrayal of the fighter Mossie for many years, we have recently been blessed by
a spate of state of the art kits from Japan. In my mind, the pick of the crop is
Tamiya's new FB.VI, clearly based on their excellent 48th scale kit. The kit
features crisp recessed panel lines (where appropriate), a well-detailed cockpit
with sidewall detail moulded into the nose halves, optional exposed or covered
five stack exhausts, narrow or paddle blade props, bombs, rocket projectiles or
slipper tanks for the wings, two styles of wheel hubs (spoked and plain) and
parts to build an NF.II, including a radar scope for the cockpit. The canopy is
well-molded and crystal clear, with a separate side panel offering plain or
slightly bulged styles. Relevant canopy frames are molded on the inside only,
and are included as small strips of interior green colour on the decal sheet.
Parts breakdown is typical, with a break in the fuselage just forward of the
wing to offer a separate nose for upcoming variants. The wing is flush mounted
to the fuselage, with a pair of short spars to mount to. The nacelles feature
some rib and stringer detail in the wheel well section. CONSTRUCTION Assembly begins with the cockpit, with benefits from some
careful painting, a spot of putty in some prominent ejector pin marks, and some
scrap plastic to cover up the holes in the back faces of the radio gear. Seat
belt decals are provided, but I replaced these with masking tape and scrap
plastic for the buckles. I replaced the lens of the gunsight with a piece of
scrap rather than trying to clean up the seam that runs directly through its
centre. The completed cockpit floor mounts to the wing spar assembly. When I
mated the fuselage halves, I left this section loose, to allow for alignment of
the wings. Wing and nacelle assembly went generally very well, with the
only problem area at the rear of each nacelle, where the top surface of the wing
joins the nacelle halves, leaving a noticeable step. This is actually evident on
the boxtop model! I also had a bit of a gap at the front of one of the
undercarriage bays. The seams inside the bays on the front and rear bulkheads
are difficult to clean up, but could be concealed with some scrap plastic. The
front seam is largely concealed by the well-detailed main gear assembly. The
main gear assemblies look great and are quite sturdy. The only detail I added
was to drill out four lightening holes in each mudguard. The canopy is beautifully clear. The separate side panel fit
perfectly. I secured it with a bit of PVA, then dipped the works into Klear.
Once this had set, I started applying the internal canopy frames. These gave me
a bit of a problem- firstly, if you apply them like a conventional decal, you
won't get a nice interior green strip visible through the canopy, you'll get a
narrow white strip, bordered by interior green. This is due to the underprinting
of white on the decals- to fix it, you'll need to apply the decals upside down.
I also had to trim the clear film from the strips, making them rather fragile.
Still, I managed to get them all laid down in the appropriate spots without too
much hassle. I used Klear to help settle the decals down. I then went for
another complete canopy dip into the Klear, which unfortunately sent half the
framing floating off! Quickly recovering from disaster, I fixed what I could,
and replaced the rest with framing made from clear decal film sprayed cockpit
green, overcoated with Micro Decal Film. By this time the Klear build-up was
getting a little thick, causing some distortion. Getting rather tired of this
whole framing deal, I got out the PVA and plopped the canopy into place, with an
excellent fit to the fuselage.
 The fuselage parts went together very well. The fuselage seam
became almost invisible with a little light clean up. I applied a touch of CA to
a few areas on the underside seam as well. The bomb bay doors (molded shut)
stand slightly proud of the fuselage, but I thought that this looked acceptable.
About the worst fitting part on the fuselage was the insert with the 20 mm
cannon muzzles (beautifully molded, though). The nose cap fit perfectly, though
I had my doubts about the safety of the protruding barrels during subsequent
assembly and handling. All 8 barrels benefit from a quick boring-out with a
sharp knife or drill. While I had the knife out, I also bored out all 20 exhaust
stacks (thankfully it was only a single stage Merlin), which was quite tedious
and fiddly. The holes in the stacks are elliptical in shape, which makes the job
that much harder. The carburetor intakes are moulded solid, so I drilled these
out as well.
The fuselage parts went together very well. The fuselage seam
became almost invisible with a little light clean up. I applied a touch of CA to
a few areas on the underside seam as well. The bomb bay doors (molded shut)
stand slightly proud of the fuselage, but I thought that this looked acceptable.
About the worst fitting part on the fuselage was the insert with the 20 mm
cannon muzzles (beautifully molded, though). The nose cap fit perfectly, though
I had my doubts about the safety of the protruding barrels during subsequent
assembly and handling. All 8 barrels benefit from a quick boring-out with a
sharp knife or drill. While I had the knife out, I also bored out all 20 exhaust
stacks (thankfully it was only a single stage Merlin), which was quite tedious
and fiddly. The holes in the stacks are elliptical in shape, which makes the job
that much harder. The carburetor intakes are moulded solid, so I drilled these
out as well.
|
PAINT & DECALS |
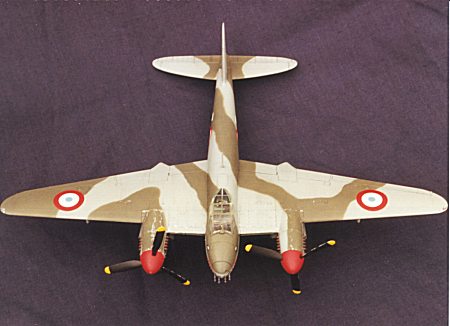
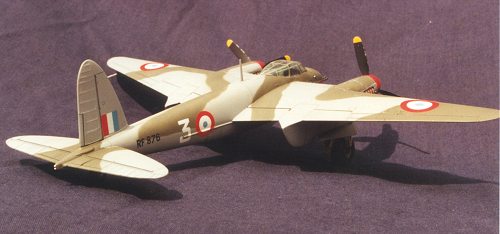
After a coat of primer and some preshading in black, I applied a light coat of medium sea grey overall. I decided to experiment a bit with the camouflage- I can paper masks for the grey areas and held them down with rolled-up masking tape. This held the masks off the surface slightly to give a small amount of overspray. Photos of the actual a/c show a soft demarcation between the green and the grey on the nose.
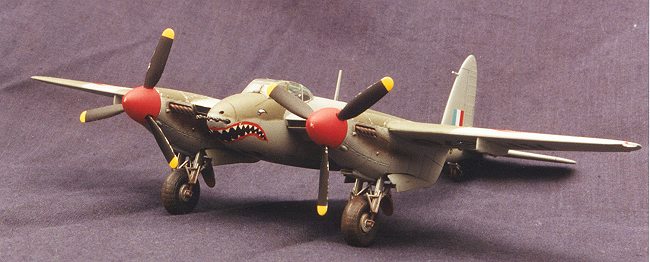
 While interesting Mosquito colour schemes abound, for me the
choice was made- for my collection of aircraft of the French Indochina and
Vietnam wars, it had to be the sharkmouthed aircraft of GC Corse depicted
on Carpena's Indochina Part 1 sheet (72.04). While studying my references, I hit
a bit of a problem. I'm hardly a member of the colour police, and I'm unlikely
to tell anyone that their camouflage scheme doesn't match the tech order, but I
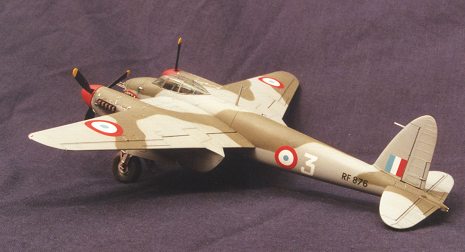
do strive for accuracy where I can. All my photos of RF 876 (the shark-mouthed
a/c) show the port side of the forward fuselage. The photo in Squadron-Signal's
VNAF shows the same side, as the negative has been reversed. From this picture,
it appears the entire nose is green, as is the inboard side of the starboard
nacelle. Checking with established schemes, this doesn't match either the
standard scheme (green nose, grey inboard to starboard nacelle) or the reversed
scheme (grey nose, green inboard to starboard nacelle). I realise these schemes
were not set in stone, but looking at other Mosquito photos, it appears the
scheme were fairly closely adhered to. I ended up going for a standard scheme,
with the green continued over the entire starboard nacelle.
While interesting Mosquito colour schemes abound, for me the
choice was made- for my collection of aircraft of the French Indochina and
Vietnam wars, it had to be the sharkmouthed aircraft of GC Corse depicted
on Carpena's Indochina Part 1 sheet (72.04). While studying my references, I hit
a bit of a problem. I'm hardly a member of the colour police, and I'm unlikely
to tell anyone that their camouflage scheme doesn't match the tech order, but I
do strive for accuracy where I can. All my photos of RF 876 (the shark-mouthed
a/c) show the port side of the forward fuselage. The photo in Squadron-Signal's
VNAF shows the same side, as the negative has been reversed. From this picture,
it appears the entire nose is green, as is the inboard side of the starboard
nacelle. Checking with established schemes, this doesn't match either the
standard scheme (green nose, grey inboard to starboard nacelle) or the reversed
scheme (grey nose, green inboard to starboard nacelle). I realise these schemes
were not set in stone, but looking at other Mosquito photos, it appears the
scheme were fairly closely adhered to. I ended up going for a standard scheme,
with the green continued over the entire starboard nacelle.
With the paint touched up, I applied a coat of Humbrol Gloss Clear in preparation for the markings. Based on previous experience, I also coated the Carpena decals I intended to use with gloss clear to prevent break up. I then had to trim almost all the carrier film from each image. For the most part the decals went on well. I recommend cutting the underwing serials into individual letters- this will certainly help them get around the bomb pylons. I left the sharkmouth to last. My poor expectations of this were realised. The decal doesn't flex well, so you'll need a lot of cuts to get it around the compound curve of the nose. The shape also seems a bit off- the mouth doesn't come far enough up the sides of the nose. I cut mine in half in the middle, placed the sides at the appropriate height, and later painted in the teeth in the centre to connect the two halves. After the decals had been left to set for a week or so (actually I was busy doing other things), I found a few spots of milky white had appeared in the finish. All was not lost, however, as these disappeared under an application of Klear.
Next I applied a wash of black and burnt sienna watercolours. As the wash dried I wiped most of it off. Given the small number of panel lines, etc. present on the actual aircraft, I kept the wash to a minimum. I then painted on some chipped metal around the cowl panels and props. Next I overcoated the aircraft and various bits (gear doors, props, etc.) with Humbrol clear flat. After leaving this to dry for a day, I unmasked the canopy and the landing lights (which I had masked with blobs of PVA glue). As usual, I managed to bugger up the canopy masking. The tape had lifted slightly off the tightly curved areas at the top of the side panels, leaving slight overspray. I also managed to forget to mask one of the eyebrow windows completely! Careful scraping removed the paint in the offending areas, but a bit of further clean up was required.
|
CONCLUSIONS |
 At this point the kit was starting to look a lot like an
aeroplane. With a very dark brown paint I added exhaust stains and weathered the
exhausts, which I had left unattached until this point. I then added the
exhaust, the landing gear and doors, the props and the pitot head on the tail.
After cleaning up the wingtip light lens, I drilled a 0.5 mm hole in the back of
each to represent the bulb, which I then touched in with a toothpick and a dob
of red and green paint. I attached these with PVA glue. Finally, a spot of
touch-up, on with the props, some drybrushed mud on the tyres and mudguards, and
the kit was done. I was pretty happy with the end result, but then again, when
you start with a kit of this quality, you have to work to bugger it up!
At this point the kit was starting to look a lot like an
aeroplane. With a very dark brown paint I added exhaust stains and weathered the
exhausts, which I had left unattached until this point. I then added the
exhaust, the landing gear and doors, the props and the pitot head on the tail.
After cleaning up the wingtip light lens, I drilled a 0.5 mm hole in the back of
each to represent the bulb, which I then touched in with a toothpick and a dob
of red and green paint. I attached these with PVA glue. Finally, a spot of
touch-up, on with the props, some drybrushed mud on the tyres and mudguards, and
the kit was done. I was pretty happy with the end result, but then again, when
you start with a kit of this quality, you have to work to bugger it up!
|
REFERENCES |
VNAF- South Vietnamese Airforce 1945-1975 by Jim Mesko. Squadron/Signal Publications
deHavilland Mosquito. Arco/Aircam Aviation Series no. 28
Copyright ModelingMadness.com. All rights reserved. No reproduction in part or in whole without express permission from the editor.
If you would like your product reviewed fairly and quickly , please contact the editor or see other details in the Note to Contributors.
Back to Reviews Page 2024