Hobbycraft 1/48 MS.406
1587
$9.00
Three aircraft
Photos by Lee
Kolosna
KIT #
PRICE:
DECALS:
REVIEWER:
Stan Pearce
NOTES:
|
HISTORY |
After reading Scott’s comment about never having seen this kit built in his preview on MM2 around Thanksgiving, I thought I throw up a few pictures of my full build and some quick comments about this kit.
See Scott’s preview for a history of the 406…
Well here she is, and where do I start? I guess my desire to build this A/C actually came from a desire for a fun camo paint job. My want of this aircraft was more about spraying the paint than building the plane. After reading the joint review of the CA MS 406 and MB 152 the gerbils in my head started spinning wheels.
 The CA
MS406 had a so-so review (it is limited run) and was proclaimed very buildable.
The MB 152’s review was shall we say not flattering. That’s when I came across
the Hobbycraft MS406 kit. I have built many HC kits, and have had varying
degrees of satisfaction, from Sea Furies that are quite nice to the La-7 that
you have to love to build nicely to a JU-87 which is one of the few kits I ever
threw away.
The CA
MS406 had a so-so review (it is limited run) and was proclaimed very buildable.
The MB 152’s review was shall we say not flattering. That’s when I came across
the Hobbycraft MS406 kit. I have built many HC kits, and have had varying
degrees of satisfaction, from Sea Furies that are quite nice to the La-7 that
you have to love to build nicely to a JU-87 which is one of the few kits I ever
threw away.
My goal was to build a quick and easy MS 406, and see how it would compare to the CA kit. Cost of the kit was $9.00 US at the hobby shop and to that I added a cockpit from TD $8.00 US, a Squadron Vacuform Canopy $3.00 US and a set of Aeromaster Decals 48-455 $7.00 US. That rounds it out to 27 bucks US which was maybe 3-5 dollars cheaper than the CA kit at the time of building.
Despite several glaring errors I made on this kit, (mostly due to a lack of care for the subject matter) I had fun building this kit.
|
THE KIT |
This is a typical run of the mill Hobbycraft kit. Opening the box, I was neither horrified nor ecstatic. The basic outline looked MS 406ish (this is a plane I don’t care enough about to measure) and quality of the moldings looked OK OOB. The panel lines (few due to a lot of wood construction) are a bit deep but acceptable. There is a mix of raised and engraved panel lines. The fabric fuselage stringer detail is a bit heavy-handed, but again acceptable when compared to HC’s La-7’s empennage or say an ICM Yak. Typical Spartan HC cockpit, and first thing noticed was the wheel well inserts lacking any detail (more on this later) Canopy was a tad thick, but very clear OOB. It has an option to be poised open, but I felt the thickness of the kit part would cause it to ride high. On closer inspection, I noticed the Vertical Stab rudder profile was a tad square. This would need some recontouring.
|
CONSTRUCTION |
This kit is mostly a no brainer. The weak cockpit was discarded and replaced with the TD resin one, a drop fit, glued in from below after assembling the fuse halves. My seat had a large piece broken off, which was repaired with CYA glue, using wax paper to form the glue to the rear of the seat. The cockpit tub is a drop in fit, secured with epoxy forever. Some how I still managed to knock out the instrument panel, and had to try and re-glue it again. It’s not perfect, but ended up having to be satisfied with getting it back in there, after fiddling forever with the glue and tweezers.
 At this
time I began to notice the Rudder/Stab contour, and again being a b@#%$-slap
build I choose to use the sandpaper and file route. In truth, the Stab needs to
be taller, but I just re-contoured it. At this time I also drilled out the
exhaust stacks with pin vise, and again failed to cross check an incorrect
reference. The larger stack should have two small holes instead of one large
one. The exhaust openings are oblong, so a bit of rocking the drill bit is
necessary to get the correct shape. I also chose not to open the vents on the
forward cowl which I assume are oil cooler vents (?)
At this
time I began to notice the Rudder/Stab contour, and again being a b@#%$-slap
build I choose to use the sandpaper and file route. In truth, the Stab needs to
be taller, but I just re-contoured it. At this time I also drilled out the
exhaust stacks with pin vise, and again failed to cross check an incorrect
reference. The larger stack should have two small holes instead of one large
one. The exhaust openings are oblong, so a bit of rocking the drill bit is
necessary to get the correct shape. I also chose not to open the vents on the
forward cowl which I assume are oil cooler vents (?)
The wing was next. First hint of trouble on opening the box was the wheel well inserts. Well the old hair on the back of the neck was correct. Not only was detail totally lacking, but the darn things didn’t fit. (The fit part sounds like the CA kit review) First consideration was to discard the inserts and scratch the well detail inside the wing. This would require using part of the insert for the gear struts, or scratching new struts as the kit struts would be too short. I’d love to proudly tell you I did that, but my heart wasn’t really in this kit that much. So too the disgust of the purist’s out there, shame on me, I came up with solution number two. Sand and file the inserts to fit, and just spray that void of detail in there flat black. Then relegate the kit to the rear of the display case!
 The wing
to fuse fit was excellent on the dorsal side, and poor on the rear ventral
join. The stringer detail in the fabric didn’t line up, and required a couple
applications of putty and quite a bit of filing with round files.
The wing
to fuse fit was excellent on the dorsal side, and poor on the rear ventral
join. The stringer detail in the fabric didn’t line up, and required a couple
applications of putty and quite a bit of filing with round files.
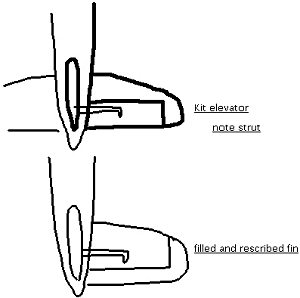
Around this time I decided to add the Horizontal Stabs and elevators. Immediately I noticed something amiss. After a bit of head scratching I realized the engraved line for the elevator and balance horn were engraved on BACKWARDS! (See drawing 1) I’m not sure if all are like this, but mine was definitely goofed up. I filled in the joint with putty and CYA, sanded and rescribed. The way the kit engraving was done would have the support strut attached to the elevator instead of the Stab. Somehow I think this design would lead to pitch control problems! Anyway it’s a quick no hassle fix…
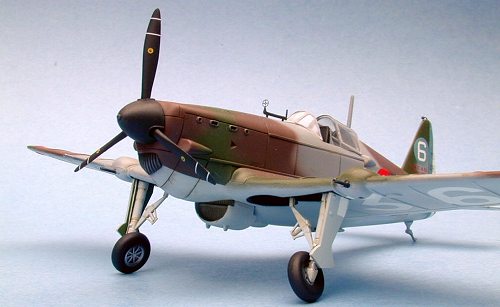
The radiator was added in the lowered position under the wing. There should be a V shaped actuator rod on the front of the radiator, and HC doesn’t provide one. I could have easily whipped one up, but after the wheel well, to be honest, I no longer cared. (Like I said earlier, I normally wouldn’t offer this build up to the masses) The kit wing guns were replaced with brass tubing as was the prominent pitot mast. Modelers that have kids will understand well this next goof. Just as I am drilling the guns and pitot, I get the familiar “Daddy I have to potty” call from the 2 yr old. After handling the frantic call, I return to drill and place the pitot in the wing. It is long, and prone to damage from handling, so I glued it in there with about a pound of 5 min epoxy. That thing wasn’t going to ever snap off on me! It is solidly attached forever, of course on the incorrect wing!
This little tidbit was noticed of course after paint, decals and clear coat. The trusty Dremel tool to cut and file the brass is now required and of course touch up paint. I’ll get around to it one day maybe. But not today… (Remember back of the cabinet)
The kit wheels, struts and doors were used, with a heavy dose of thinning of the gear doors. No I wasn’t drunk when I glued the wheel on, for once I got something right on this kit. A bit of seam line repair was required on the struts, but overall the level of detail is up to a Monogram/Revell type level. A small brake line was added from fine copper wire.
|
PAINT & DECALS |
References on early French WW2 aircraft are not as abundant as other nations. Most of these aircraft had short combat histories, and ended up in Axis powers’ possession. I found more pics of 406’s in Luftwaffe than I did in French colors.
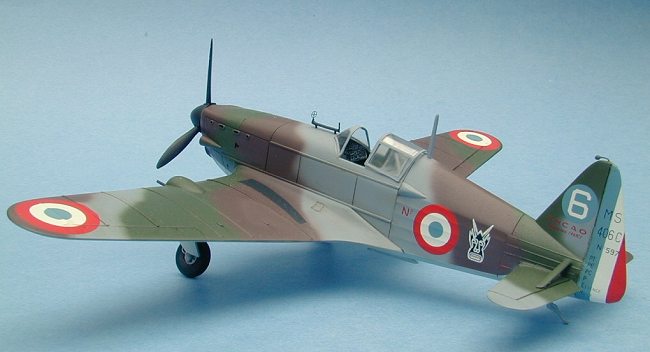
Originally the intention was to do a Vichy machine in it’s
red and yellow “slave pajamas” but after so many goofs in construction the
complex masking on the cowl was ruled out (by this time I had a Vichy P-36 in
the works) Pierre LeGloan's 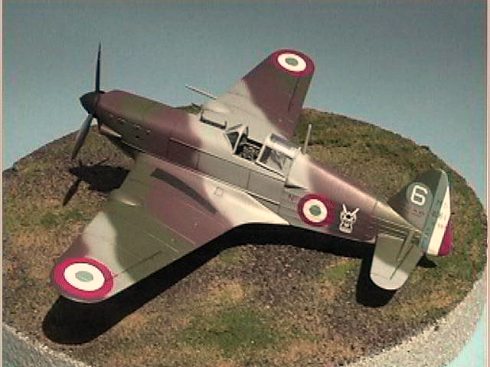 machine
was then selected and painted per the Aeromaster decal sheets instructions
48-455. ModelMaster paints where used and applied with a Badger 100 XF with a
gravity feed cup. The camo was shot freehand at very low pressure. Model
master metalizer sealer was used prior to decals and Testor's dullcoat for the
matte finish.
machine
was then selected and painted per the Aeromaster decal sheets instructions
48-455. ModelMaster paints where used and applied with a Badger 100 XF with a
gravity feed cup. The camo was shot freehand at very low pressure. Model
master metalizer sealer was used prior to decals and Testor's dullcoat for the
matte finish.
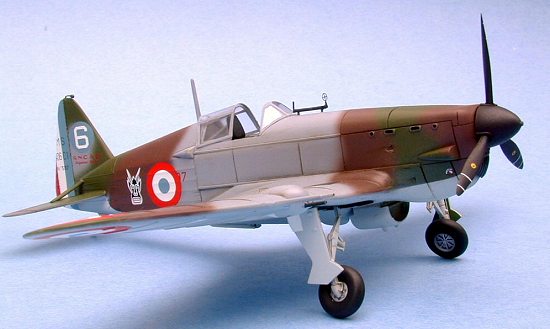
Weathering was done with a light wash of burnt umber oil/turp mix. These aircraft typically flew from sod runways and most of the pictures I have show a dirty finish.
The Squadron canopy fit so well, I was able to attach all of it after the aircraft and canopy had been painted.
The Aeromaster decals whet on very smoothly, except I damaged one of the blue circles that made up the lower wing roundel. I cut the blue circle from the Hobbycraft sheet, and immediately was pleased that I didn’t try and use the kit decals. I’ve had a full range of Hobbycraft decals from excellent to crap, and these qualified in the crap range. That blue circle fell over one of the wing stiffeners, and was impervious to softeners. It stood proud after repeated Micro-sol applications, and after about 4 apps of Walther’s solvent and some pressing with a q-tip (not for the feint of heart) it finally relented and snuggled down. But they are some of the thickest/toughest decals I had ever seen. After market decals for my kit was a must (maybe it was an older batch of decals, and no mfg’s name was printed on them). The Dorsal and ventral antenna’s were added OOB, and they are very thick. For a nice result thinning would be a must. The ventral antenna is of course stowed rearward on the ground. The kit iron gun site was cut off and discarded in favor of one of etched brass. After decaling with the appropriate Chauvier logo, the prop was added.
Adding the tail skid just about finished things up…
|
CONCLUSIONS |
For a French WW2 aficionado, I’d recommend the CA kit. It has a higher level of detail OOB, and a better outline IMHO. But with a little aftermarket and some work, (and more care and research than I did) a nice shelf sitter can be had from the HC kit. But since the cost of the aftermarket brings it in par with the CA kit, the CA 406 is probably a better deal for the money. If I ever (doubtful) build another, I’ll go the CA route. But still, except for trouble of my own making, HC’s 406 is definitely in the buildable category. Start to finish time was 4 days over 2 weekends.
Usually when I build a dog of a kit, I find myself wondering “why am I putting all this effort into this kit?” In retrospect with this 406, I ask myself, “Why didn’t I put more effort into this kit????”
|
REFERENCES |
Various websites, Kit instructions and Aeromaster Decal sheet
January 2003
If you would like your product reviewed fairly and quickly, please contact me or see other details in the Note to Contributors.