AMtech 1/48 P-40K Kittyhawk III
|
KIT #: |
|
|
PRICE: |
$25.00 when new |
|
DECALS: |
Four options |
|
REVIEWER: |
Tom Cleaver |
|
NOTES: |
Early
Aeromaster sheet,“Fighters Over The
Sahara”used. |
The RAF first ordered the Curtiss H-87A-1 Hawk following the prototype’s
first flight in 1940. These early
aircraft were known in service as the “Tomahawk.” When the H-87A-3, an improved
modification of the earlier design that first appeared as the P-40D in the
summer of 1941, it was ordered as the Kittyhawk I,” with most of these being
P-40E-1 aircraft. When it was
supplied under Lend-Lease, it was known as the “Kittyhawk
IA.”
The Tomahawk and Kittyhawk replaced the Hurricane as the RAF
air-superiority fighter, with both being considered superior to the Hurricane.
Once Spitfires became available in sufficient numbers in 1943, the
Kittyhawks were used more and more in the close air support role.
The rugged construction of the P-40 meant it had little difficulty
operating from primitive desert air strips.
The P-40K was a development of the P-40E that first attempted to solve
the problem of directional stability by adopting a vertical fin with an
increased area; later in production, the problem was solved by extending the
fuselage by approximately 12 inches.
Both versions were P-40Ks and all subsequent P-40s used the extended
fuselage.
 2
Squadron SAAF in the North African campaign:
2
Squadron SAAF in the North African campaign:
On
May 13, 1940,
Maj N.G. Niblock‑Stuart with 19 pilots and 24 ground‑crew left AFB Waterkloof
for
Cairo.
On
June 1, 1940
they began training on Gauntlets at Abu Seur.
Another group under the leadership of Lt S. van
Breda
Theron received training on Hurricanes and Furies before leaving for
Kenya
on May 22, 1940. While in
Kenya,
the Squadron received two Cheetah cubs as mascots and the name “Flying Cheetahs”
was born.
On the completion of the East African Campaign on
April 20, 1941,
half of the squadron left
East Africa
via
Durban
for the
Middle East.
On
May 2, 1941,
the rest of the squadron left
Durban
for the
Middle East,
where they were based at Amriya, first with Hurricanes, and later with
Tomahawks. On
December 4, 1941
ten 2 Squadron Tomahawks engaged more than 30 Stukas escorted by 20 C. 200 and
Fiat G.50 fighters. 2 Squadron
confirmed 6 enemy shot down and another 6 possibly shot down against a loss of
only 2 pilots. On December 10, Lt
Enslin was shot down and rescued and returned by Lt Lipawsky. During December
1941 and January 1942, 17 enemy aircraft were shot down, 5 possibly destroyed
and 13 damaged against the loss of only two 2 Squadron pilots. During the German
attack on the Gazala‑line in the spring of 1942, the Tomahawks were replaced by
Kittyhawks.
By the fall of 1942, the Kittyhawk units were increasingly used for close
air support in the fighting against the Afrika Korps. The German attack at
El Alamein
was stopped and a counter attack launched on October 23, 1942.
During October and November 1942, 2 Squadron, operating as
fighter‑bombers, still managed to claim 26 aircraft destroyed, 6 possibly
destroyed and 12 damaged. With the
termination of the North African campaign on
May 13, 1943,
the SAAF No 7 wing, comprised of No’s 2, 4 and
5 Squadrons, was considered the best dive bomber group in the North
African theater.
 Back in the late 1990s, my friend Alan Griffiths leased
AMT’s
molds for their P-40 series of kits and released them with various upgrades,
from better decals in each to an accurate resin nose for the P-40F and a resin
rear fuselage/vertical fin and rudder for the P-40K.
I was fortunate to receive more than one of the tails, and used one with
a Hasegawa 1/48 P-40E successfully.
For some reason I can’t remember because the model is really one of the better
P-40s I’ve done, this particular kit “stalled out” on final approach around 2004
- painted, decaled, etc. - then the box it was in got mislaid, then in the
course of moving to the house we now call “Le Chateau du Chat” it ended up in a
box of other unbuilt kits in the garage.
It was only rediscovered this past spring (when I was searching for
something else). With all the
recent brouhaha about the discovery of the 260 Squadron Kittyhawk I in the
Egyptian
Sahara,
I was stimulated to take it out of its box and finish it.
Interestingly enough, I also recently re-discovered the kit-supplied
decals for this project, and markings for a 260 Squadron Kittyhawk are included!
Back in the late 1990s, my friend Alan Griffiths leased
AMT’s
molds for their P-40 series of kits and released them with various upgrades,
from better decals in each to an accurate resin nose for the P-40F and a resin
rear fuselage/vertical fin and rudder for the P-40K.
I was fortunate to receive more than one of the tails, and used one with
a Hasegawa 1/48 P-40E successfully.
For some reason I can’t remember because the model is really one of the better
P-40s I’ve done, this particular kit “stalled out” on final approach around 2004
- painted, decaled, etc. - then the box it was in got mislaid, then in the
course of moving to the house we now call “Le Chateau du Chat” it ended up in a
box of other unbuilt kits in the garage.
It was only rediscovered this past spring (when I was searching for
something else). With all the
recent brouhaha about the discovery of the 260 Squadron Kittyhawk I in the
Egyptian
Sahara,
I was stimulated to take it out of its box and finish it.
Interestingly enough, I also recently re-discovered the kit-supplied
decals for this project, and markings for a 260 Squadron Kittyhawk are included!
The
AMT
P-40 kit needs no introduction; it’s been around for close to 18-20 years now.
The kit is not as detailed and accurate in small areas as Hasegawa’s P-40
series, but is far more “buildable” for the average “muddler” since none of the
kits are produced in modular form as are the Hasegawa kits, though as you can
see here the end result is certainly acceptable.
 I used the upgrade of an Aries resin cockpit I had on hand, and the resin
tail provided by AMTech. Going through the decal dungeon, I discovered a very
early Aeromaster release, “Fighters Over The
Sahara,”
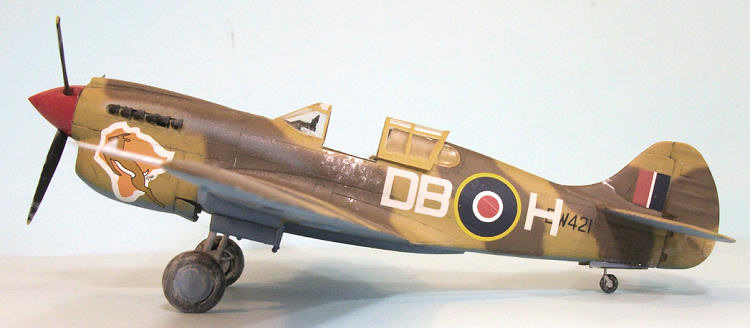
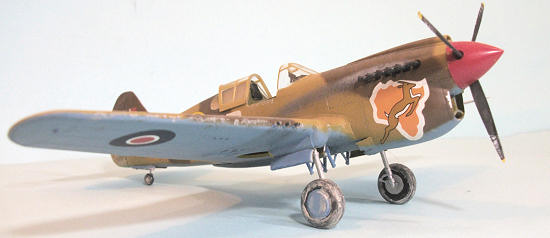
which included markings for a 2 Squadron SAAF Kittyhawk
III
with the very cool “Springbok of
Africa”
squadron marking, and determined I would use that.
I used the upgrade of an Aries resin cockpit I had on hand, and the resin
tail provided by AMTech. Going through the decal dungeon, I discovered a very
early Aeromaster release, “Fighters Over The
Sahara,”
which included markings for a 2 Squadron SAAF Kittyhawk
III
with the very cool “Springbok of
Africa”
squadron marking, and determined I would use that.
The first thing to do is cut off the tail.
The resin replacement fits along a panel line, which makes the later
assembly much easier than a Hasegawa kit, where the tail joint is between panel
lines.
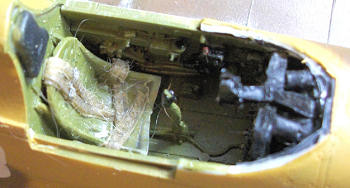
Among the real lacks of the
AMT
kit is a really-acceptable cockpit beyond very basic detail.
Any good resin cockpit from True Details, Aires, etc., will vastly
improve the final result. A True
Details vacuform canopy is also a very useful addition.
In assembling any model with a resin replacement cockpit, one needs to
remember to thin down the fuselage in the vicinity of the cockpit by about half
the original thickness, as well as
to thin down the sidewalls of the resin replacement till they are “paper-thin”
and you can see light through them, so that the cockpit will fit without
“bulging” the kit fuselage and thus widening it.
This is particularly important when building a model that has a one-piece
lower wing like this one (or any P-51), because if you fail to do this and have
a wider fuselage, forcing a fit of the fuselage sub-assembly and the wing
sub-assembly will lead to a loss of proper dihedral; by the time that condition
is discovered, it is far too late to fix the mistake.
Once the fuselage was glued together, I cut off the pour block from the
resin tail and filed the plug so the tail would slip easily into the fuselage
and attached it with cyanoacrylate glue.
Fit was overall excellent and needed no additional work past a light
sanding-down around the joint.
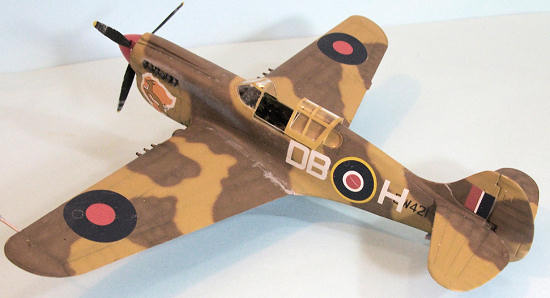
I then assembled the wing and attached it to the fuselage, as well as the
horizontal stabilizers.
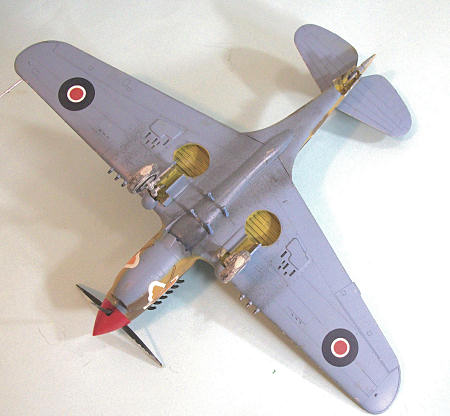
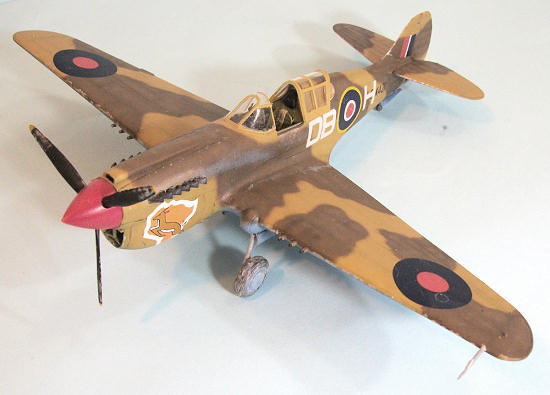
 The model was pre-shaded with flat black and then painted freehand with
Gunze-Sangyo “Dark Earth,” “Middle Stone” and “Sky Blue.”
It then received a coat of Future once the paint had cured (you need to
be careful with this when applying Future over Gunze, because if the paint isn’t
fully cured, it will develop little cracks over the surface under the Future -
give it a few days between painting and applying Future to be sure).
The various colors were post-shaded by adding a bit of light grey and
going back over panels, to simulate sun-fading in the harsh North African
environment.
The model was pre-shaded with flat black and then painted freehand with
Gunze-Sangyo “Dark Earth,” “Middle Stone” and “Sky Blue.”
It then received a coat of Future once the paint had cured (you need to
be careful with this when applying Future over Gunze, because if the paint isn’t
fully cured, it will develop little cracks over the surface under the Future -
give it a few days between painting and applying Future to be sure).
The various colors were post-shaded by adding a bit of light grey and
going back over panels, to simulate sun-fading in the harsh North African
environment.
The Aeromaster decals went on without a problem under a coat of
Micro-Sol.
 The model was washed to get rid of decal residue and then given a
coat of Micro-Gloss, followed by a thorough coat of Micro-Flat to kill all
shine and thoroughly sun-fade the scheme.
I then attached the exhausts, landing gear and prop.
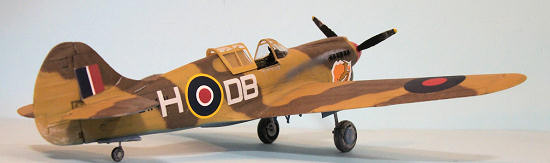
The model was “dinged” with Tamiya Flat Aluminum, particularly the
prop tips and the leading edges of the flying surfaces, which would have
been sand-blasted at every takeoff.
I used Tamiya “Smoke” over Tamiya “Sky Grey” to simulate exhaust
stains on the fuselage, with “smoke” applied for oil stains on the underside
and on the wings for gunfire residue.
I also “muddied” the landing gear and wheels.
I chose not to put a drop tank on, since the one provided had managed
to disappear. The canopy is
really too thick to sit down properly, and I strongly recommend if you build
one of these that you get the True Details P-40E vacuform canopy, which will
look incredibly better in the end.
(If I can get one, I will replace the canopy on this model.)
The model was washed to get rid of decal residue and then given a
coat of Micro-Gloss, followed by a thorough coat of Micro-Flat to kill all
shine and thoroughly sun-fade the scheme.
I then attached the exhausts, landing gear and prop.
The model was “dinged” with Tamiya Flat Aluminum, particularly the
prop tips and the leading edges of the flying surfaces, which would have
been sand-blasted at every takeoff.
I used Tamiya “Smoke” over Tamiya “Sky Grey” to simulate exhaust
stains on the fuselage, with “smoke” applied for oil stains on the underside
and on the wings for gunfire residue.
I also “muddied” the landing gear and wheels.
I chose not to put a drop tank on, since the one provided had managed
to disappear. The canopy is
really too thick to sit down properly, and I strongly recommend if you build
one of these that you get the True Details P-40E vacuform canopy, which will
look incredibly better in the end.
(If I can get one, I will replace the canopy on this model.)
This model is proof that “old kit” is not a synonym for “bad kit.”
The
AMT
P-40s are eminently buildable, with the AMTech releases all having nice
additions to make them better; even though they are all now long out of
production, you can find them on dealer’s tables at shows or on Evil Bay for a
reasonable price. Recommended for
anyone who likes the P-40.
Tom
Cleaver
May 2012
Kit courtesy of AMTech back
in the day.
If you would like your product reviewed fairly and fairly quickly, please contact the editor or see other details in the
Note to
Contributors.
Back to the Main Page
Back to the Review Index Page
Back to the Previews Index Page