Special Hobby 1/48 CA-13 Boomerang
| KIT #: | ? |
| PRICE: | $34.95 |
| MARKINGS: | Four options |
| REVIEWER: | Tom Cleaver |
| NOTES: | Limited run with resin parts |
| HISTORY |
 license-built version of the
Thus was born the “Boomerang,” the only indigenous Australian fighter
design to ever see production and combat.
Born of desperation, the Boomerang was perhaps the best improvisation
to ever take flight.
 Fortunately for
On May 29, 1942, a mere 16 weeks after being given the directive to
commence design work, the first CA-12 completed taxying trials and made its
first flight. Test pilot Ken
Fruin was elated by the performance of the new airplane.
It was highly maneuverable, with a climb rate better than the P-40,
Hurricane I or Spitfire I. The
airplane exhibited no problems, with its only minus being a top speed only
slightly in excess of 300 m.p.h.
In June, mock combats between the Boomerang and a P-40E and P-39D
were held, which revealed that at 10,000 feet the Boomerang could turn
inside both American fighters and outclimb both.
Even with a speed advantage and an ability to dive faster initially,
the P-40E could not evade the Boomerang.
The P-39 could dictate the terms of combat, but the Boomerang could
always outmaneuver the Airacobra.
The Boomerang was a winner, and was ordered into production, armed
with two locally-produced 20mm Oerlikon cannon (the prototype for which was
a war trophy brought back from North Africa by an Australian Army Sergeant),
and four .303 Browning machine guns.
In late 1942 and early 1943, 83 and 85 Squadrons RAAF became
operational with their Boomerangs, with 83 Squadron at
In late 1943, 4 Squadron began to operate Boomerangs alongside their
Wirraways in the close support role in 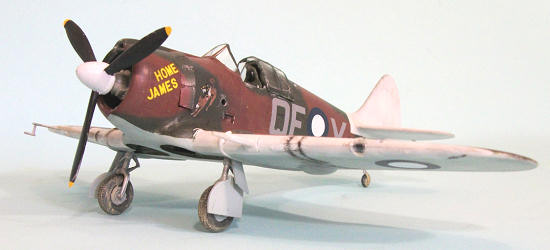 The Boomerangs were initially used to cover the Wirraways, but it was
found that the higher-powered Boomerang was perfect for maneuvering in
mountainous jungle valleys at low level to participate in combat.
Thus the Boomerang found its forte, where it became the favorite
airplane of the Australian Army as “Boomer Boys” - as the pilots came to be
known - searched out Japanese forces hidden in the jungle, knocking out the
target themselves with their cannon, or calling in Kittyhawk fighter-bombers
to finish off the Japanese targets.
5 Squadron began operating Boomerangs on Bougainville in 1944, where
their prowess was such that the RNZAF Corsairs stationed there - whose
commanders had concluded there were no worthy targets left - found
themselves well-employed in supporting Australian and New Zealander ground
forces on the island in their bloody struggle against the remaining Japanese
right up to the end of the war.
Boomerangs also operated over
The Boomerangs were initially used to cover the Wirraways, but it was
found that the higher-powered Boomerang was perfect for maneuvering in
mountainous jungle valleys at low level to participate in combat.
Thus the Boomerang found its forte, where it became the favorite
airplane of the Australian Army as “Boomer Boys” - as the pilots came to be
known - searched out Japanese forces hidden in the jungle, knocking out the
target themselves with their cannon, or calling in Kittyhawk fighter-bombers
to finish off the Japanese targets.
5 Squadron began operating Boomerangs on Bougainville in 1944, where
their prowess was such that the RNZAF Corsairs stationed there - whose
commanders had concluded there were no worthy targets left - found
themselves well-employed in supporting Australian and New Zealander ground
forces on the island in their bloody struggle against the remaining Japanese
right up to the end of the war.
Boomerangs also operated over
| THE KIT |
 There have been two other 1/48 kits of the Boomerang released in the
early 1990s, one very early, very primitive limited-run kit from Kiwi Aviation
Models, and one a less-primitive kit by
There have been two other 1/48 kits of the Boomerang released in the
early 1990s, one very early, very primitive limited-run kit from Kiwi Aviation
Models, and one a less-primitive kit by
This new release by Special Hobby makes all the other 1/48 kits obsolete.
The kit is accurate in shape and dimensions, and has one of the best
detailed OOB cockpits Special Hobby has ever put in a release. Surface detail is
petite and sharp.
The kit comes on four sprues of grey plastic, with a detailed resin
engine. The clear canopy can be
posed open. Decals are provided for
four different aircraft.
This kit differs from Special Hobby’s previous CA-12, in that it provides
a resin “hedgehog” exhaust, and the elevators do not have fabric effect, these
being the primary visual difference between the two variants.
| CONSTRUCTION |
As with all MPM products, the kit is “fiddly” and definitely short-run.
Test-fit three times before gluing once.
The very detailed cockpit would fit into the model more easily if one
sanded the fuselage sides so they were thinner. I didn’t do this because I was
concerned about sanding off the interior surface detail, but in the final result
the cockpit is tight enough you can’t see that anyway, so my recommendation is
sand away and get that area around the cockpit about half the thickness it is to
start with.
 There is a lot of fiddly detail with the engine accessories, which can be
seen through the open wheel well. I
decided that since the model was unlikely to be picked up very often, that I
would only do the major items, the other very small things looking like more
trouble than value. However, if you
are building this to enter in a contest, you may want to take the time to do all
this.
There is a lot of fiddly detail with the engine accessories, which can be
seen through the open wheel well. I
decided that since the model was unlikely to be picked up very often, that I
would only do the major items, the other very small things looking like more
trouble than value. However, if you
are building this to enter in a contest, you may want to take the time to do all
this.
Several other reviewers have claimed the cowling is too small for the
engine and resorted to shims to widen it enough to go around the engine.
This is nonsense. Once
inside the tight cowling, the outer edges of the pistons cannot be seen anyway.
Sand the engine down to fit the cowling, because the cowling is right to
fit to the fuselage.
I sanded the trailing edges of the wings and horizontal stabilizers from
the inside before gluing them together, to get thinner, more accurate-looking
trailing edges. The separate rudder
is also in two halves and needs the same treatment.
With careful fitting of the wing sub-assembly to the fuselage, you will
not need much putty on the joints, but you can’t get away with not using it.
I also puttied the fuselage centerline to get it smooth, then went over
all the joints with Tamiya Grey Surfacer to get everything nice and smooth.
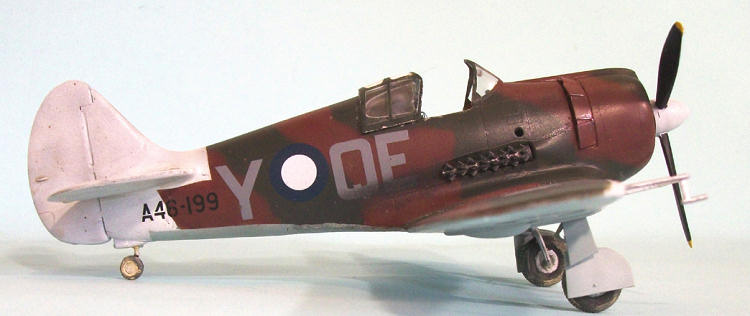
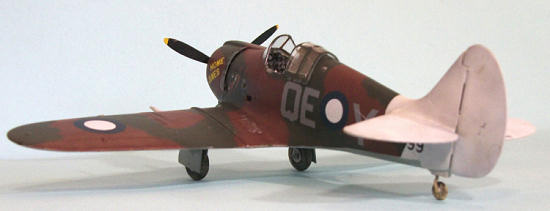
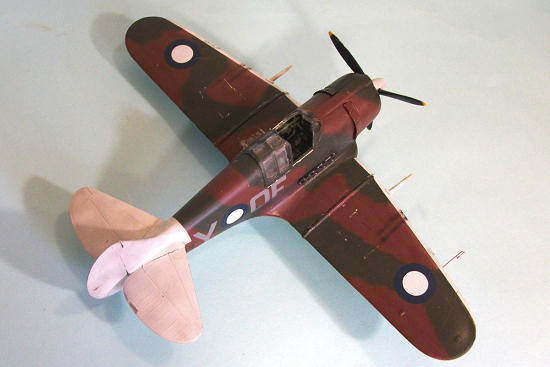
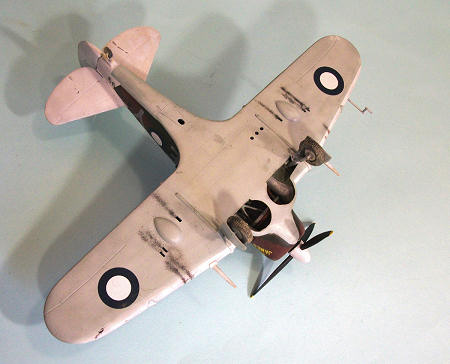
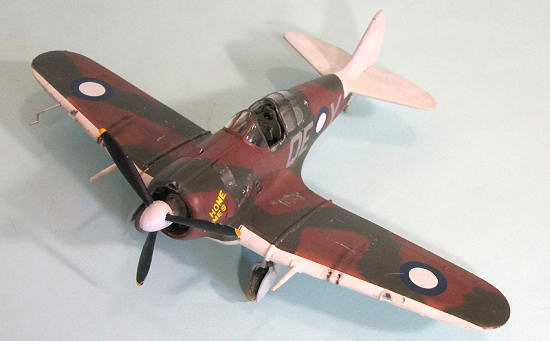
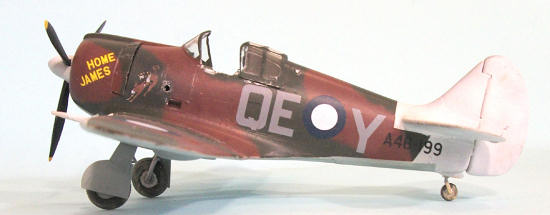
| COLORS & MARKINGS |
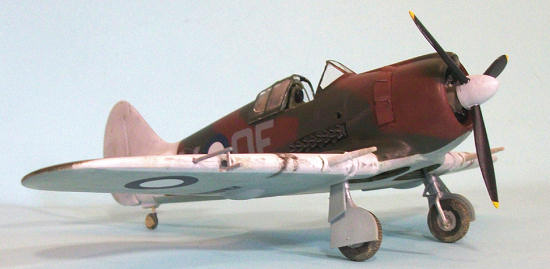 Checking in with Gary Byk at Red Roo Models, I found that a close
approximation of the Australian colors of “Dark Earth,” “Foliage Green” and
“Sky Blue” can be obtained by using Tamiya “Red-Brown” for “Dark Earth,”
“Black Green” for “Foliage Green,” and “Light Blue” (i.e., RLM65) for the
lower surfaces. After first
painting the tail and wing leading edges with Tamiya “Flat White” and
masking them off, I applied the camouflage pattern freehand and faded the
paint to imitate the tropic experience.
Checking in with Gary Byk at Red Roo Models, I found that a close
approximation of the Australian colors of “Dark Earth,” “Foliage Green” and
“Sky Blue” can be obtained by using Tamiya “Red-Brown” for “Dark Earth,”
“Black Green” for “Foliage Green,” and “Light Blue” (i.e., RLM65) for the
lower surfaces. After first
painting the tail and wing leading edges with Tamiya “Flat White” and
masking them off, I applied the camouflage pattern freehand and faded the
paint to imitate the tropic experience.
| FINAL CONSTRUCTION |
| CONCLUSIONS |
I have always liked the Boomerang, and am very glad to see it finally
kitted by a company that’s gotten things right.
I hope MPM/Special Hobby might give some thought to releasing this in
1/32 scale. This kit and the
CA-12 are definitely the best Boomerang kits on the market.
Highly recommended.
Thanks to HLJ for the review kit. Order yours at www.hlj.com
April 2012
If you would like your product reviewed fairly and fairly quickly, please contact the editor or see other details in the Note to Contributors.