| KIT: | Tamiya 1/48 P-51D Mustang |
| KIT #: | ? |
| PRICE: | $26.00 MSRP |
| DECALS: | ? |
| REVIEWER: | Tom Cleaver |
| NOTES: | Mustang 101 |
| HISTORY |
The 354th Fighter Group and the Invasion of France:
Having been placed under the operational control of the 8th Air Force to participate as a long range escort group during the Battle of Germany between December 1943 and the end of April, 1944, the 354th Fighter Group reverted that May to 9th Air Force for operational control and began tactical operations over northern France after a two week stint learning to dive-bomb. The Pioneers still found time to shoot down the Luftwaffe fighters that came up to oppose them on these missions. While they weren’t needed on D-Day itself, the group spent the next several days escorting supply drops to the paratroops by C-47s. After release from this duty, they flew long-range fighter sweeps behind the front, now that the Luftwaffe had arrived on the scene.
 On June 23, the group became “pioneers” in an additional sense when they became
the first USAAF unit based in Normandy, operating from A-2 at Criqueville on the
Normandy coast. The rest of the month was spent on sweeps against the Luftwaffe,
escort missions for B-26 Marauders, and dive-bombing the retreating Wehrmacht.
General Eisenhower visited the unit on July 4, 1944, during which he was given
an aerial tour of the St. Lo front in the group’s P-51B “hack” which had a
second seat installed in place of the fuselage fuel tank. Everyone breathed a
sigh of relief on the general’s successful return, since there was no way for
him to have exited the airplane in an emergency, due to the fact the folding
panel used for access was screwed shut from the outside.
On June 23, the group became “pioneers” in an additional sense when they became
the first USAAF unit based in Normandy, operating from A-2 at Criqueville on the
Normandy coast. The rest of the month was spent on sweeps against the Luftwaffe,
escort missions for B-26 Marauders, and dive-bombing the retreating Wehrmacht.
General Eisenhower visited the unit on July 4, 1944, during which he was given
an aerial tour of the St. Lo front in the group’s P-51B “hack” which had a
second seat installed in place of the fuselage fuel tank. Everyone breathed a
sigh of relief on the general’s successful return, since there was no way for
him to have exited the airplane in an emergency, due to the fact the folding
panel used for access was screwed shut from the outside.
On July 8, two flights led by Captain Lowell Brueland of the 355th FS had reached the limit of their fuel on an uneventful mission when they were directed against a large gaggle of 20 Fw-190 Jabos at low level and 40 Bf-109s at altitude. Brueland claimed two ‘109s in the first pass, with one more destroyed, a damaged and a probable in the ensuing low-level air battle. The flight scored 12 Bf-109s and Fw-190s, making it the largest individual air battle for the 354th during the fighting in Normandy.
In
mid-August, the group moved to A-31 near Monfort. Fighting was still tough - on
August 16th 16 P-51s engaged two different Luftwaffe gaggles,
claiming 13 destroyed for a loss of 4 of their own. The day after the
liberation of Paris, the group engaged in a ru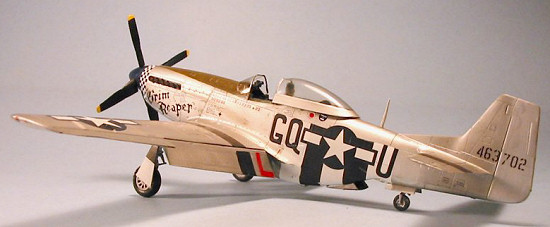 nning
air battle over Reims, Rethel and Beauvais, claiming 36 destroyed and following
up with an attack on Reims airfield where 12 more German aircraft were
destroyed, resulting in the award of a second Distinguished Unit Citation.
nning
air battle over Reims, Rethel and Beauvais, claiming 36 destroyed and following
up with an attack on Reims airfield where 12 more German aircraft were
destroyed, resulting in the award of a second Distinguished Unit Citation.
In mid-September the Pioneers moved to A-66 near St. Dizier, where they remained throughout the fighting in the fall of 1944. Moving to A-98 at Roiseres-en-Haye on December 1, the group was ordered to give up their beloved P-51s and equip with the P-47 Thunderbolt. This was recognition of the fact they were now primarily involved in ground support missions and strafing attacks against the Luftwaffe, like the mission on November 17 against Zellhausen where they destroyed 15 aircraft in what was their last big P-51 operation. Ground attack was a very dangerous mission in the P-51 since its liquid-cooled engine was far more vulnerable to ground fire than the P-47's R-2800 radial.
| THE KIT |
Please visit a preview for a look at what comes in the box.
| CONSTRUCTION |
Having looked over the collection of Mustang models submitted in the past few months here, it is obvious that modelers are still making many of the elementary mistakes it is possible to make in building the Tamiya P-51D. I thus decided to take one of my P-51Ds and examine in detail its construction, pointing out the areas to worry about and also how to solve some of the problems the kit’s design presents in creating an accurate model. If you follow what’s here, you’ll never have another problem in building another Mustang.
For a modeler building Mustangs in 1/48, the Gold Standard is the P-51B and P-51D produced by Tamiya. The kits are accurate in outline, and so outstandingly well designed that a modeler has to actively do something wrong to end up with a bad model.
For
those of us who believe - to paraphrase Hemingway about cats - that “one P-51
leads to another,” a very good alternative to the increasingly-expensive Tamiya
kits (I have seen the price rise from an MSRP of US$26.00 to US$32.00 recently)
is the ICM 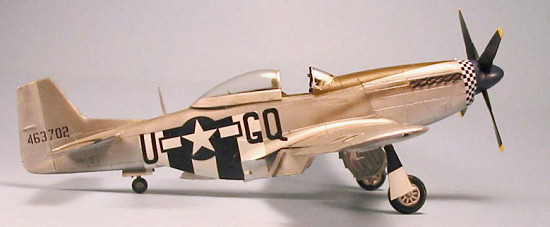 release
of the “Mustang Mk. IV” and “Mustang Mk. III” kits. These are currently out of
production, but can be found at kit collectors shows and on dealer’s tables at
model shows, where they generally go for around $10. These kits are so close to
the Tamiya kit that the major parts are interchangeable; a lawsuit over
infringement of copyright was avoided by basing the cockpits of both on the
Accurate Miniatures P-51A kit, which is completely inaccurate for either. Both
kits provide only the cuffed Hamilton-Standard or the Korean-era Aeroproducts
prop blades - fortunately, the Hamilton-Standard is correct for both. Also,
both kits have the same outer landing gear doors, which are only right for the
P-51D; fortunately, this is one of those things 99.9999999999% of us won’t
notice at a distance further than 6 inches, and it will be completely unnoticed
if you attach drop tanks. Both kits also only have the 75-gallon metal tanks.
release
of the “Mustang Mk. IV” and “Mustang Mk. III” kits. These are currently out of
production, but can be found at kit collectors shows and on dealer’s tables at
model shows, where they generally go for around $10. These kits are so close to
the Tamiya kit that the major parts are interchangeable; a lawsuit over
infringement of copyright was avoided by basing the cockpits of both on the
Accurate Miniatures P-51A kit, which is completely inaccurate for either. Both
kits provide only the cuffed Hamilton-Standard or the Korean-era Aeroproducts
prop blades - fortunately, the Hamilton-Standard is correct for both. Also,
both kits have the same outer landing gear doors, which are only right for the
P-51D; fortunately, this is one of those things 99.9999999999% of us won’t
notice at a distance further than 6 inches, and it will be completely unnoticed
if you attach drop tanks. Both kits also only have the 75-gallon metal tanks.
It’s generally said that, built-up, the ICM kits will be indistinguishable from the Tamiya original. This is almost true. The one place I find I can always spot an ICM kit is in the fact that the flaps are uniformly “short shot” with a bit of a “sag” in the lower surface of the flap. With the flap lowered, 98% of viewers will not notice this, but the anal-ists among us will want to fill that in, sand it smooth and spend some extra time rescribing the engraved rivet detail there.
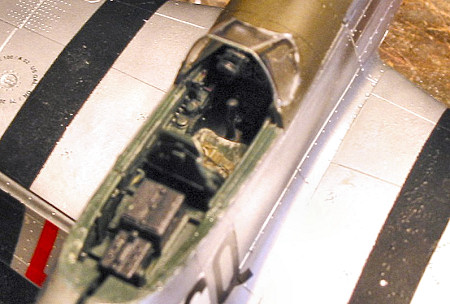 The major shortcoming of both the Tamiya kit and its ICM clone is the cockpit.
While the Tamiya version of the P-51D cockpit can be acceptable (and that for
the P-51B very acceptable) there are good resin cockpits for both versions. True
Details (Squadron) makes a really excellent cockpit for the P-51D that is also
relatively inexpensive at around US$7.00. Given the visibility of the P-51D
cockpit under that bubble canopy (open or closed) a modeler who wants to get the
most out of their model is well-advised to use this cockpit.
The major shortcoming of both the Tamiya kit and its ICM clone is the cockpit.
While the Tamiya version of the P-51D cockpit can be acceptable (and that for
the P-51B very acceptable) there are good resin cockpits for both versions. True
Details (Squadron) makes a really excellent cockpit for the P-51D that is also
relatively inexpensive at around US$7.00. Given the visibility of the P-51D
cockpit under that bubble canopy (open or closed) a modeler who wants to get the
most out of their model is well-advised to use this cockpit.
That said, this resin cockpits can also be the source of one of the biggest mistakes a modeler can make in building the kit - and when it comes to the point one realizes they have made the mistake, it is permanently un-correctable.
This
is a result of the kit design, with the one-piece lower wing. When you use this
resin cockpit, it is absolutely essential that you thin down the sides of
the plastic fuselage halves in the area of the cockpit by at least half, and
that you sand down the resin cockpit interior walls till they are thin enough
that you can see light through them. If you don’t, the result will be that
after you fit t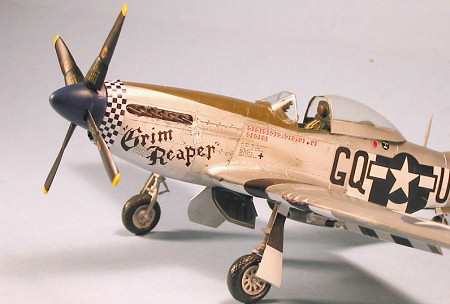 he
resin cockpit, the fuselage will be just a little bit wide. Then, when you
attach the wing sub-assembly, widened fuselage will force the wing to bend down
to widen the attachment area and fit the fuselage. This happens by so small an
amount that you will not notice any difficulty assembling the wing to the
fuselage. You’ll know you have made the mistake when you look at your model and
realize the wing has either zero dihedral or a slight anhedral, viewed head-on.
Like I said, at that point, you aren’t going to be pulling the wing off the
fuselage, pulling the fuselage halves apart and scraping off that nice resin
cockpit you glued in place with cyanoacrylate glue. The solution here is to take
the time in preparation and thin down the fuselage sides, thin down the cockpit
walls, and test fit everything beforehand. If you do, you’ll have a
really good-looking model.
he
resin cockpit, the fuselage will be just a little bit wide. Then, when you
attach the wing sub-assembly, widened fuselage will force the wing to bend down
to widen the attachment area and fit the fuselage. This happens by so small an
amount that you will not notice any difficulty assembling the wing to the
fuselage. You’ll know you have made the mistake when you look at your model and
realize the wing has either zero dihedral or a slight anhedral, viewed head-on.
Like I said, at that point, you aren’t going to be pulling the wing off the
fuselage, pulling the fuselage halves apart and scraping off that nice resin
cockpit you glued in place with cyanoacrylate glue. The solution here is to take
the time in preparation and thin down the fuselage sides, thin down the cockpit
walls, and test fit everything beforehand. If you do, you’ll have a
really good-looking model.
Another item I highly recommend are the Squadron/Falcon vacuform canopies. Be sure to get the ones that are listed for the Tamiya kits. You can get either the “Los Angeles” or the “Dallas” canopies for the P-51D. If you buy the Falcon “P-51D Special” set, you will also get the early “tear drop” bubble canopy, which is considerably different from the “standard” canopies. This set also includes a very good canopy for the Classic Airframes P-51H which is still available and is the only 1/48 P-51H available, as well as canopies for the F-82 Twin Mustang - for which we all still await a buildable kit.
In addition to the above-mentioned Major Mistake one can make when installing a resin cockpit, the single most-common mistake modelers make when building a P-51 is to attach the landing gear incorrectly. Mustang gear legs DO NOT stick down straight from the wheel well!!! This is an easy mistake to make, even moreso when the best way to attach the gear is to build it as a sub-assembly of gear leg, wheel and gear door before attaching it. Here is the way to know you have the gear in the right position:
Attach the gear. Look down at the model from directly above. The gear is in correct alignment when you can just see the entire axle of the main gear ahead of the leading edge of the wing. This is a simple trick and proof there are no “secrets” in modeling.
 The second most-common mistake modelers make with the P-51D is to slide the
canopy back into outer space. THE P-51D IS NOT A JET!!! The canopy
slides back along the top of the fuselage, coming to a rest at the end of the
slot. It sits outside the cockpit around it, so that the bottom of the leading
edge of the canopy sits on the cockpit sill. This is very easy to do with a
nice thin vacuformed canopy. The thicker kit canopy usually ends up looking
“perched” on the fuselage, but it’s possible to get this right - the trick here
is to “round down” the area of the rear of the cockpit sill, while also thinning
the plastic cockpit frame so it is nice and narrow along the bottom. With a bit
of fiddling, you can get the Tamiya canopy to sit in the right position, and the
canopy itself will cover the area you modified, so no one will see that.
The second most-common mistake modelers make with the P-51D is to slide the
canopy back into outer space. THE P-51D IS NOT A JET!!! The canopy
slides back along the top of the fuselage, coming to a rest at the end of the
slot. It sits outside the cockpit around it, so that the bottom of the leading
edge of the canopy sits on the cockpit sill. This is very easy to do with a
nice thin vacuformed canopy. The thicker kit canopy usually ends up looking
“perched” on the fuselage, but it’s possible to get this right - the trick here
is to “round down” the area of the rear of the cockpit sill, while also thinning
the plastic cockpit frame so it is nice and narrow along the bottom. With a bit
of fiddling, you can get the Tamiya canopy to sit in the right position, and the
canopy itself will cover the area you modified, so no one will see that.
The nice thing about these fixes are, if you have a completed model that has a landing gear or a canopy problem, you can still make these modifications even after the model is finished.
As regards finishing the model, there are some “areas of controversy” that could be listed among the top ten “how do I do this?” questions one reads at any scale modeling internet discussion group. Here are some answers. They are not “definitive,” but if you follow them you are 99% likely to have created an “accurate model”.
Wheel wells: when all P-51s - from the A onward - came out of the factory, the wheel wells, the inside of the wheel well doors, the gear leg and the wheel hub, were all painted with aluminum lacquer. The main wing spar - which forms the rear “bulkhead” of the wheel well - was painted yellow zinc chromate. As a matter of fact, the rear wall of the Mustang wheel well is the main spar, even in the area where the lower wing surface comes forward, which is wrong and has been universally done by all model companies as a wall that comes forward. The truly anal among you will want to cut that out and scratchbuild the area, despite the fact that 99.9999999999% of those who ever look at your model will not look in that area, let alone know that fact if they do.
Yes, some P-51s had zinc chromate wheel wells - but all evidence is this was either an “in the field” bit of work on a repaired airplane, or the result of a postwar IRAN rebuild.
 Wheel doors: the Mustang was designed so that the main wheel doors are up when
the engine is running, so as not to block air to the radiator and overheat the
engine. When the engine was switched off, if the hydraulic pressure system
wasn’t relieved, the main wheel doors would remain in the “up” position and
gradually “creep down” - with a differential “creep” between doors. If the
hydraulic pressure system was relieved, then the doors would come down all the
way. Myself, I have come to like attaching the doors at the “differential
creep” just because they then look different and some idiot will come along and
tell me “you did it wrong” at which point I get to tell him he doesn’t know as
much as he thinks he does. If you are someone for whom a collection of
chrome-plated plastic pots on your mantel is important, just assemble the gear
doors all the way down, the way “everyone” knows is “right,” so you can satisfy
those “expert” judges.
Wheel doors: the Mustang was designed so that the main wheel doors are up when
the engine is running, so as not to block air to the radiator and overheat the
engine. When the engine was switched off, if the hydraulic pressure system
wasn’t relieved, the main wheel doors would remain in the “up” position and
gradually “creep down” - with a differential “creep” between doors. If the
hydraulic pressure system was relieved, then the doors would come down all the
way. Myself, I have come to like attaching the doors at the “differential
creep” just because they then look different and some idiot will come along and
tell me “you did it wrong” at which point I get to tell him he doesn’t know as
much as he thinks he does. If you are someone for whom a collection of
chrome-plated plastic pots on your mantel is important, just assemble the gear
doors all the way down, the way “everyone” knows is “right,” so you can satisfy
those “expert” judges.
Flaps - up or down? Again, if the hydraulic system is unrelieved, the flaps will stay up, and eventually “creep down” like the main gear doors. If the system is relieved, the flaps come down all the way, about 45 degrees. Both the Tamiya and ICM kits provide separate flaps, and they are much easier to install down than up, though you can do either. The Tamiya kits have tabs on the flaps that insure they are installed in the “full down” position, while those for the ICM kits do not have these; if you want to do “differential creep” for the gear doors, and you’re building the ICM kit, then it is easy to assemble the tabless flaps without worrying about getting the absolutely-right angle, since you can say they “crept down.”
Past all this detail worry, building the models - whether they are from Tamiya or ICM - is really easy. A modeler who builds the Tamiya kits out of the box is guaranteed a very acceptable result.
| COLORS & MARKINGS |
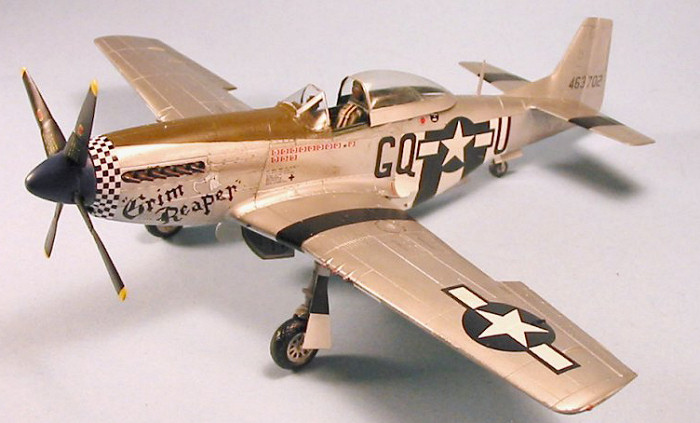
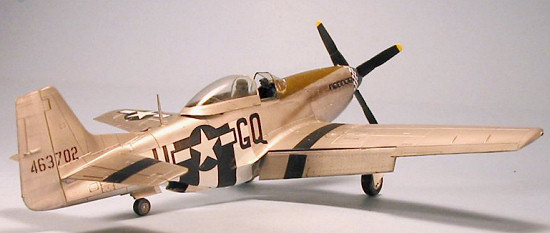
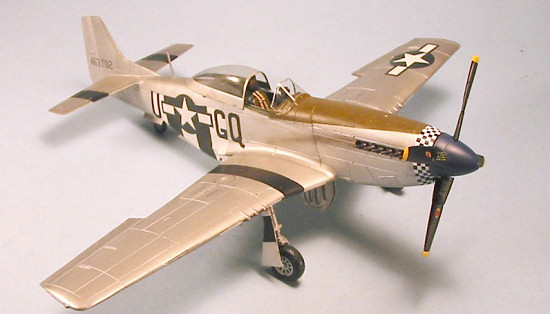
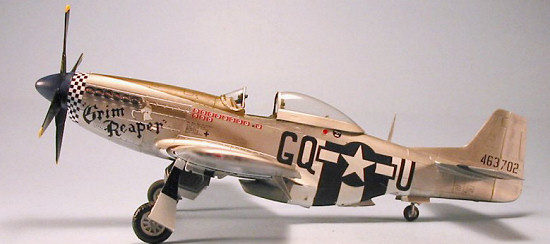
P-51D-20NA, s/n 44-63702, “Grim Reaper” - flown by CAPT Lowell K. Brueland, 355th FS/354th FG, July-August 1944:
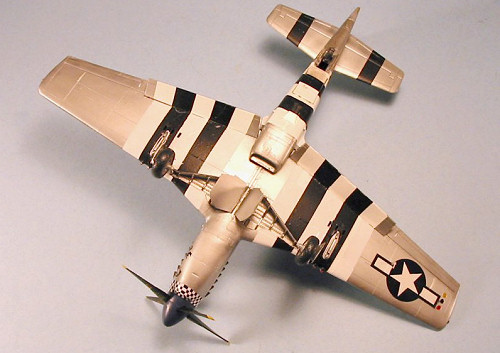 “Grim Reaper” represents the middle period of 354th FG markings,
between D-Day and their re-equipment with the P-47 that fall, with
individualized squadron markings on the nose - in this case a blue-and-white
checkerboard and blue spinner for the 355th Fighter Squadron - with
the D-Day invasion stripes only on the lower surfaces. This happens to be the
only model I have ever done with the D-Day stripes as decals - to me the decals
are more difficult to do than painting the stripes, but that might be because I
am so familiar with the process. The natural metal finish was done with a base
coat of SNJ Aluminum, with various small areas masked off and painted with
Testors ModelMaster Metalizer paints. As an airplane operating in a forward
area, the exhaust stains and oil stains are more prominent than would be the
case for an airplane based back in England. The decals are from an early
Aeromaster sheet which is currently out of production.
“Grim Reaper” represents the middle period of 354th FG markings,
between D-Day and their re-equipment with the P-47 that fall, with
individualized squadron markings on the nose - in this case a blue-and-white
checkerboard and blue spinner for the 355th Fighter Squadron - with
the D-Day invasion stripes only on the lower surfaces. This happens to be the
only model I have ever done with the D-Day stripes as decals - to me the decals
are more difficult to do than painting the stripes, but that might be because I
am so familiar with the process. The natural metal finish was done with a base
coat of SNJ Aluminum, with various small areas masked off and painted with
Testors ModelMaster Metalizer paints. As an airplane operating in a forward
area, the exhaust stains and oil stains are more prominent than would be the
case for an airplane based back in England. The decals are from an early
Aeromaster sheet which is currently out of production.
The canopy is done with the excellent Squadron (Falcon) vacuform canopy, which is thin enough to allow correct positioning of the canopy in the open position without modifying the model further. The cockpit is the excellent True Details resin replacement that really brings out the detail of the P-51D cockpit.
| CONCLUSIONS |
The Mustang may not have as many varied camouflage paint jobs as the Bf-109 or the Fw-190, but it has a truly astounding number of good-looking unit and individual aircraft markings, from the European to the Mediterranean to the Pacific Theaters. Doing a natural metal finish is not as hard as some modelers claim it is, if one just follows some general rules as to what kind of paint is used where. To me, it’s just about impossible to have too many Mustangs in one’s collection. When I was last out at Chino, I realized I have donated something like 60 P-51s of all sub-types to the model museum, and I still have 25 in my own personal collection.
March 2006
Review kit and decals courtesy of my billfold.
If you would like your product reviewed fairly and quickly by a site that has over 300,000 visitors a month, please contact me or see other details in the Note to Contributors.