Pacific Coast Hobbies 1/32
Spitfire IXc
|
KIT #: |
32005 |
|
PRICE: |
$59.95
|
|
DECALS: |
Six options |
|
REVIEWER: |
Tom Cleaver |
|
NOTES: |
Short run injected kit |
 The Spitfire IX, began life as an “interim” development of the Spitfire V -
which itself was an interim development from the Spitfire I - pending the full
development and introduction of the Spitfire VIII, with its airframe properly
redesigned to take the increase in power offered by the Merlin-60 series with a
two-stage supercharger. The reason for the urgency was the appearance of the
Focke-Wulf Fw-190A, which o completely outclassed the Spitfire V that equipped
nearly all squadrons in Fighter Command that Wing Commander Al Deere said the
Spitfire was only superior in the turn, and “turning doesn’t win victories!”
The Spitfire IX, began life as an “interim” development of the Spitfire V -
which itself was an interim development from the Spitfire I - pending the full
development and introduction of the Spitfire VIII, with its airframe properly
redesigned to take the increase in power offered by the Merlin-60 series with a
two-stage supercharger. The reason for the urgency was the appearance of the
Focke-Wulf Fw-190A, which o completely outclassed the Spitfire V that equipped
nearly all squadrons in Fighter Command that Wing Commander Al Deere said the
Spitfire was only superior in the turn, and “turning doesn’t win victories!”
Introduced in mid-1942, by the summer of 1943 the Spitfire IX had given the RAF
back equality of equipment vis-a-vis the two Luftwaffe Geschwadern on the
Channel Front, while their increasing numbers eventually provided air
superiority.
Interestingly, these two closely-related “interim” types accounted for more than
half of all Spitfires produced during the Second World War, with the Spitfire IX
beating out its progenitor by a nose to become the most-produced Spitfire
sub-variant.
When Ken Lawrence of Pacific Coast Models first told me last summer that he was
contemplating releasing a Spitfire IX, I told him that he would have to be
willing to go the extra ten miles to be sure he “got it right,” since there has
never been a Spitfire IX in any scale that completely captured the subtle shape
of the Spitfire IX.
Since then, Czech Master Resin has come out with a
Merlin-60 Spitfire series that offers dead-on accuracy for the high price they
charge for their full-resin kits.
When I opened the box, I could tell at a glance that Ken had indeed walked the
extra twelve miles.
In fact, it looks like a scaled up CMR kit - which is
unsurprising when you discover that the designer of the CMR kits had an
important hand in the design of this kit.
Putting the parts on drawings, and doing the various
measurements that Bruce Archer used in his analysis of the
 Hasegawa
Spitfire, it is clear that the kit is the most accurate Spitfire IX kit in a
scale larger than 1/72.
Hasegawa
Spitfire, it is clear that the kit is the most accurate Spitfire IX kit in a
scale larger than 1/72.
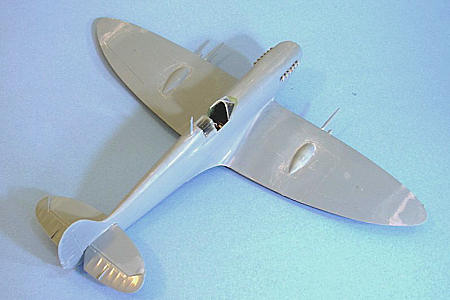
The plastic airframe parts are molded by Sword and have a nice shiny finish,
with petite engraved panel lines.
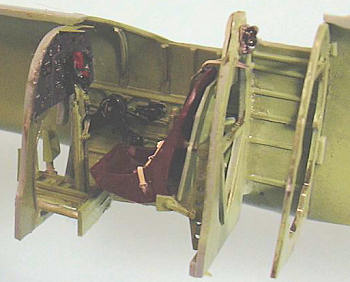
The resin cockpit interior will provide one of the most
detailed Spitfire cockpits ever.
The interior detail is finished off with a good
photo-etch set by Eduard that provides instrument panels and multi-part seat
belts.
The clear plastic parts are thin and free of distortion and there should
be no problem posing the canopy in the open position.
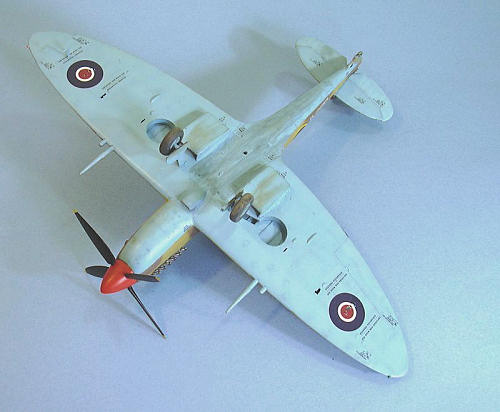
The resin wheels provide both the “solid” and five-spoke
centers.
Resin exhausts for the early “fishtail” and later “tube” exhausts are
provided.
The upper wings have the cannon covers separate, which will make things easy for
the coming Spitfire IXE and Spitfire XVI, and the likely Spitfire VII and VIII
kits.
The two cannon covers are the large teardrop for the early-production
Spitfire IX (known as the Spitfire IXB) and a second bulged cover that is
apparently for the late-production IXC.
The third cover has separate bulges which can be placed
inboard or outboard as the occasion merits to do either the “C” or the “E” wing.
Decals cover six aircraft: WZ-JJ pf the 309th
FS, 31st FG in Italy; MK392/JE-J
flown by Wg Cdr J.E. “Johnnie” Johnson at Normandy (not as OC of the Kenley Wing
- that was the year before); PT396/EJ-C of Wg Cdr Jack Charles, RCAF, 1944;
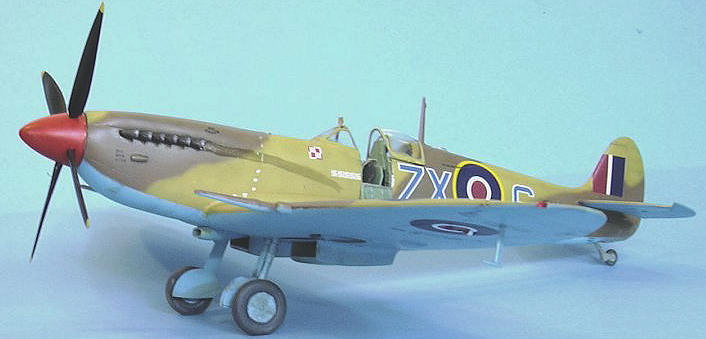
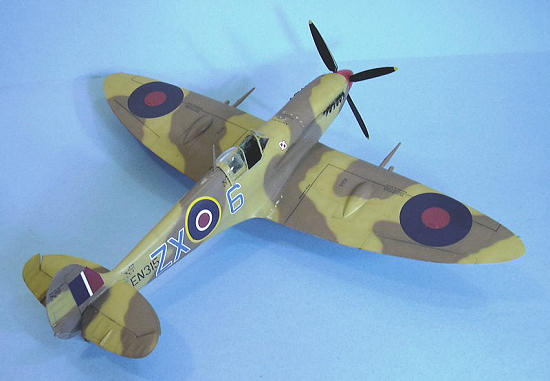
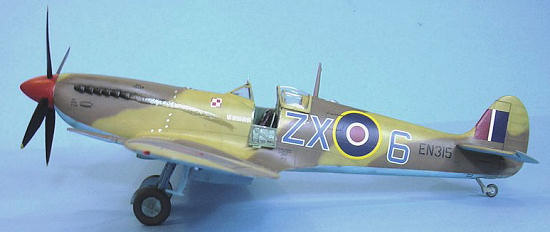
EN315/ZX-6, an early-production Spitfire IXB flown by Wg Cdr Stanislaw Skalski
in Tunisia (which uses the small intake, not the tropical intake the profile
shows); MM.4095/5-19 of 8th Grupo,
AMI in 1947; and “Red 2" of the Red Air Force.
Full stenciling for one aircraft is provided, and all
decals are of high quality. It should be noted that the “Sky” color of the ID
codes is not a correct color; a
 modeler
should replace these if possible or change the shade of the spinner and fuselage
band to match.
Also, the US insignia for WZ-JJ is completely inaccurate, as
shown on the profile instructions, which is right; a modeler wanting to do this
aircraft should obtain other decals for the national insignia.
modeler
should replace these if possible or change the shade of the spinner and fuselage
band to match.
Also, the US insignia for WZ-JJ is completely inaccurate, as
shown on the profile instructions, which is right; a modeler wanting to do this
aircraft should obtain other decals for the national insignia.
The National Nitpicking Contest is already underway on this kit, it having been
found guilty of the crime of being based on the 1/32 Hasegawa Spitfire Vb,
meaning that the rear fuselage is 2mm too short between the cockpit and the tail
(for the metrically-challenged, 2mm is approximately 1/16"), with a wing that
isn’t “quite right” in shape, a nose cross section that is “off” and prop blades
and spinners that “need replacement.”
One can find the complete Bill of Indictment over at The
Other Place if interested.
Quite
frankly, most of the Spitfire afficionados I know who aren’t suffering from
severe OCD have enjoyed the 1/32 Hasegawa Spitfire for all of the 30 years it’s
been in existence, and it’s been generally considered more accurate shape-wise
than any other Spitfire V kit in any scale.
It has its faults, but none have been of the level that
they stopped my enjoyment of the three I’ve built.
With the cost of doing things like designing kits
nowadays where it is, and with the available technology to make a limited-run
kit, taking short-cuts like this are almost the only way a kit like this can be
brought to market at a price most modelers would pay.
Right now, for most people, the model is the most
accurate 1/32 Merlin-60 series Spitfire we’re likely to see.
Complaining about the 1/48 Hasegawa Spitfire IX was
justified because it was obvious it didn’t look right; this looks “right enough”
to me and I have loved the Spitfire since I first saw a picture of one.
For those tearing their shirts over this, I have a piece
of advice that I have recently found makes my enjoyment of the hobby far better
than it was: Get. A. Life.
First, there is a bit of misinformation already floating around about this kit
as to what versions can be built from what’s in the box.
Some “Professor” over at The Other Place has proclaimed
that one can only build a
late-production Spitfire IXc or IXe with
 the
kit.
This is wrong!
With only a very small application of “some modeling
skill required,” one can make a model of any Mk.IX Spitfire with a round rudder.
the
kit.
This is wrong!
With only a very small application of “some modeling
skill required,” one can make a model of any Mk.IX Spitfire with a round rudder.
Secondly, there is a glitch in the instructions. As my good friend Iain Wyllie
pointed out: “The kit instructions have a strange error in
that they show the etched parts on the radiators in the wrong positions. Etched
parts PP3 should both be on the right side radiator and parts PP14 should be on
the left side. The smaller sections of PP14 should be on the outboard side, of
course, this being the oil cooling radiator. The RH radiator should also be in 2
sections as it is both for engine coolant and intercooler coolant but this can
easily be corrected with a small strip of styrene on the faces as the cores look
the same.”
Unfortunately for me, this piece of important
information arrived just too late to be of any use.
Not to worry - once the radiators are in place on the
wing, no one is going to be turning your model over and staring in there to see
if it’s right, and that would be
 the only
way to notice it.
the only
way to notice it.
Now, on to actual construction.
I had decided I wanted to do Stanislaw Skalski’s
Spitfire from his days with the Polish fighting Team in 145 Squadron in North
Africa.
These were all early-production Spitfires with the Mk.V elevators, a
small intake, and the large cannon bulges on the upper wing.
None of these modifications to the kit are particularly
difficult.
One look at the cannon covers - which do not have any airfoil curve to them -
made me decide I would start assembly with the upper wing, so I could make these
fit right.
It took several minutes with sanding sticks to get the cover
plates to fit the opening in the upper wing.
I then applied some brute force to the covers to curve
them to fit the upper w ing
airfoil.
ing
airfoil.
I then glued the cannon covers to the wing from
inside, to get a good firm attachment.
As long as I had already started work on the wings, when
this was done I went on to assemble to wing subassembly.
There is need for test-fitting and sanding of the
wingtip to get the extended tip attached without a gap, but I still found I
needed Mr. Surfacer 500 on that joint.
One should also take care to align the wingtips with the
wing, so they don’t tilt up or down.
This is important since there are no positive attachment
points here and all you have is a butt joint.
I
then proceeded to paint and detail the cockpit.
I used Gunze-Sangyo “Hull Red” for the seat, since this
gives a “polished mahogany” look, which is what the Spitfire seats I have seen
out at Chino actually look like.
I “popped out” detail inside the cockpit with a light
spray of Tamiya “Smoke” followed by a coat of Flat Varnish.
Overall the cockpit is easy to do, and looks very nice
when completed.
The early Spitfire IX used the fishtail exhausts, and these are impossible to
attach from the inside, even with the opening
 widened.
I ended up cutting off the fore and aft tips of the
backing plate, and was able to squeeze them in from the outside. Be careful when
doing this that you push them in far enough to not stand proud of the fuselage.
I suggest you check this by attaching the parts you cut
off and fitting things that way.
This was the only hard part of the assembly.
widened.
I ended up cutting off the fore and aft tips of the
backing plate, and was able to squeeze them in from the outside. Be careful when
doing this that you push them in far enough to not stand proud of the fuselage.
I suggest you check this by attaching the parts you cut
off and fitting things that way.
This was the only hard part of the assembly.
I
then assembled the fuselage and attached the wing subassembly. After this was
done, I then attached the rear “gull section” for the fairings.
While this was setting up, I cut the elevators off the
horizontal stabilizers, to get the Mk. V elevators, which were attached drooped
after I filled in the tip of the stabilizer to get rid of the panel line for the
late production elevators.
This is a limited-run kit, so it was necessary to apply Mr. Surfacer 500 to all
the joints.
Once this had set up and everything was sanded smooth, I attached
the small carburetor intake in position.
Painting:
I
used Xtracrylix “Dark Earth,” “Middle Stone” and “Azure Blue”.
Since these Spitfires were picked up by the Polish
Fighting Team at Algiers, it is likely that they came painted in desert
 camouflage
from the factory, rather than being repaints at Aboukir as was the case with
earlier Spitfires.
Given
this, I did a “factory style” Type A camouflage pattern.
camouflage
from the factory, rather than being repaints at Aboukir as was the case with
earlier Spitfires.
Given
this, I did a “factory style” Type A camouflage pattern.
Decals:
The kit decals are excellent and went on without problem.
Do be careful with the wingwalk stripes, as these are
very thin and easy to twist if not applied correctly.
Everything went down without problem under a coat of
Micro-Sol.
I
only “dinged” the model a little bit before giving the model a coat of
Xtracrylix Flat Varnish.
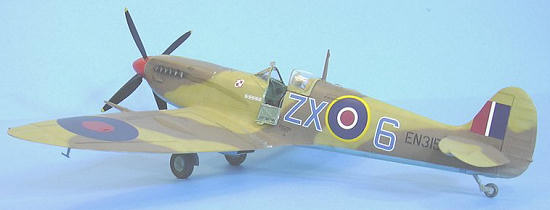
These airplanes were flown in Tunisia in the
Winter/Spring of 1943, when they faced mud rather than hard desert sand, so
there was less pitting and paint corrosion from sand during operations.
I applied exhaust stains and oil stains on the lower
fuselage with Tamiya “Smoke.” The landing gear and prop were attached.
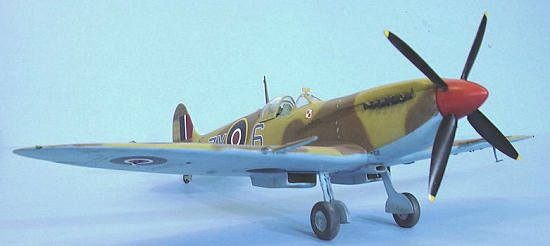
The canopy was unmasked and the side flap was attached.
Finally!!
An Spitfire IX model out of the box that is accurate enough for
all but the likely-never-to-be-satisfied True Believer, that doesn’t require a
recalculation of the national debt to afford it!
Be sure which version of Spitfire you are doing by
checking photo references, so you get it right as to use of the large or small
intake, the fishtail or tube exhausts, the wheels, and the cannon covers.
This is not a difficult kit, and will provide an excellent model out of the box,
while allowing a modeler to go to town on creating a more highly-detailed model.
I’m sure every “Spit Boffin” will get more than one of
these, and is already looking forward to the coming releases.
Highly recommended.
Tom
Cleaver
May 2008
Copyright ModelingMadness.com
Review kit courtesy of
Pacific Coast Models.
If you would like your product reviewed fairly and fairly quickly, please
contact the editor or see other details in the
Note to
Contributors.
Back to the Main Page
Back to the Review
Index Page 2017