| KIT #: | ? |
| PRICE: | $37.98 MSRP |
| DECALS: | One option |
| REVIEWER: | Tom Cleaver |
| NOTES: | Built as a British "Chesapeake" |
| HISTORY |
With the rapid development in aeronautical technology in the 1930s, it was the quite often the case that an airplane that did represent the state of the art when it appeared in the middle years of that decade was obsolescent if not obsolete by the time the war came and the airplane faced the uncompromising crucible of combat.
So it was with the U.S. Navy’s first monoplane dive bomber, the Vought SB2U “Vindicator.” Flown in combat twice - by French aircrews in the Battle of France in May and June 1940, and by U.S. Marines at the Battle of Midway in June 1942, the Vindicator proved itself anything but a suitable machine with which to fight a modern war. While it offered structural integrity and a thoroughly reliable powerplant, it had been hopelessly outmoded by advances in technology since its birth eight years earlier. Its shortcomings were many: the fuel tanks were highly vulnerable to enemy fire and its defensive armament was minimal, while its performance with a useful warload fell sadly short of what was needed. It possessed barely-adequate lateral control and at normal loaded weight its maneuverability was sluggish.
The SB2U-1 was Chance-Vought’s answer to a requirement put forward by the
Bureau of Aeronautics in 1934 for a two-seat scout and dive-bo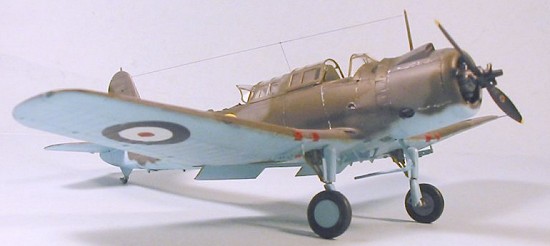 mber. The
specification called for a substantial performance advance over existing
aircraft in this category, though it did not call for a monoplane
per
se. The XSB2U-1 first flew on January 4, 1936. After preliminary
contractor’s tests were completed, it was delivered to the Navy at NAS
Anacostia on July 2, 1936. The Navy’s evaluation suffered a setback when
the prototype crashed near Norfolk on August 20, 1936. Fortunately, testing
was sufficiently advanced for the Navy to proceed with ordering 54 SB2U-1s
on October 26.
mber. The
specification called for a substantial performance advance over existing
aircraft in this category, though it did not call for a monoplane
per
se. The XSB2U-1 first flew on January 4, 1936. After preliminary
contractor’s tests were completed, it was delivered to the Navy at NAS
Anacostia on July 2, 1936. The Navy’s evaluation suffered a setback when
the prototype crashed near Norfolk on August 20, 1936. Fortunately, testing
was sufficiently advanced for the Navy to proceed with ordering 54 SB2U-1s
on October 26.
The SB2U-1 differed from the XSB2U-1 with strengthened cockpit framing, repositioning of the radio mast, addition of a substantial carburetor intake, and use of the R-1535-96 Twin Wasp, which provided a useful increase in power to 825 h.p. on takeoff and 750 h.p. at 9,000 feet, raising maximum speed by 20 mph at all altitudes. Range with a 500-lb bomb in scouting configuration was 699 miles, while use of a 1,000-lb bomb in the dive-bombing role reduced range to 635 miles.
Development of the V-156F:
With war clouds gathering in Europe in 1938, Vought saw the possibility of substantial foreign sales of their new dive bomber. While producing the SB2U-2, the company built a single airframe for use as a demonstrator with the model number V-156F. The airplane was displayed at the Salon de l’Aeronautique International in Paris in November 1938. The next month, the French Aeronavale recommended procurement of the V-156F and a contract for 20 aircraft plus spares was signed February 22, 1939. A second contract for an additional 20 aircraft was signed on May 16.
These aircraft were similar to the SB2U-2, with the exception that they were equipped with the “finger”dive brakes Vought had developed unsuccessfully for the U.S. Navy. They were not equipped with the bomb displacement gear since it was planned they would carry their 330-lb bombs on the wing racks. They were armed with two .30 caliber machine guns in the wings and a similar weapon in the rear cockpit. These aircraft were delivered through 1939 with final deliveries in February 1940, and had just equipped two French Aeronavale squadrons at the time of the German attack on May 10, 1940.
 The
V-156F-B1:
The
V-156F-B1:
On March 28, 1940, the French government signed a contract for a further 50 V-156Fs, for delivery by January 1941. Because Vought-Sikorsky had now received orders from the U.S. for the SB2U-3, it became necessary to subcontract the production of these modified SB2U-2s - the outer wings were built by the Briggs manufacturing Company, while the ailerons, flaps and tail surfaces were built by Fleetwings.
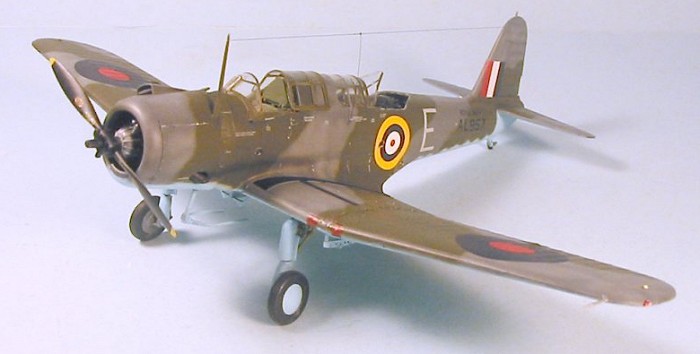
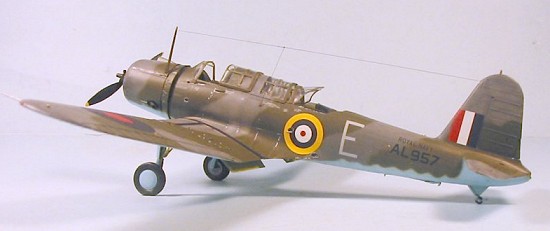
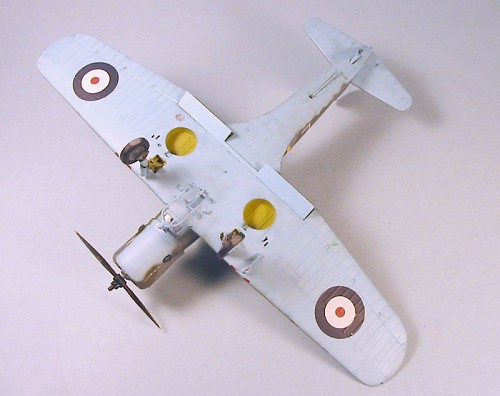
In October, 1940, following the collapse of France, the order was amended to transfer these aircraft to Britain as the V-156F-B1. Named “Chesapeake,” a number of engineering changes were specified, including the installation of a 125-gallon wing center section tank like that used on the SB2U-3, along with armor for both pilot and gunner, and an increased armament to four .30caliber machine guns in the wings. The pilot was provided a reflector gunsight, and better radios were installed. Like the SB2U-2, no dive brakes were fitted.
All of these changes increased the aircraft’s weight to 9,763 lbs in maximum loaded condition, with no increase in engine power. Performance and handling characteristics suffered as a result, with an initial climb of 600 fpm taking 41 minutes to labor to where a top speed of only 215 mph was possible at the critical altitude of 15,000 ft.
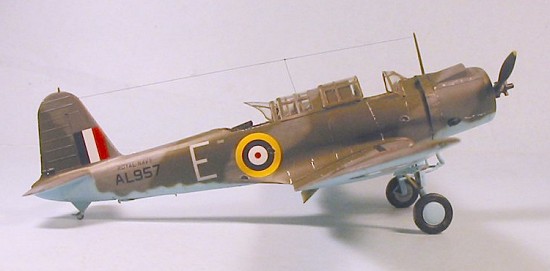
The first V-156F-B1 was accepted by the British Purchasing Commission on March 26, 1941, with the 50th and last being delivered July 24, 1941.b The Chesapeakes were delivered from Liverpool to Burtonwood Aircraft Repair Depot and assembled throughout the summer of 1941.
 Some consideration was given to using the Chesapeake in a defensive role
from Royal Navy escort carriers, but a take-off run of 1,770 feet precluded
any thought of carrier operation. Several were delivered to 778 and 786
Squadrons, which were advanced operational training squadrons, while 14
were sent to 811 Squadron at Lee-on-Solent in late July 1941, where they
saw their only operational use, being operated on coastal anti-submarine
patrols until late September, when they were replaced by Swordfish.
Some consideration was given to using the Chesapeake in a defensive role
from Royal Navy escort carriers, but a take-off run of 1,770 feet precluded
any thought of carrier operation. Several were delivered to 778 and 786
Squadrons, which were advanced operational training squadrons, while 14
were sent to 811 Squadron at Lee-on-Solent in late July 1941, where they
saw their only operational use, being operated on coastal anti-submarine
patrols until late September, when they were replaced by Swordfish.
The performance of the Chesapeake was not even equal to that of the Blackburn Skua, which had already been taken off operations by the time the Chesapeakes arrived. They were assigned in ones and twos to other advanced training squadrons, where they were operated as hacks and target tugs. The last one was taken out of service as a target tug in May 1944.
| THE KIT |
For those familiar with the Accurate Miniatures Avenger and Dauntless kits, this Vindicator is similar in quality and detail. I can’t personally see any aftermarket folks coming up with a lot of things to use on this kit other than decals.
Other reviewers have commented that the fabric detail is too pronounced. However, this is very similar to the fabric detail that is present on the Avengers and Dauntlesses, and so I think it will look just fine under a coat of paint.
The kit decals provide markings for the SB2U-1 used by the Commander of the Ranger Air Group in 1940-41, while operating the Neutrality Patrol. Fortunately, Yellow Wings Decals has sheets now available that will allow a modeler to do any SB2U-1 or SB2U-2 in prewar service with all of the units that flew them. The company has also announced a sheet “The Aircraft of ‘Dive Bomber’” that is just now available and will allow you to make a model of any of the airplanes used in the movie, including some overall light-grey SB2U-2s.
 The
Problem of the Fuselage Molding:
The
Problem of the Fuselage Molding:
The problem of the fuselage molding and sink marks has become important since this kit was released. After I said in my First-Look Review that I had been able to resolve the one bad sink area on the right side of the fuselage with the use of Mr. Surfacer and careful sanding-down, several modelers contacted me to say that their kits had far worse sink areas. The day after that review was published here, I was at my local hobby shop when their kits arrived. We opened the kits and took a look. It was like “Goldilocks and the Three Bears.” One kit had very bad sink marks on both fuselage halves, bad enough I would have returned the kit back and asked for my money back, had I bought it and left it unopened til I got home. The second had a sink mark about as bad as mine had been, but on the left half rather than the right. The third had sink marks on both sides that were light enough I would have left them alone.
To me, this indicates that the problem is not a design fault of the mold, but rather it is a lack of quality control by the company that made the parts, since no two kits seem to have the problem the same way. This belief is heightened by the fact that - when he received a test shot and reviewed it - Michael Benolkin at Cybermodeler.com made no mention of sink marks, and I know he would have had they been there. Thus, the problem is the result of the plastic molding company pulling the sprues out of the molds too soon. What we have here is a “bad batch.” Unfortunately, when they are running 10,000 at a time and not checking them over, it means they are all bad to one degree or another.
Alan Griffiths of AMTech had a similar problem when his P-40E kits came out two years ago. After going through quite a fight with the Korean plastic company that had shot the sprues, he managed to get them to re-shoot the fuselage sprues correctly, and then offered replacement fuselages free to any modeler who sent in the end panel of the kit box. He was able to get the contracting company to do this because the Uniform Commercial Code that governs contracts incorporates “the implied warranty of merchantability.” Getting past the legalese, what this means is that the customer has a reasonable expectation that what has been bought is what the seller says it is, and that it can be used for what is intended, in the condition in which it is delivered. This is recognized in the World Trade Organization, of which both the United States and the Republic of Korea are members.
Thus, it appears to me that Accurate Miniatures has a strong case to require their contractor to deliver parts sprues that have been molded so the parts can be used as expected, and that the Korean contractor should do this without charge since it is they who have broken this warranty of merchantability. Accurate Miniatures should then be able to offer to replace these defective parts sprues in the same manner AMTech did. I know for a fact the previous owner of Accurate Miniatures would have done so in a heartbeat. It’s called “good customer relations.”
| CONSTRUCTION |
 Shortly after I fixed the problem of the sink marks on my kit, I managed to
spill some lacquer thinner on the left fuselage half. While bad, it was
not a total disaster, and I was able to restore the fuselage to where the
stringer detail was mostly okay. However, this was not going to look good
under a thin coat of silver paint, so my plans to build a “Golden Wings”
SB2U were shelved. Looking at the alternatives, I decided to do a
Chesapeake, since the camouflage paint in three different colors and
variable patterns would cover the “save” of the fuselage part. All I would
have to do to convert the model was to add on head and shoulder armor for
the pilot, and remove the tubular gunsight and replace it with a full piece
of glass for the windscreen. Digging through the decal dungeon, I found
markings that would allow me to do one of the airplanes operated by 811
Squadron in the summer of 1941.
Shortly after I fixed the problem of the sink marks on my kit, I managed to
spill some lacquer thinner on the left fuselage half. While bad, it was
not a total disaster, and I was able to restore the fuselage to where the
stringer detail was mostly okay. However, this was not going to look good
under a thin coat of silver paint, so my plans to build a “Golden Wings”
SB2U were shelved. Looking at the alternatives, I decided to do a
Chesapeake, since the camouflage paint in three different colors and
variable patterns would cover the “save” of the fuselage part. All I would
have to do to convert the model was to add on head and shoulder armor for
the pilot, and remove the tubular gunsight and replace it with a full piece
of glass for the windscreen. Digging through the decal dungeon, I found
markings that would allow me to do one of the airplanes operated by 811
Squadron in the summer of 1941.
The instructions for this kit are not entirely clear as to parts placement, so I advise you to test-fit everything until you understand how the parts go together at each stage, to be sure you know what you are doing. This was particularly true with the landing gear, since that assembly diagram is particularly unclear. Modelers who have experience with limited-run kits with their limited instruction sheets will be able to stumble through all this.
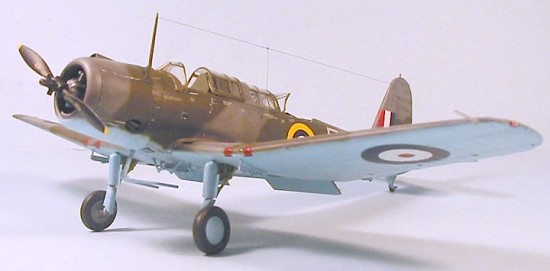
Once you understand where the parts are to go and how they are to go, assembly is quite easy, and everything fits nicely. I only used Mr. Surfacer 500 on the centerline seam of the upper rear fuselage. The most fiddly assembly sequence involves the cowling. I assembled the engine to the engine mount and then to the firewall, then separately assembled the cowling so I could work the attachment of the two cowling halves from both inside and outside. Once this had set up, it was easy to squeeze it over the engine and glue it to the firewall.
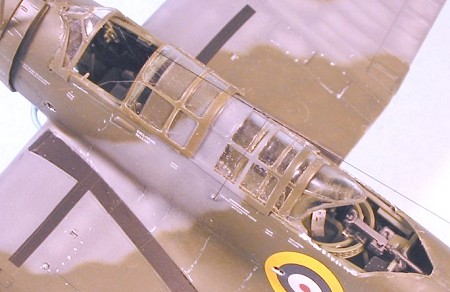
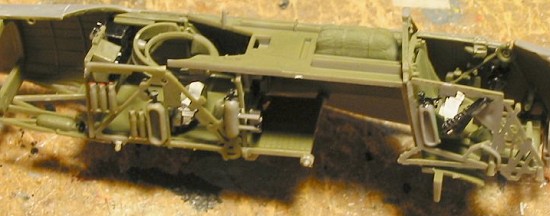 The cockpit goes together much easier than the SBD cockpit, and looks
equally good when assembled. I decided to keep the vacuform canopy for the
Golden Wings Vindicator I will be doing, so I used the kit canopy which I
decided to assemble in the open position to allow a viewer to see the
cockpit detail after trying to use the full enclosed canopy which turns out
to have fit problems in the area of the rear seat. The only difficulty
doing this is getting the rear canopy to slide under the aft cockpit
forward section. I sanded down the rear canopy and kept test
The cockpit goes together much easier than the SBD cockpit, and looks
equally good when assembled. I decided to keep the vacuform canopy for the
Golden Wings Vindicator I will be doing, so I used the kit canopy which I
decided to assemble in the open position to allow a viewer to see the
cockpit detail after trying to use the full enclosed canopy which turns out
to have fit problems in the area of the rear seat. The only difficulty
doing this is getting the rear canopy to slide under the aft cockpit
forward section. I sanded down the rear canopy and kept test -fitting until
I could get it all to fit.
-fitting until
I could get it all to fit.
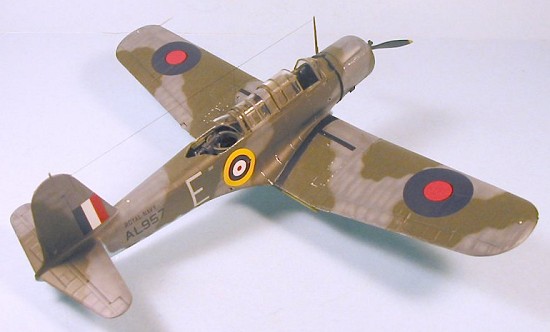
I decided to cut the flaps off and assemble them in the down position, since there is interior detail for both the flap and the upper wing. This required me to put in a piece of Evergreen sheet to block off the lower fuselage interior.
The rib tapes on the wings are really overdone, and they look overdone even after paint has been applied. I will likely sand that down for the next Vindicator I do, to get a more accurate look to the final assembly.
| COLORS & MARKINGS |
 Some sources say the Chesapeakes were painted Dark Earth, Dark Green and
Sky Blue, but I think after looking at photos that this is wrong since the
two upper colors have a low contrast. I made the guess that these were the
first airplanes to have Vought’s “equivalent colors” for Fleet Air Arm
airplanes, which meant I painted the model with Sea Grey and Olive Drab on
the upper surfaces, while using Sky Blue for the lower surfaces since this
was used on some FAA airplanes built in America due to the misunderstanding
of what color “Sky” was. It’s just as likely it was Sky Grey, but doing it
this way made it different from my other “equivalent colors” FAA models,
and I have yet to have ever seen a color photo of a Chesapeake that would
resolve things one way or the other.
Some sources say the Chesapeakes were painted Dark Earth, Dark Green and
Sky Blue, but I think after looking at photos that this is wrong since the
two upper colors have a low contrast. I made the guess that these were the
first airplanes to have Vought’s “equivalent colors” for Fleet Air Arm
airplanes, which meant I painted the model with Sea Grey and Olive Drab on
the upper surfaces, while using Sky Blue for the lower surfaces since this
was used on some FAA airplanes built in America due to the misunderstanding
of what color “Sky” was. It’s just as likely it was Sky Grey, but doing it
this way made it different from my other “equivalent colors” FAA models,
and I have yet to have ever seen a color photo of a Chesapeake that would
resolve things one way or the other.
Decals:
Decals came from the decal dungeon. The wing and fuselage national insignia roundels came from a Spitfire sheet, while the lower wing roundels and the fin flash came from a Hurricane sheet.
| FINAL CONSTRUCTION |
 After painting exhaust stains and then giving the model a coat of
Xtracrylix Satin Varnish, followed by two applications of Xtracrylix Flat
Varnish, I unmasked the canopies. I attached the windscreen, forward
cockpit canopy, aft cockpit canopy and rear cone in position. I then
attached the landing gear and prop. I picked out a little bit of “dinging”
around the wing walk and the cockpit area.
After painting exhaust stains and then giving the model a coat of
Xtracrylix Satin Varnish, followed by two applications of Xtracrylix Flat
Varnish, I unmasked the canopies. I attached the windscreen, forward
cockpit canopy, aft cockpit canopy and rear cone in position. I then
attached the landing gear and prop. I picked out a little bit of “dinging”
around the wing walk and the cockpit area.
The only negative is the bad quality control in the molding of the fuselage halves. I would recommend that, unless the sink marks are really bad, you leave them alone. If you are doing a “Golden Wings” SB2U using the Yellow Wings decals, the fuselage markings and section stripe will go over that area and thereby distract the viewer’s eye, while if you are doing an SB2U-3, the medical tape on the fuselage (the white stripes) goes over that area and will similarly distract the viewer’s eye. If you are using the kit decals to do the Air Group Commander airplane, the “Commander Ranger Air Group” decal will go over the area and hide it also.
| CONCLUSIONS |
Beyond that problem, this long-awaited kit makes up into a very nice model. If some aftermarket company comes out with photo-etch dive brakes, it will be possible to do all the versions of this airplane that saw service.
I am sure I will be building more all of them.
July 2005
Copyright ModelingMadness.com. All rights reserved. No reproduction in any form without express permission from the editor.
If you would like your product reviewed fairly and fairly quickly, please contact the editor or see other details in the Note to Contributors.
Back to the Review Index Page 2025