DETAILING
THE RB-47H
by TIM KALINA
All of the information on this and subsequent pages is courtesy of Tim Kalina. Tim is currently assisting with the restoration of an RB-47H at the US Air Force Museum. That is where the photos of the under restoration aircraft were taken. This information came about due to conversations concerning the Hobbycraft 1/144 RB-47H. I'll let Tim tell you more.
"The HobbyCraft series of B-47s are very nice indeed. In some respects they are
better than the 1/72 Hasegawa B-47E kit.
I'd like to point out a few corrections for your RB-47H review. First off, the HobbyCraft
RB-47H kit depicts a mix of early and late model H antenna arrangements. No real
aircraft would have ever carried this mixed array. The H models carried different antenna
arrays at various times so you really need good reference photos to model an H properly.
The kit can be built most easily as a very early H model. You just need to delete the Astro-tracker (this is the small airfoil shaped fairing that is to mount on the top of the fuselage behind the canopy) and not add the black diamond shaped decals (these depict the APR-17 antennas) on the side of the fin. These items only appeared on very late model Hs.
If you want to model the late H models you need to add the APR-17 antennas under each wingtip, change the shape and number of antennas on the rear fuselage and add the large ALD-7 pod (the 'Silverking' mod). I have attached a scan of the late model H antenna locations from the flight Manual I have. (See next page)
 Also I need to point out that the things you called "plates" above the #1 and #6
engine nacelles are NOT to prevent heat-seeking missiles. They are aft facing APD-4 antennas. I
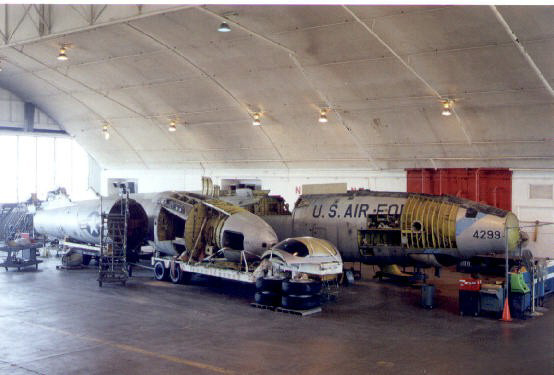
have attached a photo of this antenna that I took in the USAF Museum storage area last fall.
It's off of the RB-47H #4299 that they are now restoring there. I have been all over this aircraft so
know it well.
Also I need to point out that the things you called "plates" above the #1 and #6
engine nacelles are NOT to prevent heat-seeking missiles. They are aft facing APD-4 antennas. I
have attached a photo of this antenna that I took in the USAF Museum storage area last fall.
It's off of the RB-47H #4299 that they are now restoring there. I have been all over this aircraft so
know it well.
I also feel that the painting instructions in the kit leave a lot to be desired. They don't give the correct gear well colors, nor are very accurate concerning the cockpit colors and they are also off concerning the wingtip antenna markings along with an in correct wingtip light location. And the decals that depict the fiberglass panels on the EWO compartment (the large bulge in the plane's belly) are wrong. Also, they make no mention that the area inside the black fuselage and wingwalk markings should be painted the light 'Boeing Grey'. And you are correct in stating that the SAC band is too light of a blue. It should be a much darker blue, near FS35095. (Editor's Note: detail painting information continues after the images.)
|
|
|
|
|
|
You can't quite build an accurate H out-of-the-box. All this sounds like the kit has a lot of problems but it is all minor things
and the kit is accurate in outline and shape (except the nose is a little too low) and builds into a
nice model. The only thing
to be careful of in the building is too get the wings in the correct 'Droop'. I'd build a jig or template
for this. The height from ground to the wingtip should be a scale 7'4". Also, since HobbyCraft has used
the same fuselage for all 3 B-47 models, you need to pay attention to some minor
fuselage details that varied between the early b model and the later e and H models.
I like HobbyCraft series of Cold War bombers. I'm glad they had the courage to tackle these in 1/144
scale."
Painting information:
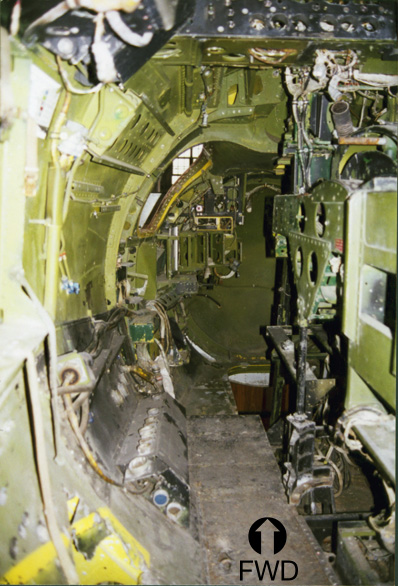
All the main crew areas; the entrance tunnel, the cockpit, the navigator's area
are all painted interior green.
The instrument panels along with the various panels and consoles are black. The
seats are interior green
with dark red headrests. The rudder pedals and control columns are black. An
interesting thing about the
control columns is that they can be disconnected from their cables and pushed
forwards and locked into
the instrument panel to provide more room when exiting the seat. In fact, the
co-pilot usually rotated his
seat 90° to the left to make it easier to exit. His seat was capable of
rotating
180° to his left in order for
him to turn around and use the gun controls behind his seat. So if you really
want to be accurate when you
build a parked B-47 model, you would depict the control columns pushed forwards
and have the co-pilot's
seat rotated 90° to the left. Neat little modeling detail that when people see
it would think you screwed up!
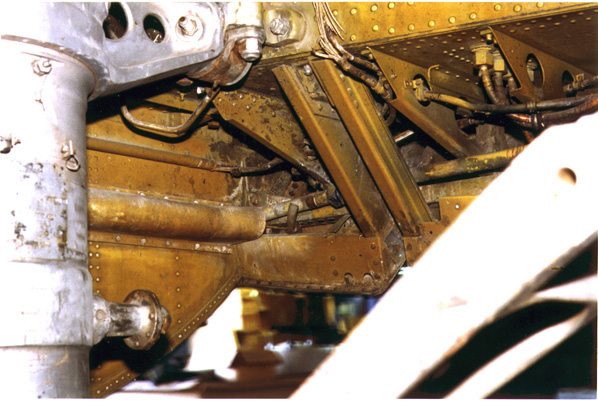
I learned all this kind of stuff from talking to B/RB-47 pilots, co-pilots and mechanics. The inside of the EWO compartment is a medium grey, but you would never see this area on a model. All internal structure other than the crew areas was painted yellow zinc chromate. Ah, the wheel wells! These are painted yellow zinc chromate but have an additional anti-corrosive coating sprayed over the chromate. It's a thin semitransparent honey-caramel color and it was applied 'quick & dirty' so had some runs and pooled around the structural members. I have a friend who works at Boeing doing maintenance on 747s and he tells me that the wheel wells on the 747 are exactly the same color. He says that a lot of the building procedures used at Boeing are decades old so some things are similar between the B-47 and the later Boeing commercial jets.
The bomb bays on the regular bomber versions of the B-47 are also this honey-caramel color. Just like
the wheel wells.
The inside of the landing gear doors are yellow zinc chromate with their front
leading edges painted red. The inside of the outrigger wheel wells were painted yellow zinc chromate but
because of the heat from the
engines directly above them, most of this paint burned off so just the natural
metal color remained with
small traces of the chromate remaining only in corners.
All the gear struts are natural metal.
The area inside the black fuselage and wing walk stripe markings is painted a
light grey. I hear this is called
'Boeing Grey' and looks just like the grey on the wing tops of Boeing's
commercial jets. Again, this is
something that started with the B-47 and is still used by Boeing. The only B-47
kit model I have ever seen
that had this grey area painted correctly was Don's and that was because I
provided him with all the correct painting instructions. If you look carefully at photos of real B-47s you'll see
that the area inside the black
stripes is a different color and tone from the metal. Everybody misses this when
they build a model.
On the real RB-47H in the restoration area, this grey was plainly visible on the
wing.
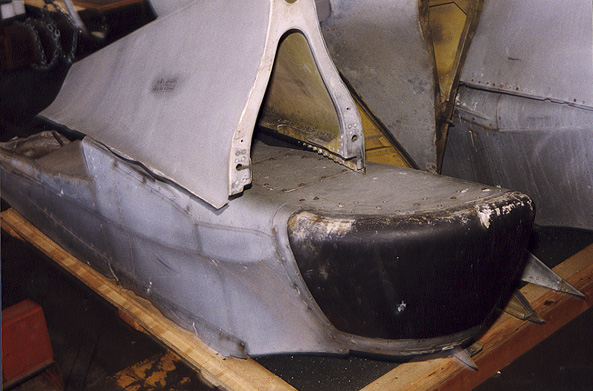
I have attached a few photos I took last fall at the restoration area. They show
the cockpit area, the crew
entrance tunnel with the cockpit pressure door at top (the entrance tunnel
itself was not pressurized; after
takeoff the Ravens had to open the inside pressure door, climb down into the
entrance tunnel, then open a
small folding door and enter a narrow crawlway that lead to the EWO compartment
in the belly of the plane
where they had to open another pressure door and get into their seats. And all
this with a chute on!),
and a view of the catwalk next to the pilots positions looking down to the
navigator's compartment.
And I have included some scans of the wheel wells showing the funny honey-caramel
color. This could be
duplicated on a model by painting the wells yellow zinc chromate, then applying
a thin wash of the honey-carmel color over the chromate color.
Editor's note; In addition to these details, Tim sent along some images of RB-47 Nose art. These are from newspapers so may be a bit difficult to see. Please go to this page for the nose art.