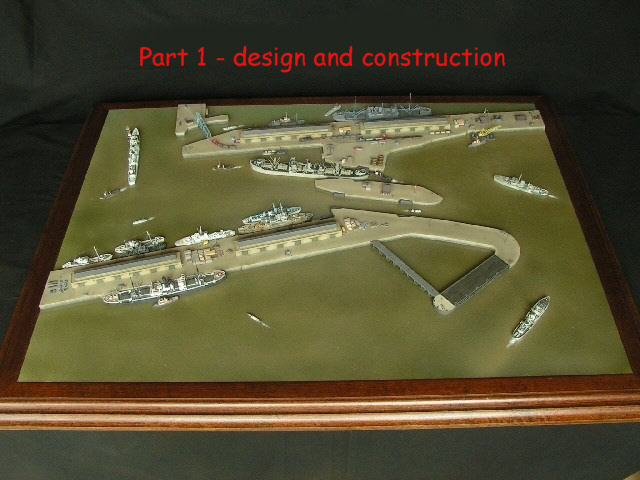
Building a diorama of Liverpool´s Langton and Brocklebank docks
An idea is born
Depicting ship models in the environment we landlubbers usually get to see ships
– in port – was always on my mind since I restarted building ship models in
2004. British and Canadian escorts from World War 2 have always been of interest
to me, hence the project should have a British subject. Jim Baumann and Peter
Fulgoney having presented their excellent harbour dioramas in 2006 precluded
choosing a similar scene in order not to wear the subject out.
By coincidence I found various plans of British docks and harbours while doing
internet research. Luckily these plans included scales, so I was able to convert
the dimensions. Poring through these plans, the double access to Liverpool´s
Langton docks, one of the numerous docks along the river Mersey, appealed to me
ever more. Getting the measurements and converting them into 1:700 scale soon
showed that a decent depiction would take up an amount of space that was hard to
cope with for a single modeler in a given timeframe. But what are friends for
after all, especially friends that share your interests?
In the spring of 2007 I presented my idea to my friends Frank Ilse, Guido Hopp,
Dirk Mennigke and Torben Keitel. As Guido and Torben both have an anglophile
strain to them, they soon agreed to cooperate on this project. Frank and Dirk
prefer 1:350 scale and planned to execute a project of their own. We soon agreed
that both projects complemented one another and could be presented
simultaneously at our display.
As I already had a certain scene in mind, I continued research into the story we
meant to tell with our diorama. Guido and Torben researched dock structures and
buildings.
Later on in the project, our new member Frank Spahr joined our group and the
diorama project.
The story
Each diorama has to tell a story. In our case we meant to depict how merchant
vessels and escorts enter the port after completing a convoy voyage. That said,
we needed to chose the timeframe, the convoy and the individual vessels
involved. The excellent web resources Convoy Web and the Wuerttembergische
Landesbibliothek both offer comprehensive data on naval warfare 1939-45, and
here I found the necessary information to determine the composition of our
diorama.
Sources:
http://www.battleships-cruisers.co.uk/royal.htm
http://www.wlb-stuttgart.de/seekrieg/konvois/konvois-frames.htm
http://www.convoyweb.org.uk/sc/index.html
The diorama was to present the situation on April 4, 1943. On this day, convoy
SC.123 arrived at Liverpool with 50 merchantmen – and without losses – after
sailing from New York on March 14. From March 20 on, Escort Group B2 (homeported
at Liverpool) took part in the protection of the convoy. This group was
commanded by Cdr. D.G. MacIntyre, DSO, RN; it comprised the destroyers HMS
Vanessa and Whitehall as well as the corvettes HMS Clematis,
Gentian, Heather and Sweetbriar. The rest of the group –
the destroyer HMS Hesperus, the corvette HMS Campanula and the
frigate HMS Mourne did not take part; they spent the time at Liverpool
undergoing refits and repairs
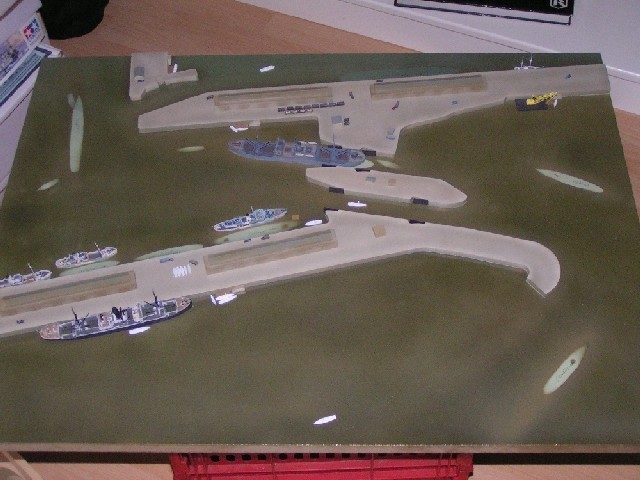
The diorama was to show some of the vessels already moored in
port, with others in the process of entering port, depicting them in various
phases of the manoeuvre. Moreover we meant to include various tugs, trawlers and
other working vessels as only these really bring a port scene to life.
Building the idea
Having agreed on the scene to depict, we needed more research into the dock
structures. Guido worked hard and obtained photos and information on the
Liverpool docks that gave us a fairly good idea of how these docks looked
between 1929 and 1955. The section we intended to build was a part of Langton
and Brocklebank docks. Various warehouses and other buildings were identified,
as well as a swivel bridge and a jetty built in front of the actual entrance to
the dock.
A host of other questions had to be answered: How was the water to be simulated,
how high were the quays and how were they actually constructed, and - most
important of all: Which items were available in kit form and which had to be
scratchbuilt? We soon agreed on the timeframe as we wanted to present the
diorama at Scale Model World 2008, held in Telford on 15/16 November, 2008.
We soon knew what could be obtained in kit form and what had to be scratchbuilt.
The quays, bridges, locks and the jetty would have to be scratchbuilt.
Warehouses and vehicles were available from Battlefleet Models and White Ensign
Models.
Before we finally were able to start, we needed to assign the work amongst the
group. Frank and Torben built the only destroyer, HMS Hesperus, plus the
corvettes HMS Heather and HMS Saxifrage. Torben also built the
small swivel bridge. Guido and I divided the remaining vessels amongst us, with
Guido building the Empire freighter SS Empire Pibroch, the corvette HMS
Clematis, the sloop HMS Totland plus the trawler HMT Kirkella.
That left me with two freighters, the Hog Islander SS Shikshinney and the
tramp SS Fjordheim; apart from that I built the corvette HMS Campanula
and two trawlers – HMT Indian Star and HMT Inkpen. The numerous
other small vessels and vehicles were set aside for the time being. Guido also
undertook building the jetty, and I took care of the display itself, the docks
and buildings.
Even though this diorama is a team project, most working hours were spent in our
individual workshops. We held four meetings throughout the building process, yet
hardly ever with all the participants being present due to work or other
commitments. In the first meeting held in March, 2008, we agreed on the
positioning of the vessels and discussed how to fabricate the dock structures
and buildings and how to simulate the water. Already then it was clear that
Torben would not be able to go to Telford due to professional commitments.
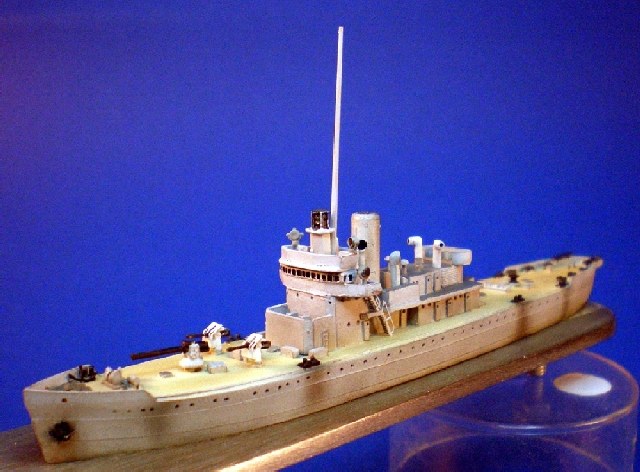
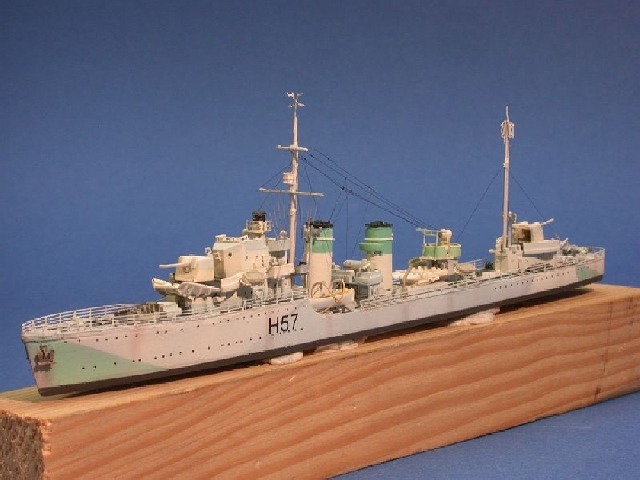
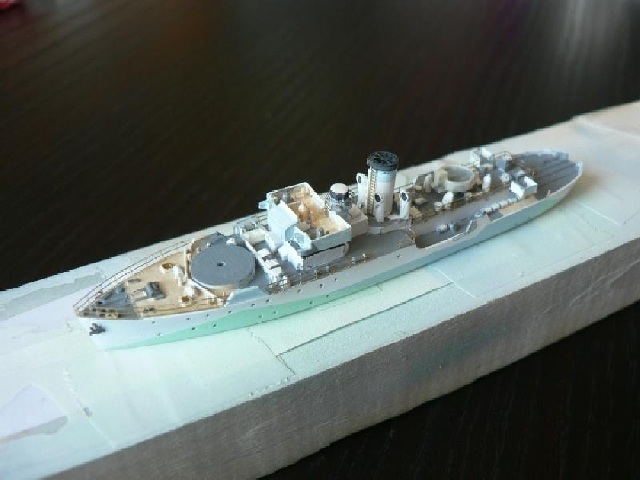
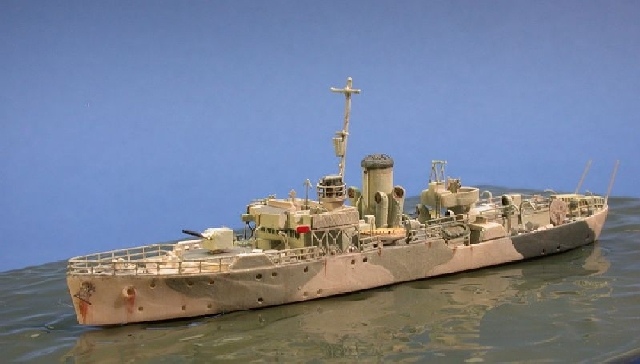
Building the ship models
The ships were built between the fall of 2007 and the fall of 2008, actually the
last vessels were completed just in time for the presentation. As we knew which
paint schemes and which equipment to use on the escorts, building them was a
straightforward process. Only Frank had to do extra work on his Hesperus,
as there is no kit of this vessel in her 1943 fit. He therefore had to kitbash
Niko Model´s ORP Garland kit with B-Resina´s HMS Hero. All the
corvettes and sloops were built using the WEM and HP Models kits, same as the
three trawlers. The trawlers are based on the HP Vorpostenboot V 1102 kit
and received major modifications to resemble British vessels.
The Empire freighter was based on the HP Models kit, whereas the Hog Islander
was built using Battlefleet Models´ excellent kit. The tramp steamer is based on
Loose Cannon´s kit fo the SS Dayrose. All models were detailed and
improved. All resin masts were replaced with brass items. Watertight doors,
hatches, vertical and inclined ladders, railings, radars, davits and the like
were taken from the various photoetched sets produced by WEM, L´Arsénal, Lion
Roar and Tom´s Modelworks. Various items were replaced by resin parts, such as
Niko´s hedgehog launchers. Styrene stock was used for conversions, such as
Hesperus and the trawlers. All the models were painted and weathered as per
our references. With the freighters, we chose to use various shades of grey plus
a peacetime scheme for the tramp.
 |
 |
 |
 |
 |
 |
 |
 |
 |
 |
In order to keep the diorama manageable to work on and to transport, we agreed
on a size of 700x550 mm (27.56 x 21.65 in); a rectangle of that size was
overlayed on the plan and the section thus chosen and defined. We intended to
keep the dock structure as simple as possible, and we were helped by the way the
Liverpool docks were built. They consisted mainly of cast concrete, with their
fronts lacking any of the reinforcements so commonly found. The Mersey´s mean
tidal range exceeds 7 metres (23 ft), and this is what the docks are built for.
So we decided on a visible height of 8 mm (.31 in) for the docks, which
translates into 5.6 metres (18 ft 4 in) and should be correct for a median tidal
range.
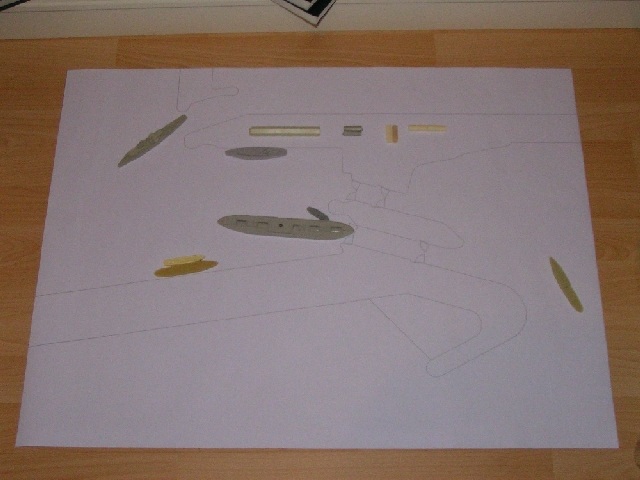
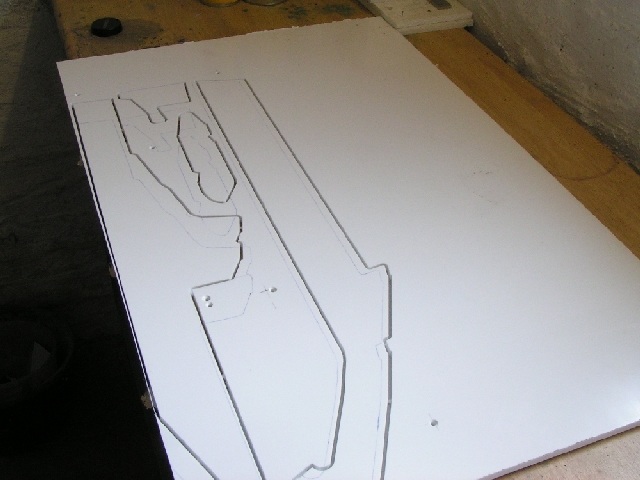
Making docks from 8 mm styrene stock sounded easy at first, but it soon proved
to be pretty hard to achieve crisp cuts in styrene of that gauge, let alone in
the length needed. While discussing the issue with modeling friends the idea of
computer assisted milling turned up. Coincidentally one of the friends, a
free-lance designer, owns a 3-axis milling machine that could make quick work of
the job needed. Having already designed the docks using CAD software made
conversion into *.dxf format and importing the data into machine easy. Within a
few days I had the crisply milled parts at home.
For an attractive presentation, a base plate was cut from 19 mm MDF, and an
ornamental frame was crafted from beech. The latter was stained and polished.
The base plate is fixed to the frame with screws, enabling us to use the frame
for other future projects. It was only fixed to the frame after all other work
was completed.
After removing the dock parts, their edges were cleared up lightly. To keep the
whole setup flexible, the dock elements and the main buildings were to be
screwed to the base. Hence, the sections were aligned, temporarily fixed to the
plate, holes were drilled and threads were cut. After finally determining the
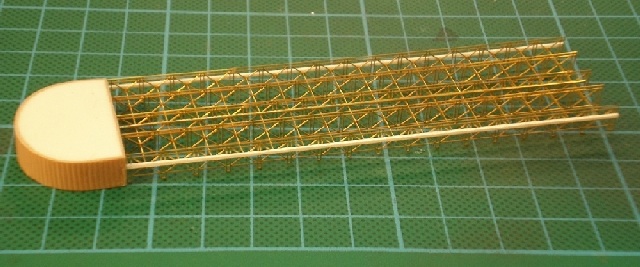
buildings´ positions, they were treated likewise. The prominent lock gates at
the dock´s entrance were scratchbuilt from styrene stock using photographic
references. The handedness of the gates necessitated making a pattern for both a
left-handed and a right-handed gate. Molds were made from the patterns and the
required number of parts was cast in resin.
Upon our second meeting in July both the base and the dock elements were
completed; that made finalizing the vessels´ positions easier. At this meeting
we decided on how to simulate the water and agreed on the further schedule. Most
of the vessels built by Torben, Frank and Guido were completed at the time.
 |
 |
 |
Until the next meeting scheduled for early September I had to perform a lot of
work on my ship models. Already then I decided not to implement one of the
vessels originally planned. Guido and Torben could not participate due to
professional commitments, so Frank and I made the water and continued on other
aspects of the diorama. Torben had visited me before to make sure the swivel
bridge did fit. We realized we would have to do some adjustments to the dock to
fit the bridge.
Main issue of the third meeting was making the water. We used a method Frank had
successfully executed several times before. To correctly replicate the shade of
the Mersey and the water in the docks – a pleasant muddy multi-hued green-brown
– we consulted Google Earth´s
satellite view. The dock entrance still exists, even though many of the docks
have been demolished or backfilled.
The first step was brushpainting the base in an appropriate basic hue, using
liberal amounts of wallpaint stippled on to give the surface some structure
replicating the ripples of the water.
That cured, the contures of the docks and vessels were marked and masked.
Using two airbrushs, we then applied various shades of green, grey and brown,
always trying to simulate the effects caused by currents and the movements of
the vessels. Vallejo´s ModelAir acrylics proved to be ideally suited to blend
the shades nicely. After we were satisfied with the result, we sealed the entire
water area with several coats of clear gloss lacquer from a rattle can, taking
care not to overdo the gloss. We concluded this day´s work by priming the
various buildings and vehicles.

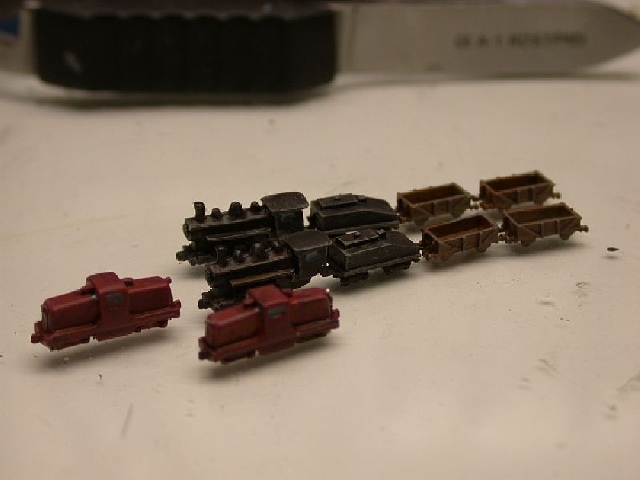
Bringing
a diorama to life needs many small elements. In our case this meant assorted
buildings, tugs, vehicles, cargo, figures and so on. We divided this work
amongst us. Frank produced assorted cargo like piles of boxes, heaps of sand and
coal, winches, train engines and cars plus military goods stored on the quays.
Guido built around 110 freight cars, train engines and lorries. Torben built
several tugs, barges and other working vessels, and I had about 50 lorries and
various cargo on my workbench – plus the docks and buildings! Painting and
weathering all this took several evenings and weekends. We only used acrylic
paints, weathering was done using artist´s oil paints and pastel chalks.
Having
completed the docks and buildings, they could be fixed to the base, with the
lacquer having had ample time for curing. A first trial using available elements
and vehicles showed a need for considerably more details. So quayside lamps were
made from brass wire and white glue. Moreover, a collection of cutters, barges
and rowing boats were taken from numerous detail sets; they were painted,
weathered and spread around the diorama. Inclined and vertical ladders as well
as working rafts brought additional life to the scene.
The
swivel bridge was also finally fitted and fixed to the base. On the quays,
railroad tracks were marked. In the meantime, Guido worked hard on the jetty, a
focal point of the diorama. The first in-progress images he sent showed
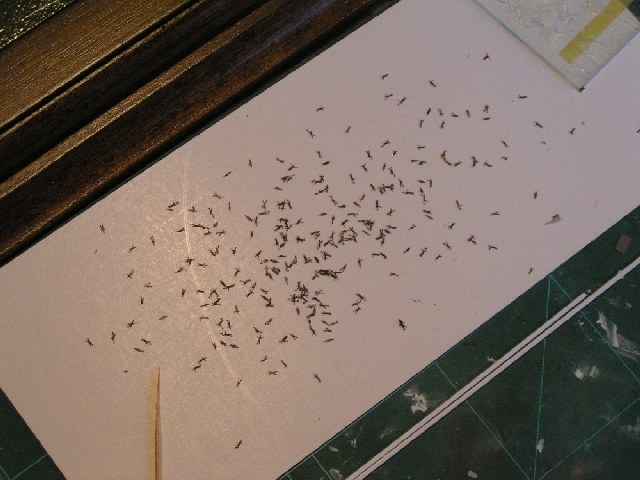
extremely delicate PE structures and let my excitement mount. Guido and Frank
painstakingly painted 1:700 PE figures, ending up with about 3,000 of them.
Apart
from all the docks, buildings, vehicles and so on, my ship models were completed
by the end of October. So the road was clear to a final meeting to complete the
diorama.
 |
 |
 |
Frank and I met for the final building session. Having fixed the quays and main
buildings, we had to add the smaller buildings, vehicles, small items and
figures in lively scenes. After several rehearsals we were satisfied with the
result and started fixing the elements to the base. White glue was used to keep
the pieces removable, only the 300 figures were super-glued. Yes, only 300 of
them. Alert readers will wonder why we left 2,700 figures out. But those 300
figures brought so much life to the scene that less seemed more. We will surely
use the remaining figures some day.
To add more realism, we needed moorings and tow cables. These were made from
copper wire to be as flexible in regard to the ships´ positions as possible.
Fitting the delicate jetty to the quay was an exciting moment. Guido had built
the parts using only the plans I had provided him, without any access to the
actual parts. Nonetheless it was a perfect fit – so the CAD plans have worked
well.
All the while we made travel plans for our trip to Telford. Ferry, hotel and a
van had to be booked, as well as the itinerary and our registration for SMW
2008. Frank Ilse and Dirk Mennigke had almost completed their diorama project –
it was two weeks to go to SMW.
Whereas Frank had decided to leave his vessels on the diorama, I had to make a
transport box for my vessels.
 |
 |
End of Part One!