Creating An Aviation Painting (#2)
Tom Berto
The pilot and the story
Richard Peterson flew with the 364th Fighter Squadron, 357th Fighter Group,
US 8th Air Force – one of "The Yoxford Boys".
He was based at
Richard Peterson left the air force in 1946 and ran a successful
architectural firm with his son, until his passing in June of 2000.
He was "highly respected and loved by all who knew him or had served
with him" (Olmsted).
I found my research for the painting and this article to be quite
rewarding – most of all reading Olmsted's book.
On at least three documented occasions, Captain, then Major Peterson flew
escort to battle-damaged American bombers.
On Easter Sunday 1944, he fought off Luftwaffe fighters that were
attacking Kent Mosley's B-24.
Richard Peterson finally met Kent Mosley nearly sixty years later.
On July 11, 1944, Peterson and three other P-51 pilots escorted Sig
Robertson's B-24 and crew to the boundary of Swiss airspace.
In perhaps late October 1944, he provided escort to a B-17 of the 34th
Bomber Group which had been crippled by flak.
The sight of a P-51 Mustang, flown by a triple ace pilot, arriving to
escort them home must have brought intense relief to the crew of the B-17.
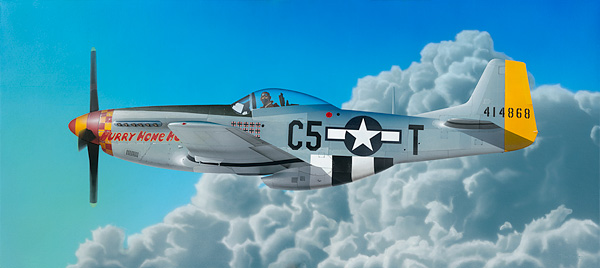
That event is the one behind this painting.
The name of the P-51 must have made it seem as though the Mustang and
pilot were destined to be their savior.
This must have happened many times with many fighter escorts and
bombers, but the name of Peterson's Mustang must have been particularly
memorable.
This painting is closely based on a black & white USAAF photo.
The source photo was one of at least two taken from the starboard
waist gun window of that B-17, by Corporal E.W. Poveroff.
The Mustang was close enough to the B-17 to cause noticeable
foreshortening of the aircraft.
The Mustang is throttled back, the propeller turning over so slowly
that it is nearly frozen by the camera.
Materials and
tools
Please refer to my first article for a more thorough discussion.
Here are some basic notes:
I
use a Paasche VL-3 airbrush.
The double action is crucial for working with acrylics.
When I refer to "hand-painting" below, I mean "with a regular
paintbrush", but airbrushing is of course done by hand as well.
I recently refurbished the airbrush with genuine Paasche replacement
parts, made in the
I usually paint on Crescent #100 cold-press illustration board, but I tried
out Crescent #1 board for this painting – over 1/8" thick, 100% rag, 40 plies.
It's harder to find, but it stays flatter while being painted and
makes the painting more rugged, so I found it to be worth the expense.
I use soft body acrylics from Liquitex, a good compromise of performance and
cost. They
come in 2 oz squirt bottles.
Two years ago they were called "medium viscosity" – as far as I know
there hasn't been a formulation change to go along with the name change.
I won't become an expert on their nomenclature until they stop
changing the names of what they sell.
I avoid the "high viscosity" acrylics in tubes, which don't thin or
spray as well.
For "thinner", I use a 50/50 mix of gloss medium and rainwater.
I use that 50/50 mix to thin the paints to about the consistency of
heavy cream.
I wear a mask when I'm really putting on a lot of color – otherwise no
protection other than moderate ventilation in a large space, and avoiding the
most dangerous pigments - those with cadmium, copper, chrome, or lead. For more
information about pigment and solvent hazards, consult the book "Artist Beware"
by Michael McCann, PhD.
The Process
After composing the painting and cutting the illustration board to size (18 x
40"), I began the painting by airbrushing a background of "brilliant blue", used
straight in the upper right corner, blended with white toward the lower left.
I added a mist of Hansa yellow on the extreme left, to evoke the shift
in colors toward the sun.
The backgrounds of both photos are too washed out to be usable for the painting,
so I went cloud-hunting.
On my way west from
I made a pair of "studies", trying to figure out how best to paint the
clouds. First
I tried a simple, schematic representation, using just three tones of gray and
hard edges, but that was a bit too simple, so I free-handed the clouds in the
second study, and was satisfied with the way they turned out.
A few words about studies: I was trying out a lot of new things with "Hurry
Home Honey": painting complex natural metal, an unknown background, a blown
canopy, a more complicated propeller than with "Mustang", and also more complex
illumination.
My response to each of these uncertainties was to burn an hour (or more) in
making a small study that would test the techniques.
These studies are the perfect cure for Advanced Painter's Syndrome.
A painter so afflicted is so obsessed with the quest for perfection
that he or she actually stops painting.
Studies aren't "heavy": if they don't work out, the painting doesn't
suffer – in fact, there is a sense of relief that they aren't part of the
painting.
They often helped me to overcome fear and procrastination as the painting grew
complicated and absorbed dozens and dozens of hours of work.
They offered a route upward when the learning curve started looking
like a wall.
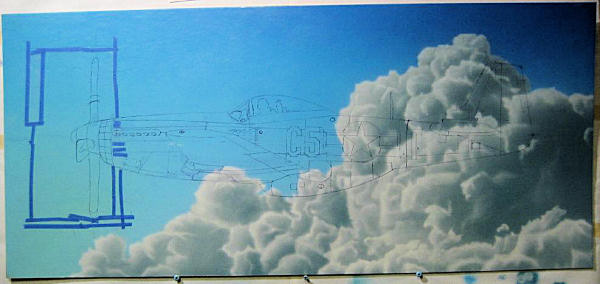
Bolstered by the second cloud study, I freehanded the entire cloud formation.
I started with a uniform blue-gray base coat, then laid out the cloud
outlines by projecting the source cloud photo onto the blue-gray and lightly
hand-painting the edges of the most prominent clouds with thinned white.
I then airbrushed the billowing clouds with thinned TiO2 white,
working with low pressure, usually very close in.
I had not yet established the location and size of the airplane, so I
ended up painting the clouds in full detail over the entire background,
including where the aircraft would be.
In retrospect, adding those unnecessary clouds was a waste of time and
I wouldn't do it again.
When I had completed the clouds to my satisfaction, I applied a heavy gloss
coat over the entire background, in particular over the areas where the airplane
would be.
This smoothed the surface and allowed better adhesion of the frisket. When that
had thoroughly dried, I covered the entire painting with Createx Frisket Film.
This is a translucent plastic film with a low-tack repositionable
adhesive on one side and a matte finish on the other.
I made a 35 mm slide copy of the source photo, projected this onto the
"frisketed" background, and drew in as much information as the photo could
provide. The
aircraft was reasonably clear in the middle, but the tail and nose were washed
out and indistinct.
I made up for the shortcomings of the source photo by consulting Rikyu
Watanabe's illustrations, John Dibbs' gorgeous photos, the Arco-Aircam book,
Olmsted's book, and my own photos of a P-51 (NL5441V) at Planes of Fame in
Chino.
The Chino Mustang was useful because it hasn't been polished to a fair-thee-well
or painted overall silver.
Lastly, I had taken a picture of the nose of Dan Vance's Mustang, painted as Don
Bochkay's "Speedball Alice" (another 357th FG ace).
This beautiful Mustang is based here at
Thus over the
course of several hours, the P-51 emerged in ghostly outline over the clouds:
I cut through
the frisket all along the periphery of the aircraft and peeled that big piece
off the painting, carefully setting it aside, back on its release paper.
I then hosed on TiO2 white where the aircraft would be, until all
traces of the clouds had disappeared.
Only the cockpit area and the anti-glare panel were not painted at
this time.
Frisket:
can be drawn on and cut easily, and is transparent enough to allow visibility of
the painting behind it.
It can be stretched just a tiny bit, and sticks just the right amount.
Once applied to the painting, individual areas are marked, cut out,
peeled off, and set aside.
The exposed areas are sprayed and dried, then the peeled pieces of
frisket are re-applied and the process repeated elsewhere.
It's time-consuming, but it's the only way!
The only knock is that it's expensive, about $65 for a ten-yard, two
ft wide roll – it costs as much per square foot as the 40-ply illustration
board.
357th FG Mustangs, once the "White Nose Era" ended in early April 1994, had
yellow and red checked noses and banded spinners.
Later in the war 364th Fighter Squadron Mustangs had yellow rudders.
Using the frisket and painting technique described above, I started on
the aircraft by painting the checker and bands pattern, the insignia, fuselage
tank filler cap, and yellow tail.
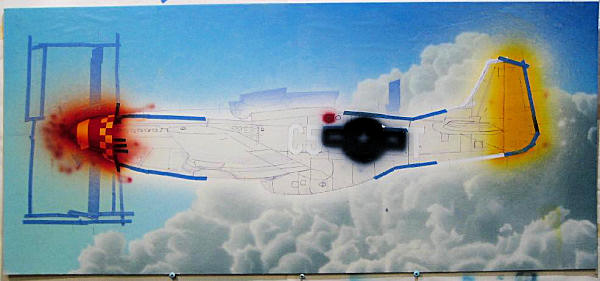
Continuing, I added the anti-glare panel, invasion stripes, and C5-T fuselage
code. I
painted the black portions of the stripes with a dark gray, which allowed me to
paint a little darker along the bottom to provide shape to the fuselage.
I re-attached the frisket over all these painted markings, then
airbrushed a base light blue-gray over all of the natural metal areas:
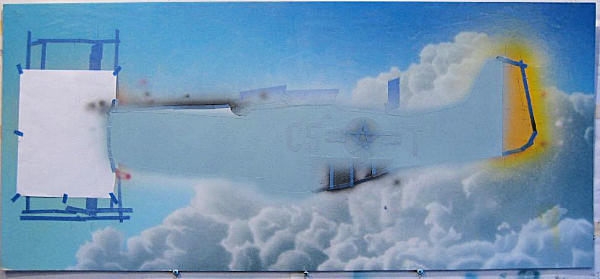
The natural metal effect was achieved by uncovering individual panels and
misting on just enough of a lighter or darker blue-gray color to give variation.
Natural metal aircraft are flying collections of curved mirrors, with
variable polish and texture.
The fuselage aft of the canopy is reflecting deep blue sky above and
behind the aircraft, and so is the darkest blue.
The wing is reflecting a cloud bank below and behind and is light
gray.
The low angle and direction of the shadows in the source photo indicate that the
two aircraft were flying west in the late afternoon, in all likelihood returning
to
After I had finished this and peeled off all natural metal frisket, I
realized that there was a bit too much variation between panels, so I misted on
more of the base blue-gray to reduce the contrast.
I then removed and discarded all of the frisket covering the aircraft
and could see almost all of the aircraft at once.
Note that there are only two white invasion stripes – the rearmost
stripe can't be seen in either of the two photos.
I could be wrong, but I don't think it's there.

Using heavily thinned black, I started adding panel lines, rivets, fasteners,
and shadows along panel edges.
I also used thinned white to build up the reflections off the front of
the exhaust stacks, the front of the fin, wingtip, stabilizer tip, wing and
stabilizer roots, etc.
If I thought a panel was too dark or too light, I'd add the
appropriate thinned paint to correct it. Midway through this, I added a light
gray mist along the bottom of the fuselage fore and aft of the wing, as these
areas were also reflecting the cloud layer and shouldn't have been blue.
When I got to a point where the panels in a certain area looked good, I'd
seal them in with clear gloss.
As with the earlier painting, the process of detailing with thinned
black and white improved the look of the painting a lot, and was very enjoyable.
It was a gradual process, so the mistakes made were small and easy to
correct (while the paint was still wet).
After the first round of detailing, I got around to three things that I knew
would be arduous – the fin numbers, kill markings, and "Hurry Home Honey" name.
The fin numbers were first: I used my slide of the source photo to project
and mark them, cleaned them up with a ruler, then cut them out and sprayed them.
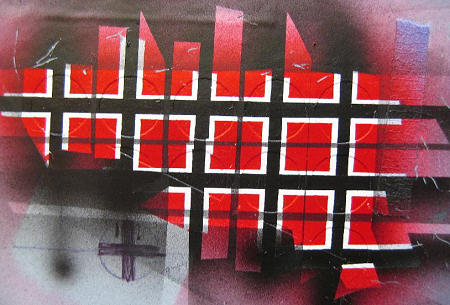 Major Peterson's kill markings varied from white swastikas (on the P-51B) to
ornate crosses (on the first P-51D) to red circles with something resembling a
Luftwaffe balkenkreuz on the plane I was painting – by then there were fifteen
of them. The
ornate crosses on the first P-51D, reproduced on Joe Richardson's modern-day
"Hurry Home Honey", would have been fiendishly difficult to paint.
The balkenkreuz were not so bad, because the features align
horizontally and vertically.
They were done by applying a piece of fresh frisket, cutting in the
eleven visible full or partial circles, spraying them white, masking off white
crosses, spraying red, masking off the red and a bit of white and spraying
horizontal black bars.. then repeating that for the vertical bars.
That went better than I deserved:
Major Peterson's kill markings varied from white swastikas (on the P-51B) to
ornate crosses (on the first P-51D) to red circles with something resembling a
Luftwaffe balkenkreuz on the plane I was painting – by then there were fifteen
of them. The
ornate crosses on the first P-51D, reproduced on Joe Richardson's modern-day
"Hurry Home Honey", would have been fiendishly difficult to paint.
The balkenkreuz were not so bad, because the features align
horizontally and vertically.
They were done by applying a piece of fresh frisket, cutting in the
eleven visible full or partial circles, spraying them white, masking off white
crosses, spraying red, masking off the red and a bit of white and spraying
horizontal black bars.. then repeating that for the vertical bars.
That went better than I deserved:
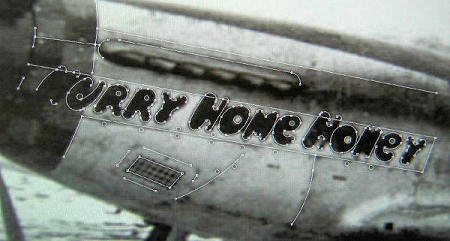 The "Hurry Home Honey" name was a much more complex problem.
It is more or less invisible in the source photo due to overexposure.
There are two other pictures of it extant – one from the front 3/4
position, the other from the rear 3/4.
The front was the more useful of the two, but the perspective was
backward. I
"digitized" the name by using a jpg of this photo as the background image in the
CAD program I use for my day job, OneSpace Designer by CoCreate (the best
mechanical design software in the world - shameless plug).
Using the program, I drew in arcs and polygons over the letters and
panel lines:
The "Hurry Home Honey" name was a much more complex problem.
It is more or less invisible in the source photo due to overexposure.
There are two other pictures of it extant – one from the front 3/4
position, the other from the rear 3/4.
The front was the more useful of the two, but the perspective was
backward. I
"digitized" the name by using a jpg of this photo as the background image in the
CAD program I use for my day job, OneSpace Designer by CoCreate (the best
mechanical design software in the world - shameless plug).
Using the program, I drew in arcs and polygons over the letters and
panel lines:
By saving these arcs and polygons in a certain file format, I was able to
insert their XY coordinates into Excel as a text file.
I used Excel to sort them and strip out the copious excess digital
gobbledygook, then spe nt a while tweaking the shapes. I then used mathematical
operations in Excel to rotate the coordinates, shrink them (different amounts in
different directions), and finally shear them in the horizontal direction.
I was using the known shapes of the panels on the painting as my
"targets" for the transformations.
Manipulating the data in Excel took several hours.
The end result was not perfect, but suitably close:
nt a while tweaking the shapes. I then used mathematical
operations in Excel to rotate the coordinates, shrink them (different amounts in
different directions), and finally shear them in the horizontal direction.
I was using the known shapes of the panels on the painting as my
"targets" for the transformations.
Manipulating the data in Excel took several hours.
The end result was not perfect, but suitably close:
I printed this out at exactly the right size, then got that onto a piece of
frisket using a regular copier!
I was able to use the two panel lines to line up the frisket when I
attached it to the painting.
I then cut out and removed the letters and sprayed them yellow.
Under a magnifier, I hand-painted in the red centers, leaving just a
hint of yellow around the periphery.
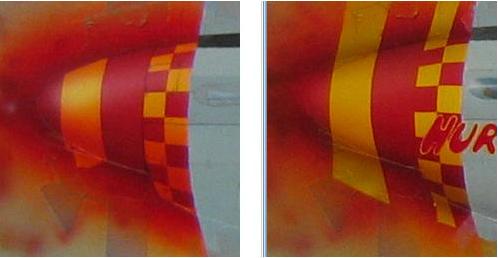
It was at this time that I noticed that I had the checkerboard colors
reversed. The
check pattern split on the front seam between the two panels that capture the
shield over the exhaust stacks.
The check above the seam is red, which sets the "polarity" of the
pattern. What
I had painted was yellow, so I had reversed the pattern.
When the time had come to peel off frisket and spray red, I had chosen
the wrong squares without a moment's thought, and I lost that coin toss.
There was nothing for it but to redo the entire nose.
The silver lining was that the yellow on the nose had been too orange,
so I was able to fix that at the same time:
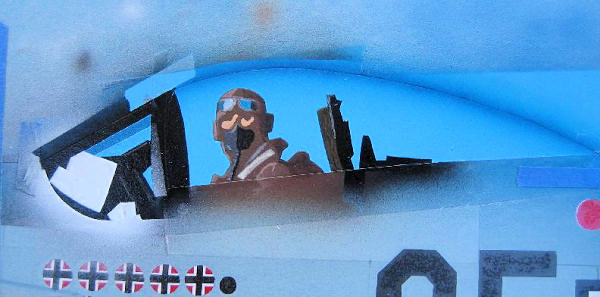
With that fixed and the name painted, I started on the pilot and cockpit.
Upon close examination of the source photo, Major Peterson melts into
the half-tone dots.
To the naked eye the dots blend together and his face and head seem
clear and sharp.
I made a study by enlarging the half-tone photo until the head was 3" tall,
then hand-painting it with only black and flesh tone.
In both photos, Major Peterson is looking over at the B-17, with his goggles
up on his forehead.
Peterson, like most of the original 357th FG pilots, wore the RAF Mk
VIII goggles, which had two flat panes of glass on each side.
One of these reflected the afternoon sun as Poveroff took the
pictures.
Major Peterson had been doing some housekeeping and had stuffed the flight
plan or map into the gap between the coaming and the left pane of the
windscreen.
I'm not sure what the other white object is – hankie?
Using the regular technique, I airbrushed the coaming & K-14 gunsight, map,
hankie, pilot, headrest, armor, canopy brace, and radio.
I then hand-painted the goggles, face, oxygen mask, harness, and some
basic highlights and shading of Major Peterson.
I added a line of brilliant blue along the top of the canopy and the
cockpit area was nearly complete:
A final step was a misted-on highlight of white over the canopy, to match the
reflection of the sky.
Next, using a misted-on blue-black, I added the shadow to the underside of
the wing, radiator scoop, and below the stabilizer.
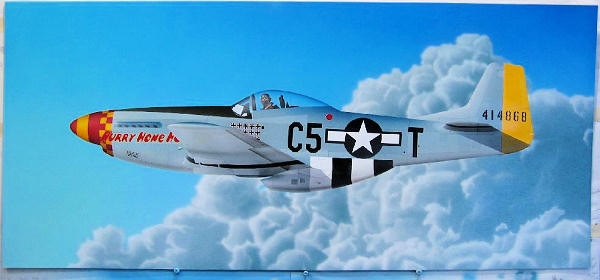
Finally, I felt it was time to remove the frisket from the background,
and Mustang emerged in its element:
Ironically, by this point I had spent so much time looking at the painting
from 15" away that I couldn't see the airplane for the rivets.
In order to get a feeling about how the Mustang popped out of the
background, I had to turn it over!
This is a common trick of painters when checking composition.
Looking at it in a mirror (another trick) didn't work because the
backwards C5-T kept drawing my eye.
I returned to hand-brushing thinned white highlights, panel scuffs, dimples,
and ripples, with particular emphasis on the forward wing and stabilizer roots.
I detailed the exhaust stacks and added tiny bits of shading there, a
very restrained exhaust stain, the tail light, details on the fuselage tank
filler cap, and that mysterious black dot behind the filler cap.
When this was all done I gave the aircraft and the area around it
another coat of clear gloss.
I masked, marked, cut out, and painted the antenna in a matter of a few
minutes, then the hardest part of the painting arrived: the propeller.
The source photo provided the rough locations of the blades and confirmation
of my thoughts about how the blades should appear.
Because the Mustang was slightly ahead of the photographer, the
propeller is seen from behind, and the bottom blade is almost flat to camera
because of the pitch.
That makes the bottom blade wider than the top blade, which is more
knife edge to the camera.
We are also looking at the sunlit front side of the top blade, but the
unlit back side of the bottom blade.
The middle blade is the most blurred as it was "racing the camera
shutter", which moved from bottom to top.
Thus every blade was different.
I kept the one-piece Monogram 1:48 P-51B propeller at hand while I
pondered what to do, gazing at it from aft and giving it the occasional
flick-and-spin flight to relieve tension.
I did one study of the entire propeller, then a second of only the middle
blade, which was the hardest nut to crack.
After those two studies, I proceeded with the propeller on the
painting – I covered the area with frisket, cut openings larger than the blades,
then sprayed black down the middle of the openings.
I stayed away from the edges, to keep them blurred.
I added the crescent-shaped yellow tips to all three, and a broad
white highlight and the blurred Hamilton Standard logo to the top blade,
The middle blade was a bit too solid and I spent some time fixing it
by lightening the edges.
I added a light shadow behind and to the right of the middle blade,
which completed the propeller.
My signature in the lower right corner completed the painting.
"Hurry Home
Honey"
Dedicated to
Richard Peterson, and to a second WWII veteran pilot, my friend
Grant Bird, who
passed away on Christmas Day, 2008
I typically paint landscapes and flowers.
"Hurry Home Honey" and "Mustang" before it were changes of pace for
me, rewarding labors of love.
More examples of my work can be seen at:
http://www.sonic.net/~monicab/tom
Sources
"To War with the Yoxford Boys"
Merle C. Olmsted, Eagle Editions Ltd
ISBN 0-9721060-6-5
"Flying Legends" John M Dibbs, Crestline, ISBN 978-0-7603-3376-1
www.vintagefighters.com – notes from Brad Hood
www.littlefriends.co.uk
"War Paint – Fighter Nose Art"
John M and Donna Campbell, Motorbooks International, ISBN
0-87938-451-4
"North American P-51D Mustang in USAAF-USAF Service"
Richard Ward, Arco Publishing, ISBN 668-02093-8
"The Great Book of World War II Airplanes" Illus. Rikyu Watanabe,
Zokeisha Publications, ISBN 0-517-459930