Sword 1/72 Grumman JRF Goose
| KIT #: | 72011 |
| PRICE: | $42.95 MSRP |
| DECALS: | Two options |
| REVIEWER: | Joel Hamm |
| NOTES: | Short Run |
| BACKGROUND |
Our editor has posted a preview of this kit that includes a thorough a/c history and peek inside the box; so let’s get right down to the…
| CONSTRUCTION |
 Before things get put
together, things have to get put right. Several molding errors are most
easily handled before any glue tubes get opened. Easiest is the spray rail
that goes around the base of the hull. Reference photos (“Grumman
Guidebook”) indicate it should not go anywhere – at least not on this
version. Apparently it was a modification added to later models that are
distinguished by retractable floats.
Before things get put
together, things have to get put right. Several molding errors are most
easily handled before any glue tubes get opened. Easiest is the spray rail
that goes around the base of the hull. Reference photos (“Grumman
Guidebook”) indicate it should not go anywhere – at least not on this
version. Apparently it was a modification added to later models that are
distinguished by retractable floats.
Next easiest fix is wing dihedral. There should not be any of that either – at least not the obtuse angle induced by attaching the wings as furnished. Best fix is to file down the wing root fairings on the lower halves, followed by repeated dry fittings until the cabin width no longer forces the wing panels upward.
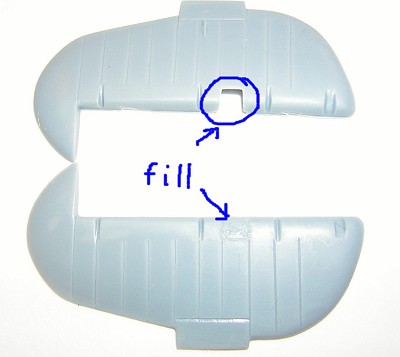
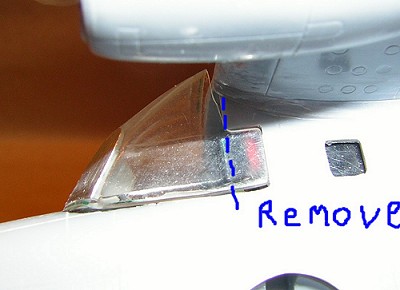 Third
repair is the flight deck rear side window. This apparently did not exist
on the real thing either. The fuselage is formed with a cutout to accept a
window panel extension molded into the vac-canopy. All photos clearly show
only one rectangular side window that
Third
repair is the flight deck rear side window. This apparently did not exist
on the real thing either. The fuselage is formed with a cutout to accept a
window panel extension molded into the vac-canopy. All photos clearly show
only one rectangular side window that
 extended
no further aft than the wing leading edge. To effect the repair, chisel
away the molded-in window rails, glue in a piece of card stock, then
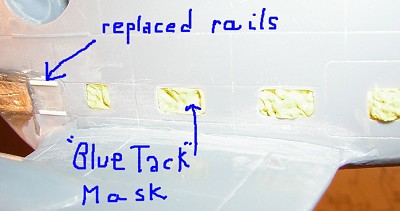
disguise the seams with new rails mode from thin strip.
extended
no further aft than the wing leading edge. To effect the repair, chisel
away the molded-in window rails, glue in a piece of card stock, then
disguise the seams with new rails mode from thin strip.
Toughest fix is replacing the cabin windows. Models with panes that must be inserted from inside always pose a paint-masking problem. These, however, could not be inserted from inside, outside, or upside-downside, lacking any flanges or bevels to hold them in place. Nor were they worth saving, being rough, cloudy, and attached with large sprue gates. The least worst technique I’ve yet devised is to back up the openings inside with clear sheet, then mask the recesses outside with “Blue Tac” – type poster adhesive, that gummy-rubber-sorta-like-modeling-clay compound. I’d previously encountered disaster when this stuff wouldn’t unstick cleanly, but since discovered that it will come away easily if cooled by being touched for a few seconds with an ice cube. After painting and mask removal, the windows can be filled flush to the surface with clear epoxy.
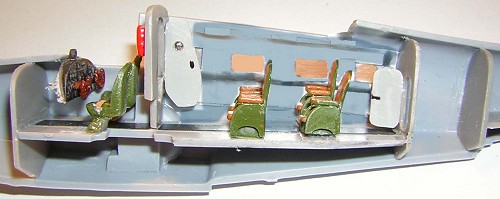 Even
though nothing can be seen through the windows, a complete cabin interior
is provided, which I not only dutifully painted, but also embellished by
opening the baggage and flight
Even
though nothing can be seen through the windows, a complete cabin interior
is provided, which I not only dutifully painted, but also embellished by
opening the baggage and flight
 deck
doors, drilling out the embossed door porthole, and replacing it with clear
epoxy. I believe it’s called “modeling for God”. The cockpit is a
different story, as its guts can be seen through the large flat windshield.
I busied up the rear bulkhead by adding a “fire extinguisher” and “first
aid kit”.
deck
doors, drilling out the embossed door porthole, and replacing it with clear
epoxy. I believe it’s called “modeling for God”. The cockpit is a
different story, as its guts can be seen through the large flat windshield.
I busied up the rear bulkhead by adding a “fire extinguisher” and “first
aid kit”.
Nothing notable about the rest of the assembly, except that leaving the rudder attachment till last provides an aperture up the fuselage’s rear to perch it on a Panavise, and makes painting and decaling the rudder easier. The vacuformed canopy fit surprisingly well, after the bogus window extensions were cut away. (It also seems as if there are slots in the rudder to fill. Ed)
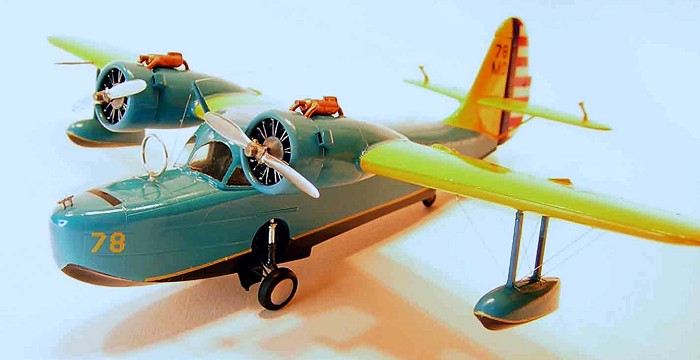
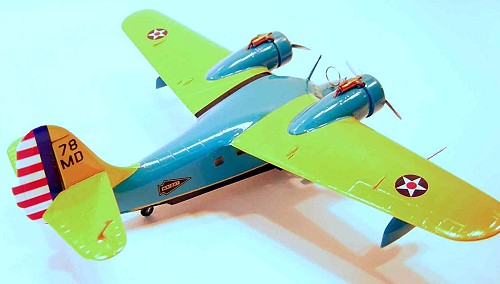
| COLORS & MARKINGS |
The kit was
originally issued with overall blue US Navy or British markings. A later
release featured a more interesting USAAC mid-war blue and yellow livery.
Rather than spend $30 on a new kit, I sprung for a $10 sheet of Draw Decals
made for that scheme. Except for this single military set, that company
sticks exclusively to civilian airliner markings; which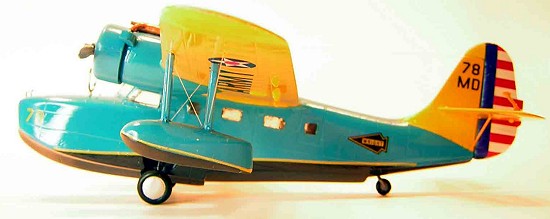 is a shame, since their quality and service are so good.
The fuselage color is an odd slightly green-tinged shade, which, according to Draw, is made by bluing up Model Master Modern Russian Interior. It was a difficult mix that, when dry, changes hues drastically according to the light source, and doesn’t seem to properly register at all on the accompanying photos. The thought can’t be avoided that the color is actually an anomaly. Draw’s website indicates that the scheme was copied from a ‘40’s magazine cover. Color films of that period, to say nothing of 60 years of aging, are known to add just such a tinge to photos.
Decals went on easily with no need for setting fluids, though they got a dose anyway. Multiple sprays of Future sealed everything beneath an unrealistic but attractive high gloss
| FINAL CONSTRUCTION |
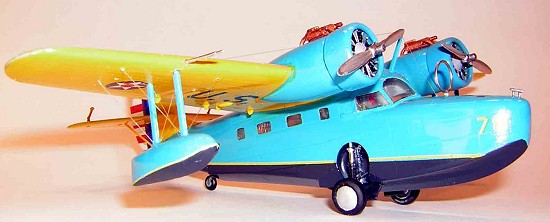 All the add-ons prolonged
and complicated the project’s completion. The resin landing gear braces
were impossible to fit, so they were replaced with snippets of extruded
rod. Prop blades come as both plastic and resin, the latter looking more
refined and realistic. Float rigging and antennae were done with
“invisible thread” monofilament, which is more invisible than desired, but
better than the thinnest wire that could be conjured up. The DF sensing
loop on this USAAC plane was not part of the kit, and had to be fashioned
from the wire that was too thick for rigging.
All the add-ons prolonged
and complicated the project’s completion. The resin landing gear braces
were impossible to fit, so they were replaced with snippets of extruded
rod. Prop blades come as both plastic and resin, the latter looking more
refined and realistic. Float rigging and antennae were done with
“invisible thread” monofilament, which is more invisible than desired, but
better than the thinnest wire that could be conjured up. The DF sensing
loop on this USAAC plane was not part of the kit, and had to be fashioned
from the wire that was too thick for rigging.
| CONCLUSIONS |
So what’s to conclude? A complicated and time consuming build that takes center stage on the amphibian shelf, next to it’s baby brother Airfix Gosling.
December 2005
Copyright ModelingMadness.com. All rights reserved. No reproduction in part or in whole without express permision.
IIf you would like your product reviewed fairly and quickly, please contact the editor or see other details in the Note to Contributors.