Revell 1/72 Hurricane IIc
| KIT #: | ? |
| PRICE: | $10.00 |
| DECALS: | Two options |
| REVIEWER: | Ralph Koziarski |
| NOTES: |
| HISTORY |
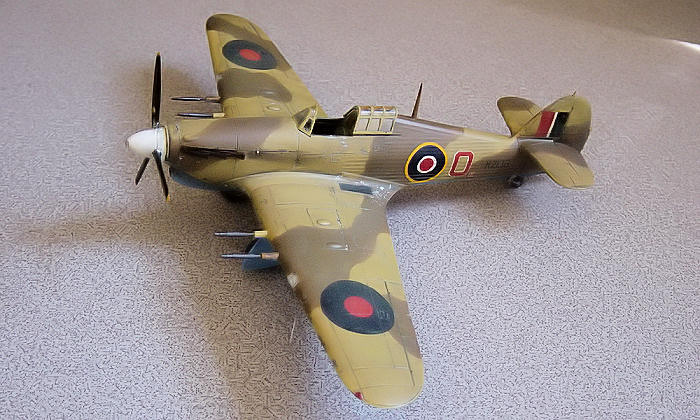
The Hawker Hurricane was the workhorse of the RAF during the first years of World War II, and became the mount of many early allied (English, Polish, Czech, etc) aces. However, despite the incredible feats achieved by its pilots during the Battle of Britain, by late 1940 the Hurricane was becoming obsolescent. The Mk II Hurricanes featured more powerful engines, and improved armament. The Mk IIc modeled here, featured four 20mm cannon that significantly improved firepower. Additionally, the Mk II series were able to carry bombs, which when combined with the cannons, made the Hurricanes effective ground attack aircraft; a role they performed admirably serving with Coastal Command units, but especially abroad in North Africa and southern Asia.
| THE KIT |
This mold was released by Revell of Germany in the
1990s, and should be considered one of the company’s earliest “quality” kits.
Considering the price, you really g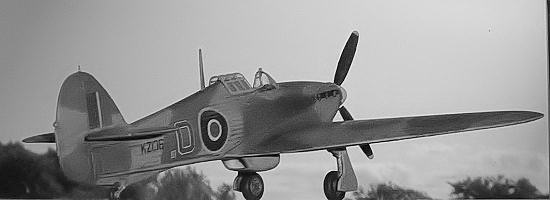 et
a good bit of quality per dollar here. The kit features fine recessed panel
lines, nicely detailed wheel wells, and cockpit, few molding imperfections
(although the age of the molds is beginning to show), and an overall respectable
level of parts fit. The kit features a modular engineering to accommodate the
many versions of the Hurricane II, thus the parts breakdown is at times awkward;
for example in the five piece wing, and the lower rear fuselage which is tricky
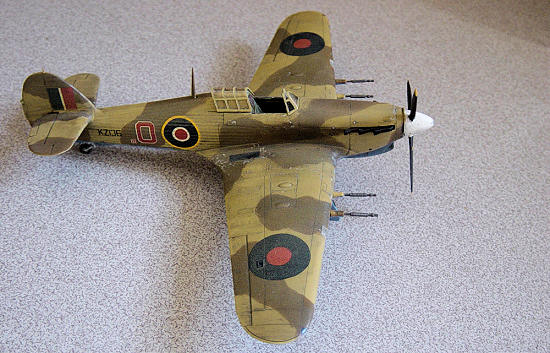
to install properly. Markings are included for the no. 336 sqn (Greek) serving
in
et
a good bit of quality per dollar here. The kit features fine recessed panel
lines, nicely detailed wheel wells, and cockpit, few molding imperfections
(although the age of the molds is beginning to show), and an overall respectable
level of parts fit. The kit features a modular engineering to accommodate the
many versions of the Hurricane II, thus the parts breakdown is at times awkward;
for example in the five piece wing, and the lower rear fuselage which is tricky
to install properly. Markings are included for the no. 336 sqn (Greek) serving
in
| CONSTRUCTION |
I began constructions by assembling the propeller and two piece spinner. I knew right away that I wanted to build the no.336 sqn machine, so the spinner was airbrushed white following a little bit of filling with Mr. Surfacer on the spinner. The prop has lightly raised lines denoting the edge of the yellow tips, making their painting a breeze. I first applied Polly Scale’s Italian Camouflage Yellow to the tips and then painted the blades with slightly lightened shade of black. The blades were futured, decals were applied, followed by a flat coat. I then began to mask the canopy.
Onto the fun parts.
The cockpit was next, and Revell really delivers here.
You get nicely molded sidewalls, a floor with pedals, a seat with molded-in
harnesses, stick, and nice instrument panel (with decals if you want to use it).
After assembly, I painted all of these parts British interior green, and gave
them a black wash. The harnesses were painted a homebrewed mixture
 of
brown and gray, that ended up looking almost taupe, and details were picked out
in black, silver and red. Finally the instrument panel was painted black and
dry-brushed white. Additional effort would be wasted, as not much is really seen
through the smallish cockpit opening. Before closing the fuselage halves, I cut
out the dorsal and tail antenna masts that Revell molds into the fuselage. I cut
small holes into the fuselage spine and rudder where I can refit the pieces
later without fear of breaking them off during construction. After all of this
fuselage prep, its two halves were closed. These fit without a hitch, but a word
to the wise. There was some flash around the fuselage edges, and I didn’t remove
it. When I glued it all together, the flash provided a source of native plastic
for any gaps which may have been there. When all was dry, I simply whittled off
the excess. With the two halves together, I was ready to install the bottom of
the rear fuselage. This is provided as a separate piece probably to accommodate
a sea-hurricane version, where this area looks slightly different. Whatever the
case may be, the part doesn’t fit too well, in that it sinks slightly into the
opening, causing a step on all four of its edges. This would not be difficult to
deal with if it wasn’t for the corrugated surface that exists here. My solution
was to cut a shim from sheet plastic and sandwich it between the part and the
tabs that it rests on. This eliminated the step entirely, and only left me with
a small gap to fill at the forward edge. This was done with Mr. Surfacer and
sanded down with a round jeweler’s file to preserve the corrugations. The last
bit of fuselage work involved the sanding down of the lateral portions
immediately behind the canopy in order to accommodate the hood in a slid-back
position. $
of
brown and gray, that ended up looking almost taupe, and details were picked out
in black, silver and red. Finally the instrument panel was painted black and
dry-brushed white. Additional effort would be wasted, as not much is really seen
through the smallish cockpit opening. Before closing the fuselage halves, I cut
out the dorsal and tail antenna masts that Revell molds into the fuselage. I cut
small holes into the fuselage spine and rudder where I can refit the pieces
later without fear of breaking them off during construction. After all of this
fuselage prep, its two halves were closed. These fit without a hitch, but a word
to the wise. There was some flash around the fuselage edges, and I didn’t remove
it. When I glued it all together, the flash provided a source of native plastic
for any gaps which may have been there. When all was dry, I simply whittled off
the excess. With the two halves together, I was ready to install the bottom of
the rear fuselage. This is provided as a separate piece probably to accommodate
a sea-hurricane version, where this area looks slightly different. Whatever the
case may be, the part doesn’t fit too well, in that it sinks slightly into the
opening, causing a step on all four of its edges. This would not be difficult to
deal with if it wasn’t for the corrugated surface that exists here. My solution
was to cut a shim from sheet plastic and sandwich it between the part and the
tabs that it rests on. This eliminated the step entirely, and only left me with
a small gap to fill at the forward edge. This was done with Mr. Surfacer and
sanded down with a round jeweler’s file to preserve the corrugations. The last
bit of fuselage work involved the sanding down of the lateral portions
immediately behind the canopy in order to accommodate the hood in a slid-back
position. $
Next came the five piece wing, which I assembled by first gluing the lower central portion to the fuselage. I followed this by gluing the upper halves to the fuselage, and finished off with the lower outer sections. Some others complain about fit problems here, but by using the sequence described above, I had no problems at all.
Next came the horizontal stabilizers, the port one needing some filler at its root, and the filters. Both filters needed a little bit of filling and sanding to fit properly. I glued on the masked canopies and was ready to paint. This really is a simple kit!
| COLORS & MARKINGS |
 Painting
was done with Polly Scale acrylics sprayed on with my Paasche VL. I began with
the Azure blue, masked this and did the middle-stone up top, masked with poster
putty, and finished off with British dark earth. Following the application of
each color, a few drops of white paint were added to each, and these were then
sprayed more or less randomly into the centers of some panels to break up the
color. This method works beautifully, beautifully in larger scales, but doesn’t
show up almost at all in 1/72. Shade variation would have to be pulled off with
later post-shading, so I decided to move on to the decals.
Painting
was done with Polly Scale acrylics sprayed on with my Paasche VL. I began with
the Azure blue, masked this and did the middle-stone up top, masked with poster
putty, and finished off with British dark earth. Following the application of
each color, a few drops of white paint were added to each, and these were then
sprayed more or less randomly into the centers of some panels to break up the
color. This method works beautifully, beautifully in larger scales, but doesn’t
show up almost at all in 1/72. Shade variation would have to be pulled off with
later post-shading, so I decided to move on to the decals.
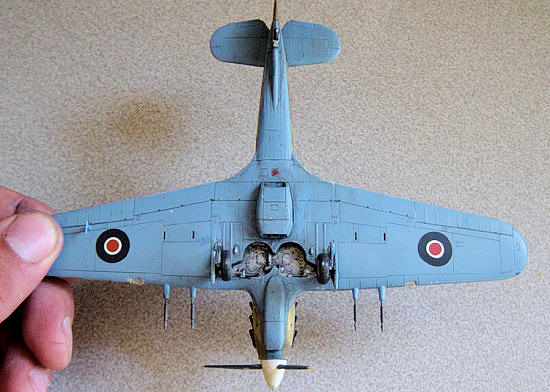
At this point the wheel wells were painted aluminum and I began to think about weathering.
The rest of the weathering process was an exercise in
frustration. In order to make the model look more realistic I decided to
experiment with various techniques that I normally use on 1/35 scale armor, and
sometimes 1/48 aircraft. This began with a wash of black and brown pastels
rather than he traditional oil wash. I plopped on a solution of pastels
suspended in water and when they were beginning to dry, rubbed them off with a
damp cloth. I wiped the cloth from front to back to create a streaking effect.
While this didn’t look all-together bad, it was a little heavy handed. In an
effort to tone down the effect, and give the model a nice faded appearance, I
decided to give it a filter coat. A filter is a very thin oil wash whose purpose
is to alter the hue of the paint beneath it (hence the name), and not so much to
collect in depressions and make details pop, as would a traditional wash. I used
yellow ochre oil paint mixed with turpenoid in roughly a
 The
filter looked good as it was going on, but soon it began to lift some of the
pastel grains and resettle them outside of panel lines and in random areas. Even
worse, the turpenoid began to dissolve the enamel aluminum paint chips I had
painted. I now had a mess on my hands. I didn’t want to wipe off the filter
coat, as in areas where it wasn’t in contact with pastel powders or enamel
silver, it looked really good. I decided to not touch anything and let it all
dry over-night. Much to my chagrin, when I woke up, I found that the model had
dried with odd, dusty faded spots in the most random areas, like at the root of
the tail (see pictures). Even worse, the pastel dust must have settled on the
partially dissolved enamel paint chips, and hence turned my chips into little
black “boogers” for lack of a better term. I was ready to bin the kit at this
point, and maybe I should have, however I was so close to the finish line (and
had part of this review already written), that I decided to just carry on and
turn this into a back shelf filler model. I scraped off the buggers as best I
could and replaced them with some new paint chips. I tried to wet down the weird
dusty areas and succeeded in removing most but not all. A flat coat of MM
Acrylic was the last step. Maybe someday I’ll strip all the paint and try again,
but for now I’ll have to live with it.
The
filter looked good as it was going on, but soon it began to lift some of the
pastel grains and resettle them outside of panel lines and in random areas. Even
worse, the turpenoid began to dissolve the enamel aluminum paint chips I had
painted. I now had a mess on my hands. I didn’t want to wipe off the filter
coat, as in areas where it wasn’t in contact with pastel powders or enamel
silver, it looked really good. I decided to not touch anything and let it all
dry over-night. Much to my chagrin, when I woke up, I found that the model had
dried with odd, dusty faded spots in the most random areas, like at the root of
the tail (see pictures). Even worse, the pastel dust must have settled on the
partially dissolved enamel paint chips, and hence turned my chips into little
black “boogers” for lack of a better term. I was ready to bin the kit at this
point, and maybe I should have, however I was so close to the finish line (and
had part of this review already written), that I decided to just carry on and
turn this into a back shelf filler model. I scraped off the buggers as best I
could and replaced them with some new paint chips. I tried to wet down the weird
dusty areas and succeeded in removing most but not all. A flat coat of MM
Acrylic was the last step. Maybe someday I’ll strip all the paint and try again,
but for now I’ll have to live with it.
| FINAL CONSTRUCTION |
After the disastrous weathering session I finished off the kit by assembling the landing gear which went on with no fuss, gluing on the prop, exhaust stubs, canopy, windscreen and antennae. Finally, I glued on the mean looking 20mm cannons and painted their roots the appropriate camo colors, while the barrels were painted Polly Scale Panzer Gray, and rubbed with ground graphite (pencil lead).
| REFERENCES |
This turned out to be one of those models that looks good enough to not bin, but just bad enough that looking at it frustrates me. At the same time, it was my first modeling disaster after two 1/72 tanks, and five 1/48 aircraft this year, so I really can’t complain. Revell’s kit is a nice one, and they can’t be faulted for my screw-ups. If nothing else the kit was a good test bed for 1/72 weathering experiments, and I’ll know not to do a pastel wash in this scale ever again. On that note I’d like to end by challenging readers out there to come up with a set of suggestions and guidelines for weathering in 1/72. There may be fewer parts to these kits, but they present a challenge all their own when it comes to achieving realistic finishes.
Final Tally
Value: A+
Accuracy/Detail: A
Options: A
Fun Factor: B+If you would like your product reviewed fairly and quickly, please contact me or see other details in the Note to Contributors.