I'll start this edition with trains. Not a lot has
been purchased as my shelf space for train boxes is getting pretty full. I did
buy a two car train that runs on a section of track called the
Oito Line.
This line runs from
 the north central coast of Japan and goes basically south
towards Tokyo. Basically Niigata and Nagano prefectures. It has portions that are operated by both JR West and JR East.
This is not a highly travelled line and so the train does not have the usual four door
cars, but ones with three doors. The area of the route is quite mountainous and
the track has been blocked several times in its history by avalanches and rock
falls. The train types are Series 127 EMUs and this train was produced by
Kato.
the north central coast of Japan and goes basically south
towards Tokyo. Basically Niigata and Nagano prefectures. It has portions that are operated by both JR West and JR East.
This is not a highly travelled line and so the train does not have the usual four door
cars, but ones with three doors. The area of the route is quite mountainous and
the track has been blocked several times in its history by avalanches and rock
falls. The train types are Series 127 EMUs and this train was produced by
Kato.
 The
other Kato train I bought is this 211-3000 series EMU. It is a three car set and
is from another low capacity line. The set is only called 'Nagano color' and
doesn't provide information on what line uses it. After a bit of sleuthing, it
seems it is part of the
Shin'etsu Main Line
line that is part of JR East and runs from Niigata to Nagano. As much as I like
the larger 10 and 11 car trains, these smaller ones seem to be more appropriate
for a small layout.
The
other Kato train I bought is this 211-3000 series EMU. It is a three car set and
is from another low capacity line. The set is only called 'Nagano color' and
doesn't provide information on what line uses it. After a bit of sleuthing, it
seems it is part of the
Shin'etsu Main Line
line that is part of JR East and runs from Niigata to Nagano. As much as I like
the larger 10 and 11 car trains, these smaller ones seem to be more appropriate
for a small layout.
I did get in the additional track mentioned last time
so was able to finally get all the track sections properly done to eliminate a
few oddball kinks and get the interior siding complete. This seems to pretty
much take care of any track requirements as I've pretty well crammed as much as
I can into the space provided. I know it is not prototypical, but it is properly
busy when I have all the trains going.
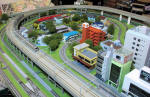
This provides for seven trains to be running at the
same time, along with the trolley and two busses. There are sidings to hold an
additional two trains. The inner one runs around the outside of the trolley
line while there are two more inner lines that go outside the raised section
for about half of their running length. Then there are the two full outer loops
and the raised section. A full look at the layout is at the bottom of the
article.
For the bus line, I purchased an intersection set.
This really requires more room than I have as one is supposed to do a figure 8
with the lines. By adjusting magnets, you can have the bus go left, right or
straight at the intersection. There are other magnets that have the bus stop at
the intersection. I was hoping this would be like the bus stops where the bus
would stop for a few seconds and then continue on, but it is not the case. The
bus either stops or goes through the intersection. The stop mechanism has to be
manually activated or deactivated through a throw switch. I have also noticed
that the busses do not run smoothly through this section. They tend to get hung
up for a while or in some cases, do not go in the direction wished. I'm sure
there is something in the instructions that I've missed so I'll keep playing
with it.
 Another
thing I've been doing is adding lights to the interior. Both Tomix (image below)
and Kato (image to right) offer light sets with the Tomix ones being more
expensive though they are literally drop fit. The Kato ones seem to work a bit
better, but require assembly. As you'd expect, Tomix sets only work on
Another
thing I've been doing is adding lights to the interior. Both Tomix (image below)
and Kato (image to right) offer light sets with the Tomix ones being more
expensive though they are literally drop fit. The Kato ones seem to work a bit
better, but require assembly. As you'd expect, Tomix sets only work on
 Tomix trains and Kato
sets only work on Kato trains. Both of them have contacts that run from the
light bar that fits to the roof down onto metal contacts in the chassis that
also rub on the wheels. Power is then directed from the wheels to the contacts
in the chassis to the contacts in the light set to the light. Since the wheels
do not make 100% contact all the time, the lights tend to flicker on the
straights, though they generally work perfectly on turns where the wheels are pressed up
against the rails by centrifugal force. These are not inexpensive and come in
sets of 6 so having everything lit will take time. One thing about the Tomix set
is that the contacts are springs. Both train shells have either clips or posts
where these items fit.
Tomix trains and Kato
sets only work on Kato trains. Both of them have contacts that run from the
light bar that fits to the roof down onto metal contacts in the chassis that
also rub on the wheels. Power is then directed from the wheels to the contacts
in the chassis to the contacts in the light set to the light. Since the wheels
do not make 100% contact all the time, the lights tend to flicker on the
straights, though they generally work perfectly on turns where the wheels are pressed up
against the rails by centrifugal force. These are not inexpensive and come in
sets of 6 so having everything lit will take time. One thing about the Tomix set
is that the contacts are springs. Both train shells have either clips or posts
where these items fit.
These are all LEDs that have light bars on the roof to
direct the light. The Kato ones are a better design and offer more uniform light
while the Tomix ones have 'hot spots' on one end. One nice thing about the Kato
lights is that they come with an amber filter so you can simulate the
incandescent lights on older trains.
More next time.


Back to Silver Rails index


