Last installment, lighting was covered as well as
various methods for providing that light.
This time, the subject will be focus.
I have to confess that it is quite difficult to get
the entire model in focus for many photographers. Frequently I get some very
nice images that are just impossible to use because of issues with focus. As I
tell people, digital software can fix images that are too dark, a bit too light
or have a strange color cast to them from not matching camera setting with
lighting conditions. However, as much as you would like to believe from movies,
software cannot fix out of focus.
There are several factors that come into play when it
comes to focus. One, which really can be divided into several sections, is
camera settings. Another is the distance of the camera to the subject and the
third is the size of the subject, which in many ways is related to the distance
to the subject.
So let's start with the camera itself. There are times
when one is using a camera that has no adjustable settings. Phones with cameras
come to mind on this as do many 'point and shoot' cameras. This will require some
diving into the instructions that come with it to find what the minimum
focus might be. If it is three feet and you are two feet from the subject, your
photos will be out of focus. Guaranteed. I should mention that three feet is a
relatively common minimum focus distance for these sorts of cameras.
If you have the ability to adjust things like shutter
speed, ASA, and f/stop (I know digital cameras don't have shutters and film
doesn't come in to play, but these settings are still being used so bear with
me), or which takes priority then you will have more control over the end image.
First thing is to take the camera off 'Auto'. These
are usually weighted to give you the greatest shutter speed. Next, choose
'Aperture Priority' for your imaging. This will allow you to set the maximum
f/stop for your camera and you need to pick whatever is the highest in terms of
numbers. F/8 is better than f/2 and if you have a nice camera, you might have
f/11 or f/22 available. Pick it as that will increase the depth of field and put
more of your subject in focus. We are using either a tripod, flash or daylight
to take the photos so this should not be an issue.
 Now that you have your camera set on aperture priority
you need to choose the lowest ASA setting you can. Again, take that setting off
Auto or it will choose a high ASA number. What a low ASA setting will do is to
reduce the amount of electronic noise you get in your image. By using a high
setting (like 800), your camera will try to gather in as much light from the
subject as it can. When doing this it increases the sensitivity of the light
sensors and this greatly increases the amount of electronic noise it picks up.
This noise is generated by the tiny amount of heat given off by the sensors
themselves and will show in your image as a lot of graininess. Military grade
image sensors cool the sensor array with liquid helium in order to lower this
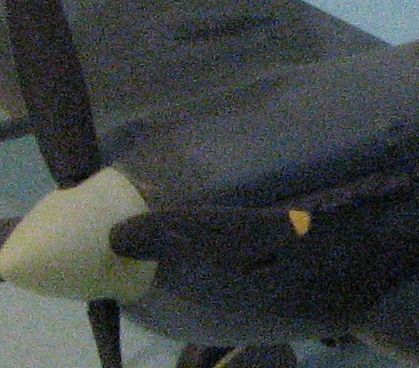
phenomenon. Your camera probably doesn't have that capability. You can see a
good example of this noise in the image to the right. Notice also that this
image does not have what I'd call enough light and what there is comes from the
back of the subject, muting the colors and making details like the exhaust
difficult to differentiate.
Now that you have your camera set on aperture priority
you need to choose the lowest ASA setting you can. Again, take that setting off
Auto or it will choose a high ASA number. What a low ASA setting will do is to
reduce the amount of electronic noise you get in your image. By using a high
setting (like 800), your camera will try to gather in as much light from the
subject as it can. When doing this it increases the sensitivity of the light
sensors and this greatly increases the amount of electronic noise it picks up.
This noise is generated by the tiny amount of heat given off by the sensors
themselves and will show in your image as a lot of graininess. Military grade
image sensors cool the sensor array with liquid helium in order to lower this
phenomenon. Your camera probably doesn't have that capability. You can see a
good example of this noise in the image to the right. Notice also that this
image does not have what I'd call enough light and what there is comes from the
back of the subject, muting the colors and making details like the exhaust
difficult to differentiate.
Shutter speed only comes into play in the fact that
with a low ASA and a high f/stop setting, you will have a relatively slow
shutter speed. This is where using a tripod and the timer setting comes into
play if not taking your images outdoors. For instance, my camera only goes to
f/8 and yet for many of my model photos, even when using the reflector as a
light source, the shutter speeds are in the 1/6 to 1/4 second range; too slow
for hand holding.
That is a lot on camera settings, but it is important.
The other is on the distance from the subject. Unless taking close-up images,
you want to be at a distance where the entire subject is in focus. I have found
that with most models, if I am between 2-4 feet away from it, I can get good
depth of field. It also means that I do not introduce the sort of image
distortion that comes with being too close and using a wide setting. I almost
NEVER use a wide setting when taking photos. It will give you better depth of
field, but to me is not worth having the distortion that comes with it. Look
through some of the articles and you can tell when the photographer has used
wide settings. This is where close things are huge in comparison to far away
bits and where horizontal lines tend to be curved to some extent. Below are a couple of examples. In both cases the fuselage filled the
frame, but the upper one was taken using wide angle settings and the lower one
was on a standard or medium telephoto.
I should mention that in no case have I altered
anything about any of the images in this presentation other than to reduce their
size. No sharpening, no adjustment of brightness or contrast, no changing hue or
increasing the intensity of the colors.

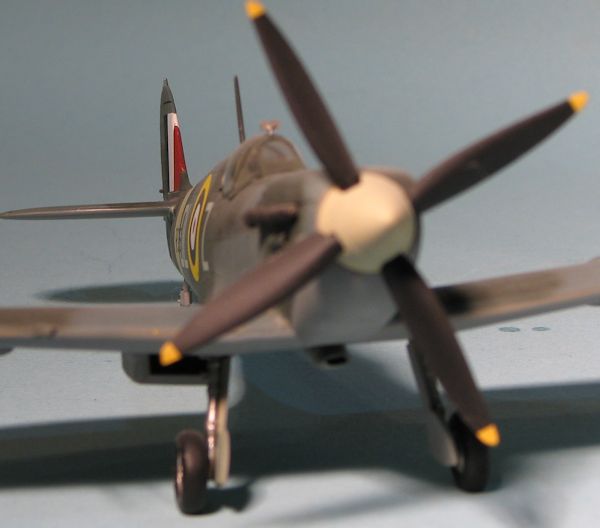
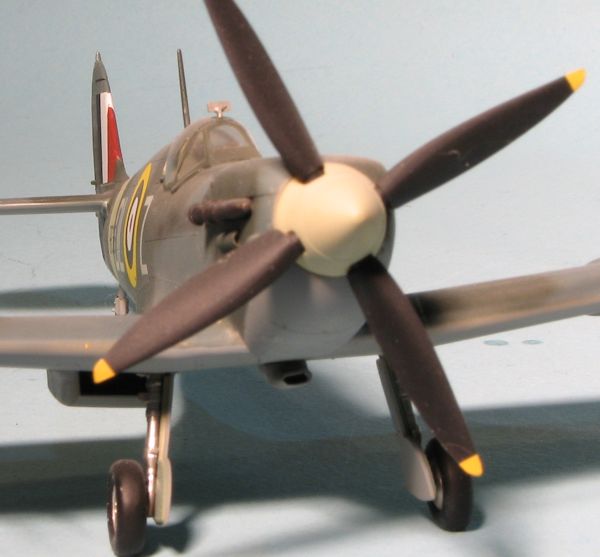
I have included two photos that help to illustrate
depth of field. Both of these images were taken at the same distance, the only
difference is that the one on the left (or the upper photo depending on your
screen resolution) was taken at the lowest f/stop my camera will attain (f/3.5)
and the one on the right with the highest (f/8). You can see which is
the better image. Much more of the second image is in focus. This is the main
reason you should use aperture priority and the highest setting when taking
photos.
This should provide you with enough fodder to continue
practicing taking photos. Look through a few articles. See if you can spot
images that have poor depth of field, have wide angle distortion or are
back-lit. Part of improving is knowing what to look for. Do not be afraid to rattle off a lot of images.
Inspect them to see if they have enough light and if they are in focus. Practice
moving your camera back and forth in relation to the subject to see what you get
as results.
Back to the first installment.