Welcome to the first installment of how to take model
photos. Over the years, I have been passing out guidance on taking model photos. It finally dawned on me (yes, I'm slow on the uptake at times), that a series of articles on the subject might well be worth while. So here we go.
Probably the most important part of any article is not
the write-up, though that is important, but the photos that accompany that
article. It is also the part of providing an article that seems to be the most
difficult to get across to those who submit their work.
Now I will admit that I do not have a PhD in
photography, but I have been taking photos for a very long time and have
undoubtedly produced hundreds of thousands of images over the years. This gives
me a pretty good idea of what I like and what can be done to provide pleasing
images.
Many think that simply pointing a camera at the
subject will be good enough, but the truth is that there has to be some thought
put into it.
So what makes for a good model photograph? There are
several things; lighting, focus, background and general presentation are the
ones that really come to mind and are what I look for in a nice model image. Let
me provide a bit of a caveat. What looks good to me may not always be what the
photographer likes, but I get enough feedback to know what readers like and
after all, one needs to provide what the target audience finds the most
pleasing.
This installment will start with the first thing;
lighting.
Just about everyone has a camera of some sort. For a
few it is their mobile device while others have a dedicated image taking device
that has adjustments on it that correspond with those on an 'old fashioned'
analog camera (those that use film).
Providing an image that is well lit is paramount. The
image should have sufficient light on it from either a natural source or from
artificial lighting. If using a natural source, don't be afraid to take the
subject outside where there is an abundance of light. One does, however, need to be aware of from where that light comes. Too often I get images
taken when the light is from the back of the subject, or indoors where there is
insufficient direct light. This makes the colors washed out and details difficult to see. It may be artsy to do this,
but in my opinion, it does not make for a good model photo.
So what do you do? Well, the simple reply is to take
the model outside during a nice day and take your photos. When doing so, be sure
that the light source is behind you and that you are not casting a shadow on the subject.
It also helps when the sun is about 45 degrees above the horizon. This gets rid
of the orange cast that early and late sun can provide while also eliminating
the direct overhead light.
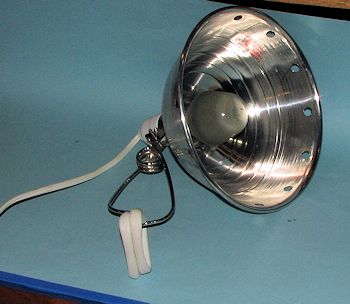 Indoors, a
simple set-up can be used. A standard reflector with a high watt bulb in it can
be used in conjunction with other indoor lighting. The one I use was well under
$10 at any hardware or DIY store.
Indoors, a
simple set-up can be used. A standard reflector with a high watt bulb in it can
be used in conjunction with other indoor lighting. The one I use was well under
$10 at any hardware or DIY store.
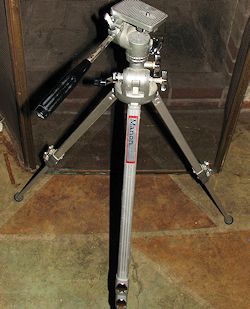 For this
you need to use a tripod or other method to steady your camera as the exposure
times will be slower than outside. A tripod is inexpensive and a good
investment. I have been using one I bought in 1974 and it will very much outlast
me. For most people you will want one that stands on the floor. I looked through
Amazon and found quite a few of them for under $30. You don't need a 'pro'
version, just one that will hold your camera.
For this
you need to use a tripod or other method to steady your camera as the exposure
times will be slower than outside. A tripod is inexpensive and a good
investment. I have been using one I bought in 1974 and it will very much outlast
me. For most people you will want one that stands on the floor. I looked through
Amazon and found quite a few of them for under $30. You don't need a 'pro'
version, just one that will hold your camera.
Another option is to use a light box. This is much more involved and a lot more costly as one will need several strong lights to penetrate the cloth surrounding the box as well as a relatively large area to set it up. I have one, but do not use it as it is just too much hassle to set up and take down all the time.
Of course, you can simply use the flash as that will
provide enough light and the light will come from the proper direction, though
the down side of a flash is that you may get unwanted reflections. Using a
mobile light source will allow you to move it so that reflections are eliminated
or at least minimized.
You also should have a timer function on your camera.
This will eliminate any wiggling of the camera on the tripod when you hit the
shutter button and give you a chance to properly position your light source.
When previewing the shot in your viewfinder or screen take the reflector and
move it around to get the best angle.
As with everything, you will need to practice.
Thankfully, in the digital age, we do not have to wait for the film to come back
from the processor and can inspect our work almost immediately to see what looks
good and what does not.
Try using these items to take your images and we will
go over a few additional aspects in the next installment.