When I left off many months ago, I had raised much of the then-newish track sections on Styrofoam risers. Since that time, I have done a considerable amount of work in terms of landscaping. The first thing I did was to remove all the track from atop the risers, and drape in plaster cloth. Under quite a bit of it I put sections of Styrofoam insulation that I'd cut using a hot wire, especially where I wanted to raise the 'surface' up to near the level of the track. The hot wire works great to provide some slope to the stacked sections of insulating foamboard I use to provide elevation changes. My early attempts at using newspaper a year or so back on the initial parts of the track were horrible and much of that has been removed.
When I got the first round of plastering done, I
reinstalled the track. At that time, I noticed that I really needed to do more
around the track area itself. You may recall that when I finish with the plaster
cloth, I go over it with thinned wall spackling compound to fill in the holes.
Using this material also provides some 'rocks' from the un-thinned chunks of
spackling that are inevitably left. It was many months before I again got the
motivation to work on it some more. In the mean time, I used Woodside Scenics'
brown acrylic paint, thinned it down to a wash and did several coats over
the extant plaster work. This worked out quite well. The thinner
 brown looked
like dry earth and I was able to do several shades of it by doing repeat
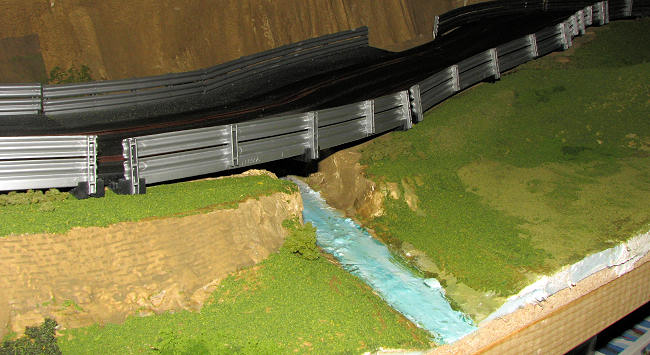
applications. I also used some of my green paint for certain areas. I wanted to
have a low flow waterfall and a stream running down from the high end of the
track, so planned that from the start. This area was not painted brown, but
using some of my various Vallejo acrylics, I was able to paint in the stream
bed. It looks convincing enough.
brown looked
like dry earth and I was able to do several shades of it by doing repeat
applications. I also used some of my green paint for certain areas. I wanted to
have a low flow waterfall and a stream running down from the high end of the
track, so planned that from the start. This area was not painted brown, but
using some of my various Vallejo acrylics, I was able to paint in the stream
bed. It looks convincing enough.
More months past during which I was able to run cars and pretty well enjoy the track. It also allowed me to work out a few bugs in providing support to some sections. Once again, I pulled up the track and put down more plaster cloth to fix the areas that needed it. Then I did the usual with the spackling paste and the paint work.
Another break. Now that I had all the base work done, I decided to do something I'd wanted to do for over a year. You see, as a sectional track gets old, each one of the track joints slightly oxidizes and collects quite a bit of grease and gunk. What this means is that every track join adds a tiny bit of resistance to the overall track. Add up all that resistance and it means a significant reduction in the voltage to the track, especially those sections farthest away from the power supply.
Now there are three ways to take care of this. One is to periodically take
apart the entire track so each join can be cleaned. This is quite time consuming
if you have a large track and will only have to be done again in the near
future. Secondly, one can put in a string of power taps to various parts
 of the
track. This requires running cable and terminal blocks and drilling holes in the
track base. Then soldering the wires onto the sections of track. Ideally, this
should be done every 15 feet. It is a lot of work and still will not totally rid
one of the resistance that will build up between track sections. It only means
there won't be as much of a power loss.
of the
track. This requires running cable and terminal blocks and drilling holes in the
track base. Then soldering the wires onto the sections of track. Ideally, this
should be done every 15 feet. It is a lot of work and still will not totally rid
one of the resistance that will build up between track sections. It only means
there won't be as much of a power loss.
The third one is the one I chose. That is to run copper tape over the entire track. This is self adhesive tape with a conductive glue. It comes in 108 foot rolls and is a bit wider than the metal rail on the track. As it is a constant, single conductor, there are no electrical losses, even if you have the tape break and have to lay tape over the top of it. Plus it is relatively cheap. Doing my track ran about 50 dollars and I used nearly seven 108 foot rolls.
Basically, you start at one end and slowly work your way around the track. The tape has some stretch, but I found I had to put up with wrinkles around the very tight corners. This doesn't affect the conductivity of the tape, but the wrinkles do collect gunk. Most of them can be pressed out using a smooth, metal cylinder, but not all. It was not an easy task as several areas of the track are difficult to reach, but each time I did a rail, it was easier and easier to do.
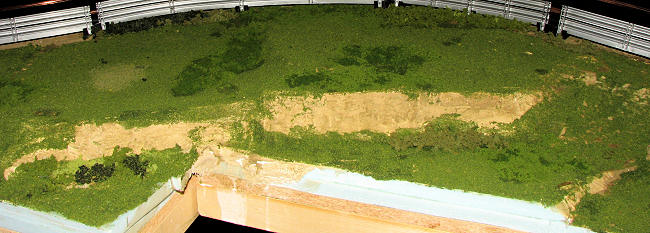
 Once that
was done, I started landscaping using various mixtures of Woodland Scenics
materials. I've included three photos of how things looked about two weeks ago.
For the water, I used a material called 'Magic Water' It is a two part mixture
that flows like syrup. It also will leak through any holes you have so it is
imperative that you have the area well sealed. I used it for the waterfall,
pond, and stream. It goes quite a long way, though it is a bit pricey at $30.
However, I've never used anything better. It can be layered with no trouble and
dries fully in about 24-36 hours. I also does not shrink. Down side is that it
can't be formed into 'choppy' water as it tends to be self-leveling. I highly
recommend it.
Once that
was done, I started landscaping using various mixtures of Woodland Scenics
materials. I've included three photos of how things looked about two weeks ago.
For the water, I used a material called 'Magic Water' It is a two part mixture
that flows like syrup. It also will leak through any holes you have so it is
imperative that you have the area well sealed. I used it for the waterfall,
pond, and stream. It goes quite a long way, though it is a bit pricey at $30.
However, I've never used anything better. It can be layered with no trouble and
dries fully in about 24-36 hours. I also does not shrink. Down side is that it
can't be formed into 'choppy' water as it tends to be self-leveling. I highly
recommend it.
If you look in the background and some of the foreground shots you'll see the 'bare earth' bits, which are simply the plaster cloth with several washes of brown over them. Some of these will eventually get bits of vegetation on them. Ground work is a bit time consuming and I do a little bit at a time. It is neat to see how things progress.
Well, that is about it for this session. Next time I'll go more in to the cars I've been playing with and more scenery. I hope you learned a bit and if you have any questions or wish to share your experiences or images of your track, I'd like to hear from you on the subject so please e-mail me at mmreaders@aol.com.
Scott