
Last time, I went into a couple of car chassis types; the front drive and sidewinder versions. Today, I though you'd like to see an anglewinder type. There are several companies who make this design and it has the benefit of allowing rear installation of a longer motor as well as keeping the weight of the car more to the front. However, it requires some special gears to function properly. While you'd think that the angled gears that are shown on the car below from Ninco would be the way to go, those who like to spend massive amounts of money on their cars will often go with lightweight aluminum gears that are straight cut.
However, I'm not one of those who likes to spend money any more than the next fellow and I'd rather spend my loot on a new car than on parts.
I also like to have cars which have lights in them.
Several of the slot car makers; specifically Scalextric and Carrera, offer cars that have working headlights or both headlights and tail lights. These lights are such that when you apply power to the car, it also powers the lights. Some Carrera cars have a small capacitor in them so that the lights don't instantly go off when you remove power, but stay on for a second or two when you let off for a corner then re-apply electricity.
However, this isn't the way lights work on real cars. Not only do they stay on once you turn them on, but they don't go off when you slow or brake for a corner.
For those who aren't afraid of a soldering iron, there are several companies who make aftermarket lights to put into your cars. Some are very expensive, but are quite tiny and will fit just about anywhere. Others are relatively inexpensive, but require a bit more space to use.
I purchased a set of lights from Ninco, the company who also makes the car into which I have installed the set. Ninco is one of the many companies from Spain and it known for producing some relatively fast cars. However, all that I've ever bought have a decidedly cheap feel to them. They make more noise than most others, both in terms of gear noise and general rattles. They also have terrible tires with little grip that need to be replaced with silicones at the earliest opportunity. Their saving grace is that they offer some interesting cars and they are not that expensive. So I chose the Ninco Mosler GT as the car into which I was going to install these lights.
Anyway, for $16, I purchased a set of lights that is fully wired. All I had to do was mount it and and attach the two wires along with the wires that lead to the pickup in the front of the car. Trouble is that all the wires are quite short. That very much limits where they can be placed unless one wants to unsolder the old ones and install new and longer ones.
This set also has the benefit of having a relatively large capacitor that discharges through the rear lights when power is no longer applied. In effect, it provides brake lights. These rear lights will stay lit for about 30 seconds after you remove power. The fronts dim rather quickly.
First step is to find a drill bit large enough to handle the bulbs, which are rather large as things go, but very bright. I drilled out one headlight on each side and did the same for a tail light. Though the car has two lights on each side, few light sets will allow the use of more than four lights, and those that do are limited to six.
This was the first time I'd done something like this so made several goofs along the way. One was that I did not fully anticipate the room required. Each of the lights is on a tiny circuit board and one has to make room for this board. While the rear was no problem, the front was. I ended up trimming the inside of the front wheels and tires to provide clearance for the headlight boards.
 This lack of room severely limits
the cars in which one can place these lights unless one removes them from the
circuits boards to which they are attached.
This lack of room severely limits
the cars in which one can place these lights unless one removes them from the
circuits boards to which they are attached.
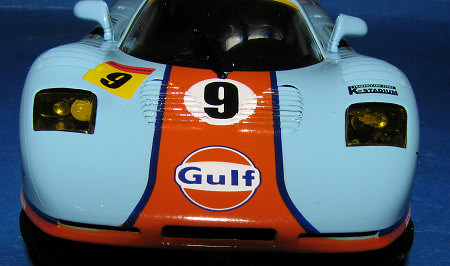
Anyway, I managed to drill out the
holes for the headlights, using the inner light. I also managed to scratch the
inside of the light cover in the process, but you have to look close. (see image
to the left). Then the tail lights were drille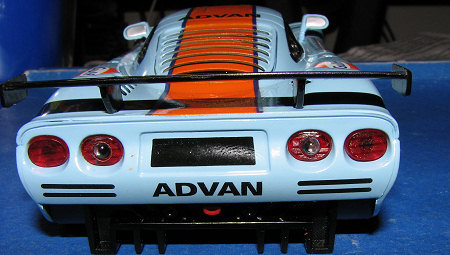 d
out and the lights installed. The rear lights are a red LED so no worries about
color problems. I also drilled through the tail light lens to get these to fit
properly. It doesn't look too bad. Again I used the inner lenses as there was no
room to fit them into the outer position. (see image to right).
d
out and the lights installed. The rear lights are a red LED so no worries about
color problems. I also drilled through the tail light lens to get these to fit
properly. It doesn't look too bad. Again I used the inner lenses as there was no
room to fit them into the outer position. (see image to right).
The next thing was to find a place to fit the circuit board. Thanks to the compact design of the car and the short wires and the height of the capacitor, I was severely limited, but did find a spot on the roof aft of the driver's compartment to attach the board. All of the components were glued in place using clear bathroom caulking compound. This is strong enough to hold things in place once dry and yet flexible enough to keep things from falling loose under the usual vibration and crashes of these cars. Were the wires long enough, I could have attached the board to the front behind the rear wheels. As it was, I soldered the power wires directly to the tabs on the motor.
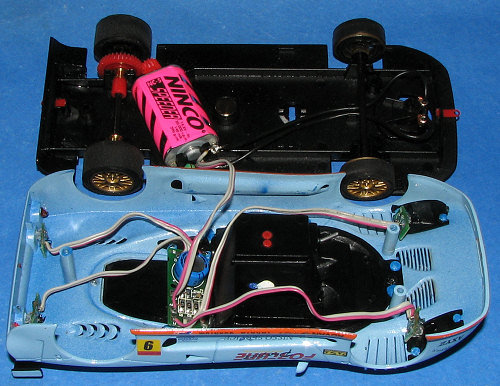 You can see the installation
in the image to the left. Note the angle winder motor position as well as how
the wires were rounted. You can also see how I trimmed the wheels and tires in
the front to allow them to clear the small circuit boards that hold the lights.
Note also how snugly the main board fits above the motor behind the driver's
compartment. I did this modification back in early September and have also
modified a Fly Corvette with this set. The 'Vette was a real pain in the butt to
install for a variety of reasons, the biggest being a lack of room. On that one,
I had to cut the bottom of the interior to find room for the circuit board, but
that is another story.
You can see the installation
in the image to the left. Note the angle winder motor position as well as how
the wires were rounted. You can also see how I trimmed the wheels and tires in
the front to allow them to clear the small circuit boards that hold the lights.
Note also how snugly the main board fits above the motor behind the driver's
compartment. I did this modification back in early September and have also
modified a Fly Corvette with this set. The 'Vette was a real pain in the butt to
install for a variety of reasons, the biggest being a lack of room. On that one,
I had to cut the bottom of the interior to find room for the circuit board, but
that is another story.
The end result are two cars that look very cool when I'm racing them around the circuit. It is neat to see the tail lights brighten when the car goes into a corner!
Well, that is about it for this session. I hope you learned a bit and if you have any questions or wish to share your experiences or image of your track, I'd like to hear from you on the subject so please e-mail me at mmreaders@aol.com.
Scott